Home
Dräger
Medical Equipment
Isolette C2000
Dräger Isolette C2000 Service Manual
5
of 1
of 1 rating
524 pages
Give review
Manual
Specs
To Next Page
To Next Page
To Previous Page
To Previous Page
Loading...
Chapter 4: Removal,
Replacem
ent,
and Adjustment
Procedures
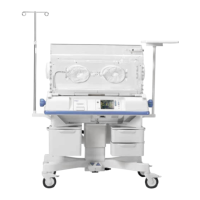
Isolette® Infant Incubator (Model C2000)
Service Manual
Page 4 - 97
4
Replacement
1.
Perform the removal procedure in reverse order
.
2.
T
o ensure proper operation of the Isolette® Infant Incubator
,
perform the “Function Checks” on page 2-6.
297
299
Table of Contents
Default Chapter
6
Table of Contents
6
Audience
20
Chapter 1: Introduction
20
Chapter 2: Troubleshooting Procedures
20
Chapter 3: Theory of Operation
20
Chapter 4: Removal, Replacement, and Adjustment Procedures
20
Organization
20
Purpose
20
Chapter 5: Parts List
21
Chapter 6: General Procedures
21
Chapter 7: Accessories
21
Typographical Conventions
22
Technical Definitions
24
Introduction
26
Overview
26
Features
27
Humidity System (Optional)
27
Mattress Tilt Mechanism
27
Operating Precautions
27
Oval Access Doors
27
Oxygen Control System (Optional)
27
Pedestal Stand Assembly
27
Weighing Platform (Optional)
27
Physical Description
28
Specifications
28
Electrical Description
30
Humidity Description
31
Oxygen Control Description
31
Regulations, Standards, and Codes
32
Scale Description
32
Model Identification and Series Changes
33
Safety Tips
35
Isolette® Infant Incubator (Model C2000) Service Manual Page
36
Warning and Caution Labels
41
Chapter 2: Troubleshooting Procedures
43
Getting Started
46
Initial Actions
46
Function Checks
47
Through
53
Final Actions
65
Alarms
66
High and Low Air and Skin Temperature Alarms
66
Alarm and System Prompt Messages
67
System Failure Messages
74
Diagnostic Menus
76
Entering the System Configuration Menu
76
Entering the Diagnostic Information Menu
78
System Test (1 of 3) Menu
81
System Test Menu
81
System Test (2 of 3) Menu
83
System Test (3 of 3) Menu
84
Key Check Display
86
Data Summary (1 of 2) Menu
87
Data Summary Menu
87
Data Summary (2 of 2) Menu
89
There Is no Power, and Power Failure Alarm Does Not Activate
92
Down
93
Variable Height Adjustable (VHA) Pedestal/Stand Does Not Move up or Down2
93
Skin Set Temperature Cannot be Achieved or Maintained
95
Oxygen Concentration Is Low
97
Oxygen Concentration Is High
99
Hood Does Not Tilt or Close Properly
101
Controller Failure #1-EEPROM Circuitry Failure
104
Controller Failure #2-Ambient Air Probe Failure
105
Controller Failure #4-Controller Cooling Fan Failure
106
Controller Failure #5-Display Test Failure
107
Controller Failure #7-Power Supply Voltage Failure
108
Controller Failure #8-RAM Test Failure
109
Controller Failure #9-Real-Time Clock Failure
110
Controller Failure #10-Watchdog Timer Failure
111
Controller Failure #11-Relay Test Failure
112
Controller Failure #13-Heater Circuit Failure Detected
113
Controller Failure #14-Low Heater Current Detected
114
Heater Thermocouple Does Not Work Properly
115
Humidity Heater Draws too Much Current
117
Motor Fails
118
Communication between the Sensor Module and the Controller Fails
119
Sensor Module Is out of Position
121
A Stuck Key Is Detected
122
Unit Fails the Non-Volatile Memory (NVM) Integrity Test
123
Access Panel Assembly Does Not Latch Properly
124
Iris Entry Port Does Not Open or Close Properly
126
Access Door Does Not Operate or Latch Properly
127
Heat Shield Does Not Latch Properly
129
Mattress Tray Does Not Tilt Properly
131
Mattress Tray Is Damaged
133
Air Intake Is Not Working Properly
135
X-Ray Tray Does Not Operate Properly
137
Sensor Module Lock Does Not Secure the Sensor Module
139
Sensor Module Lock Does Not Secure the Sensor Module (Units Equipped with the Sensor Module Lock Only)
139
Air Set Temperature Cannot be Maintained
142
Low Air Temperature Alarm or High Air Temperature Alarm Does Not Sound When Air Temperature Drops or Rises out of Specification
143
Low Skin Temperature Alarm or High Skin Temperature Alarm Does Not Sound When Skin Temperature Drops or Rises out of Specification
144
Does Not Sound
145
Sound
145
When Skin Probes Are Disconnected, Connect Skin 1 Probe Alarm
145
Incubator's Air Temperature Exceeds Air Set Temperature by 1.5 C or Greater, or Infant's Skin Temperature Exceeds Skin Set Temperature by 1.0 C or Greater2
146
Humidity System Is Not Working Properly
147
Power Failure Alarm Sounds
149
Skin 1 Probe Does Not Work Properly
150
Only)
153
Oxygen System Is Not Working Properly
153
Oxygen System Is Not Working Properly (Units Equipped with an Oxygen System Only)
153
Poor Air Circulation Exists Within the Incubator
154
Sensor Module Assembly Fails
155
Remove Skin 2 Probe Alarm Sounds
156
Scale Is Not Working Properly
157
Oxygen System's Cal Fail System Prompt Message Appears
160
Chapter 3: Theory of Operation
163
Controller Assembly
164
Variable Height Adjustable Pedestal/Stand Assembly
168
Hood/Shell Assembly
169
Electrical System
178
Sensor Module
178
Theory of Operation
178
Controller
182
Impeller Movement Detector (IMD) P.C. Board
183
Fan Motor
184
Heater Power
185
Humidity Heater Power
185
Air System
190
Overall Functional Description
190
Air Mode
192
Oxygen Control
193
Skin Mode
193
Hardware
194
Humidity Control Valve
194
Trend Displays
194
Weighing Mode
194
Interface Connections
195
Serial Port Protocol
196
Chapter 4: Removal, Replacement, and Adjustment Procedures
203
Removal
203
Replacement
205
Removal
206
Replacement
206
Sensor Module Assembly
206
Skin Temperature Probe
206
Removal
207
Replacement
207
Sensor Module Assembly
207
Replacement
209
Oxygen Sensor Cell
210
Removal
210
Replacement
211
Controller Assembly
212
Removal
212
Replacement
212
Removal
213
Hood Assembly
215
Removal
215
Replacement
215
Check Valve Assembly
217
Removal
217
Replacement
218
Removal
219
Replacement
219
Mattress, Mattress Tray, and X-Ray Tray
221
Removal
221
Replacement
222
Impeller Assembly
223
Removal
223
Replacement
224
Motor Assembly
225
Removal
225
Removal
226
Replacement
228
Access Panel
230
Removal
230
Removal
232
Replacement
232
Adjustment
233
Iris Entry Port Sleeve
234
Removal
234
Replacement
234
Removal
235
Access Door Latch
236
Removal
236
Removal
238
Replacement
238
Access Door and Access Door Pivot Hinges
239
Removal
239
Removal
240
Replacement
240
Replacement
241
Electroluminescent (EL) Display Front Panel
242
Removal
242
Replacement
243
Electroluminescent (EL) Central Processing Unit (CPU) P.C. Board, el Display Faceplate, and el Display
244
Removal
244
Replacement
245
Controller Fan Assembly
246
Removal
246
Replacement
247
Interface/Power Supply Module
248
Removal
248
Interface/Power Supply Module
249
Removal
249
Replacement
249
Power Supply P.C. Board Assembly and Interface P.C. Board Assembly
250
Removal
250
Replacement
251
Air Intake Microfilter
252
Removal
252
Replacement
252
Heater Assembly
253
Removal
253
Replacement
255
Impeller Movement Detection Sensor
256
Removal
256
Removal
257
Replacement
259
AC Wiring Harness Assembly
261
Removal
261
Removal
262
Replacement
263
Replacement
264
Removal
266
Sensor Module-To-Controller Cable Assembly
266
Removal
267
Replacement
268
Removal
270
Access Panel Pawl Latch and Knob Assembly
271
Removal
271
Replacement
272
Removal
273
Iris Entry Port Retaining Rings
274
Removal
274
Replacement
274
Access Door Cuff
275
Removal
275
Replacement
275
Access Door Gasket
277
Removal
277
Replacement
277
Pivot/Hook Lock Assembly Bracket
278
Removal
278
Removal
279
Replacement
279
Replacement
280
Heat Shield Latch
281
Removal
281
Replacement
282
Heat Shield
283
Removal
283
Replacement
284
Mattress Tilt Knob
285
Removal
285
Removal
287
Replacement
288
Replacement
290
Mattress Tilt Mechanism
291
Removal
291
Replacement
292
Removal
293
Replacement
294
Removal
295
Sensor Module Lock (Models with Sensor Module Lock Only)
295
Replacement
296
Access Grommet
297
Removal
297
Replacement
298
Removal
299
Replacement
299
Upper Transition Plate
299
Service Parts Ordering
306
Recommended Spare Parts
308
Incubator Hood and Shell Assembly
311
(P/N 83 200 77-R)
315
High Dual Access Hood Assembly with Left & Right Iris Ports
315
High Front Access Hood Assembly with Two Access Doors and Left & Right Iris Ports (P/N 83 200 71-R) (Series 00 Model)
319
High Front Access Hood Assembly with Two Access Doors and Left & Right Iris Ports (P/N 83 200 78) (Series 01 Model)
323
High Dual Access Hood Assembly with Left Iris Port and Right Access Door (P/N 83 200 79) (Series 01 Model Only)
332
Model)
332
High Dual Access Hood Assembly with Left & Right Access Doors (P/N 83 200 73) (Series 00 Model Only)
336
High Dual Access Hood Assembly with Left & Right Access Doors (P/N 83 200 80-R) (Series 01 Model Only)
340
High Front Access Hood Assembly with Left & Right Access Doors (P/N 83 200 74) (Series 00 Model Only)
344
High Front Access Hood Assembly with Left & Right Access Doors (P/N 83 200 81) (Series 01 Model Only)
348
High Front Access Panel Assembly (P/N 83 300 70-R) (Series 00
353
High Front Access Panel Assembly (P/N 83 300 70-R) (Series 00 Model Only)5
353
Model Only)
353
(Series 00 Model Only)
354
(Series 01 Model Only)
357
Replacement High Front Access Panel Assembly (P/N 83 300 76-R)
357
High Rear Access Panel Assembly (P/N 83 300 71-R) (Series 00
361
High Rear Access Panel Assembly (P/N 83 300 71-R) (Series 00 Model Only)5
361
Model Only)
361
(Series 00 Model Only)
362
(Series 01 Model Only)
365
Replacement High Rear Access Panel Assembly (P/N 83 300 77-R)
365
Shell Assembly (Series 00, 01, and 02 Models Only)
369
Top Shell Assembly and Barn Door Shell Assembly
373
Top Shell Assembly and Barn Door Shell Assembly (Series 00, 01, and 02 Model Only)
373
Shell Assembly (Series 03 Model Only)
377
Top Shell Assembly (Series 03 Model Only)
381
Impeller Movement Detector P.C. Board Assembly
384
Controller Assembly-Model C2C-2 (P/N 83 006 76)
385
Controller Enclosure Assembly
387
Electroluminescent Display Front Panel Assembly
389
Interface/Power Supply Module
390
Sensor Module Assembly
391
Fixed-Height Pedestal Stand Assembly (Series 00 Model Only)
393
Fixed-Height Pedestal Stand Assembly
398
Fixed-Height Pedestal Stand Assembly (Series 01 and Higher Models Only)5
398
Models Only)
398
Variable Height Adjustable Pedestal Stand Assembly
402
Hood/Shell Assembly and Pedestal Stand Assembly Attachment
407
Front and Rear Foot Switch Assemblies
409
Check Valve Assembly Replacement Kit (P/N 83 900 16)
411
Scale Assembly (P/N 83 600 50)
413
Pole Assembly (P/N 83 444 00) (Accessory)
415
High Monitor Shelf Assembly (P/N 83 442 00) (Accessory)
417
(P/N 83 440 00) (Accessory)
419
Swivel Drawer Assembly, Small (P/N 83 441 00) and Large
419
Humidity System Assembly (P/N 83 610 70/80/90) (Accessory)
423
(Series 02 Model Only)
427
Humidity System Assembly (P/N 83 613 70/80/81/90) (Accessory)
427
Evaporator Reservoir Assembly (Accessory) (Series 02 Model Only)
430
(Accessory)
434
Oxygen System Assembly (P/N 83 620 60 and 83 621 20/21/22) (Accessory)5
434
Ventilator Tube Support (P/N 83 001 05) (Accessory)
437
Oxygen Tank Bracket Assembly (P/N 83 443 00) (Accessory)
438
Cleaning
442
Access Door Gaskets and Tubing Access Ports
443
Cleaning Hard to Clean Spots
443
Disinfecting
443
Skin Temperature Probe
443
Steam Cleaning
443
Using Cleaning Agents
443
Controller, Shell, and Pedestal Stand
444
Hood, Sensor Module, and Heat Shields
444
Heater Radiator and Fan Impeller
445
Mattress Tray, Main Deck, Heater/Impeller Cover, and Mattress
445
Mattress Tray, Main Deck, Heater/Impeller Cover, and Mattress Tilt Bars6
445
Tilt Bars
445
Air Intake Microfilter
446
Humidity Reservoir
446
Board
447
Component Handling
447
Lubrication Requirements
448
Preventive Maintenance
449
Preventive Maintenance Schedule
450
Preventive Maintenance Checklist
451
Assembling
452
Installation and Set-Up
452
Unpacking
452
Setting up
455
Oxygen Sensor Calibration
459
Room Air-21% Oxygen Calibration
459
100% Oxygen Calibration
460
Oxygen Concentration Test
462
Weighing Scale Calibration
464
Current Leakage Test
466
Procedure
466
Set-Up
466
Disassembly
467
Disassembly and Assembly for Cleaning
467
Assembly
471
Cleaning
471
Filling the Humidity Reservoir
473
Procedure
474
Updating the Software
474
Tool and Supply Requirements
475
Chapter 7: Accessories
479
Accessories
480
Installation
482
Weighing Scale
482
Removal
484
Installation
485
Oxygen System
485
100% Calibration Fixture Installation
490
Removal
491
Humidity System
492
Preparing the Shell Assembly
492
Installing the Humidity System (Series 00 and 01 Models)
494
Installing the Humidity System (Series 02 Models)
496
Removing the Humidity System
498
October
524
5
Based on 1 rating
Ask a question
Give review
Questions and Answers:
Need help?
Do you have a question about the Dräger Isolette C2000 and is the answer not in the manual?
Ask a question
Dräger Isolette C2000 Specifications
General
Brand
Dräger
Model
Isolette C2000
Category
Medical Equipment
Language
English
Related product manuals
Dräger Isolette 8000
2 pages
Dräger Isolette 8000 plus
192 pages
Dräger Infinity C500
610 pages
Dräger Infinity Vista
280 pages
Dräger Infinity Delta
614 pages
Dräger Infinity Kappa
614 pages
Dräger Infinity Series
384 pages
Dräger Interlock Series
422 pages
Dräger Infinity Delta XL
614 pages
Dräger Evita Infinity V500
24 pages
Dräger Infinity Gamma Series
384 pages
Infinity Acute Care System M540
350 pages