WARNING
TO REDUCE THE POSSIBILITY OF ELECTRICAL SHOCK, ALL CURRENT TRANSFORMERS
(CT'S) SHOULD BE SHORTED BEFORE ATTEMPTING TO REMOVE OR REPLACE ANY RFL
9300 I/O MODULES.
CAUTION
Each I/O module position in the rear of the RFL 9300 is dedicated to a specific I/O module type,
though the module positions are not keyed. A label along the rear of the chassis specifies
which I/O module goes in each position. I/O modules can be damaged if they are installed in
the wrong chassis slot. When removing and replacing I/O modules, use the label in the chassis
as a guide to make sure each I/O module is in the proper slot.
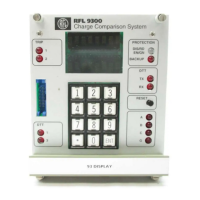
28.3.2 I/O MODULES
RFL 9300 I/O modules are mounted at the rear of the RFL 9300. Each I/O module is held in place by captive
screws at the top and bottom of the I/O module. All I/O modules are grounded to a grounding bar that extends
across the rear of the RFL 9300.
An I/O module removal tool is provided with each RFL 9300 to simplify removal and replacement of the I/O
modules. The tool is stored in a clip on the protective cover that extends across the rear of the RFL 9300.
To use the I/O module removal tool to remove and replace an I/O module, proceed as follows:
1. Using a make-before-break switch, place a short across each CT, and open each CT circuit that is
feeding the RFL 9300.
2. Using a Phillips screwdriver, loosen the two screws holding the protective cover in place across the rear
of the RFL 9300, and slide the protective cover up and out of position.
3. Disconnect all wiring from the I/O module to be removed.
Tag all wires before removal. This will simplify rewiring once the I/O module is replaced.
4. Using a flat-blade screwdriver, remove the screws that secure the grounding bar to each I/O module,
and lift the grounding bar out of position.
5. Pull the I/O module removal tool out of its storage clip on the protective cover.
6. Insert the threaded end of the I/O module removal tool into the threaded hole on the I/O module to be
removed, and turn the tool clockwise until it is tight.
The RFL 93B RELAY I/O module has a threaded hole near the center of the panel. If you
are replacing one of the other I/O modules, insert the removal tool into the threaded stan-
doff for the grounding bar located at the top rear of the module.
7. Using a flat-blade screwdriver, loosen the captive screws holding the I/O module in place.
8. Using the I/O module removal tool as a handle, pull the I/O module out of the chassis.
9. Disconnect the I/O module removal tool from the I/O module by turning the tool counterclockwise until it
is loose.
RFL 9300 RFL Electronics Inc.
May 5, 2002 28 - 4 (973) 334-3100