62 TimeProvider 5000 User’s Guide 098-00028-000 Revision F – May, 2012
Chapter 2 Installing
Rack Mounting the Chassis
Rack Mounting the Chassis
The installation procedure described in this section provides general guidelines for
installing the TimeProvider 5000, as well as theTimeProvider E10 and TimeProvider
E30 expansion shelves. Always follow applicable local electrical standards.
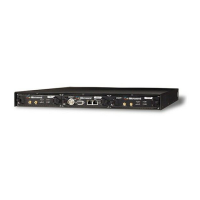
Rack Mounting the TimeProvider 5000 Main Shelf
Use the following steps to mount the TimeProvider 5000 in a rack.
1. TimeProvider 5000 is shipped with rack mounting brackets attached. The rack
mounting brackets can be removed and reattached in a different orientation, if
desired. See Figure 2-4 for mounting hole placements. See Figure 2-5 and
Figure 2-6 for chassis dimensions. Ensure that the
mounting brackets on both
sides are attached to the chassis at equal distances from the front of the unit (see
Figure 2-7) using 6-32 x 1/4-inch screws.
2. Mount the chassis to the front of the equipment rack rails with four screws and
associated hardware. Use the proper screws for the equipment rack.
Note: 1RU above the TimeProvider 5000 must be left
unoccupied for heat dissipation.
Note: The TimeProvider 5000 comes equipped with 19-inch rack
mounting brackets. 23-inch (58.42 cm) rack mounting adapters are
also available as a separately ordered item. 21-inch (ETSI) rack
mounting adapters are available as a separately ordered item.
 Loading...