LIST OF FIGURES
ENVOY™ TRANSCEIVER REFERENCE MANUAL xvii
List of figures
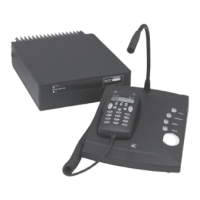
Figure 1: Typical transceiver system . . . . . . . . . . . . . . . . . . . . . . . . . . . . .4
Figure 2: 2220 Handset . . . . . . . . . . . . . . . . . . . . . . . . . . . . . . . . . . . . . . .5
Figure 3: 2221 Handset . . . . . . . . . . . . . . . . . . . . . . . . . . . . . . . . . . . . . . .6
Figure 4: 2230 Desk Console . . . . . . . . . . . . . . . . . . . . . . . . . . . . . . . . . . .7
Figure 5: 2210 RFU . . . . . . . . . . . . . . . . . . . . . . . . . . . . . . . . . . . . . . . . . .8
Figure 6: Steps in the wizard . . . . . . . . . . . . . . . . . . . . . . . . . . . . . . . . . .10
Figure 7: Wizard Startup screen . . . . . . . . . . . . . . . . . . . . . . . . . . . . . . . .12
Figure 8: Channel screen . . . . . . . . . . . . . . . . . . . . . . . . . . . . . . . . . . . . .25
Figure 9: Scanning screen . . . . . . . . . . . . . . . . . . . . . . . . . . . . . . . . . . . .26
Figure 10: Status areas . . . . . . . . . . . . . . . . . . . . . . . . . . . . . . . . . . . . . . . .28
Figure 11: Available themes for the display in the control point . . . . . . . .31
Figure 12: Select Language screen . . . . . . . . . . . . . . . . . . . . . . . . . . . . . . .39
Figure 13: Connection between RFU and desk console using
10-way to 8-way cable . . . . . . . . . . . . . . . . . . . . . . . . . . . . . . .43
Figure 14: Connection between RFU and desk console using
Ethernet cables and optional switch . . . . . . . . . . . . . . . . . . . . .44
Figure 15: Call screen with Call Log . . . . . . . . . . . . . . . . . . . . . . . . . . . . .48
Figure 16: Available status types for a Get Status call in a Selcall
or an ALE/CALM HF network . . . . . . . . . . . . . . . . . . . . . . . . .61
Figure 17: GPS screen . . . . . . . . . . . . . . . . . . . . . . . . . . . . . . . . . . . . . . . .73
Figure 18: Distance and bearing . . . . . . . . . . . . . . . . . . . . . . . . . . . . . . . . .74
Figure 19: Crosspatch status . . . . . . . . . . . . . . . . . . . . . . . . . . . . . . . . . . . .82
Figure 20: Typical menu screen . . . . . . . . . . . . . . . . . . . . . . . . . . . . . . . . .90
Figure 21: Menu structure (admin level) . . . . . . . . . . . . . . . . . . . . . . . . . .91
Figure 22: Navigation indicator showing navigation keys that
may be used . . . . . . . . . . . . . . . . . . . . . . . . . . . . . . . . . . . . . . .92
Figure 23: Basic view (no advanced view indicator) . . . . . . . . . . . . . . . . .94
Figure 24: Advanced view . . . . . . . . . . . . . . . . . . . . . . . . . . . . . . . . . . . . .94
Figure 25: User level (no admin level indicator) . . . . . . . . . . . . . . . . . . . .96
Figure 26: Admin level . . . . . . . . . . . . . . . . . . . . . . . . . . . . . . . . . . . . . . . .96