DI ST RI BU T I ON - REAR
TABLE OF CONTENTS
page page
A/C CONDENSER COVER
REMOVAL . . . . . . . . . . . . . . . . . . . . . . . . . . . . . 52
INSTALLATION . . . . . . . . . . . . . . . . . . . . . . . . . 52
A/C CONDENSER HOUSING
REMOVAL . . . . . . . . . . . . . . . . . . . . . . . . . . . . . 52
INSTALLATION . . . . . . . . . . . . . . . . . . . . . . . . . 54
A/C EVAPORATOR COVER
REMOVAL . . . . . . . . . . . . . . . . . . . . . . . . . . . . . 55
INSTALLATION . . . . . . . . . . . . . . . . . . . . . . . . . 55
A/C EVAPORATOR HOUSING
REMOVAL . . . . . . . . . . . . . . . . . . . . . . . . . . . . . 55
INSTALLATION . . . . . . . . . . . . . . . . . . . . . . . . . 57
AIR FILTER
REMOVAL . . . . . . . . . . . . . . . . . . . . . . . . . . . . . 58
INSTALLATION . . . . . . . . . . . . . . . . . . . . . . . . . 58
BLOWER MOTOR
REMOVAL . . . . . . . . . . . . . . . . . . . . . . . . . . . . . 58
INSTALLATION . . . . . . . . . . . . . . . . . . . . . . . . . 59
A/CCONDENSERCOVER
REMOVAL
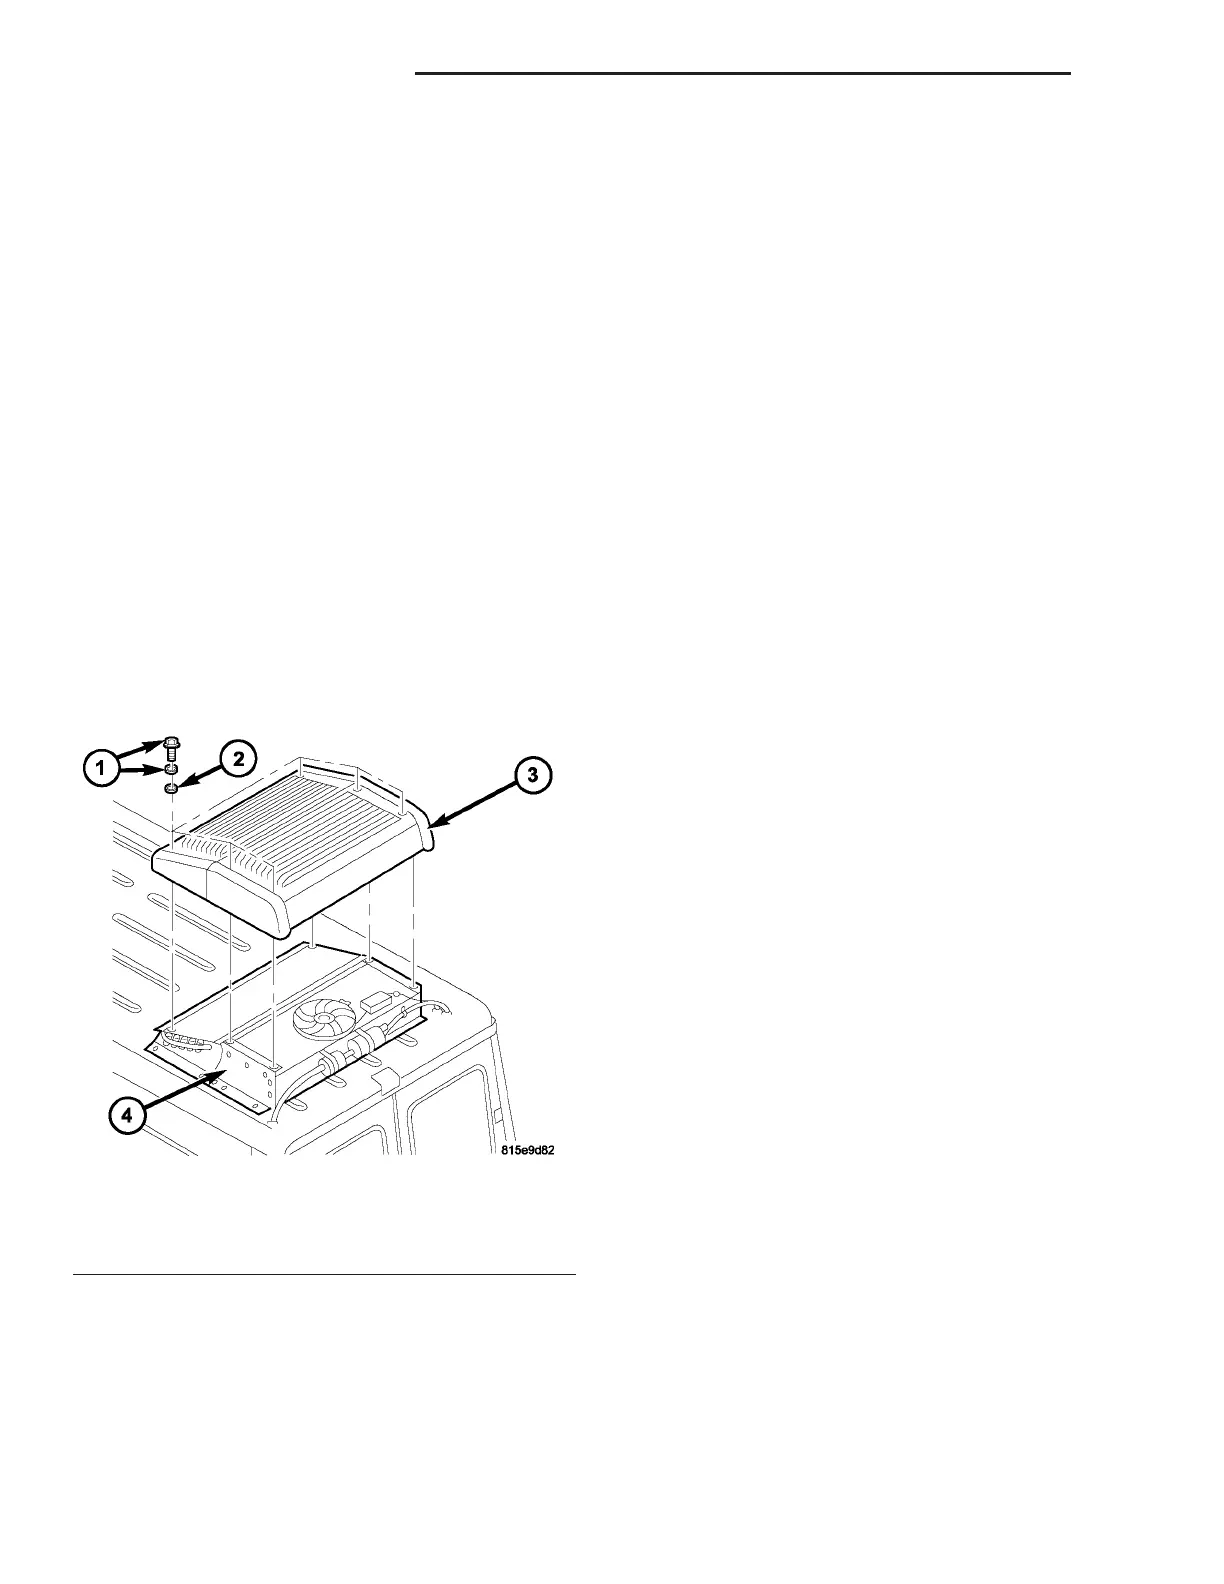
(1) Unlock t he six quick-release fa st eners by tur n-
ing them 90 degr ees in either direct ion (Fig. 1).
(2) Remove the rear A/C conden ser cover from t he
rear A/C condenser h ousing.
INSTALLATION
(1) In spect the six r ubber damping wa sh ers for
correct sea lin g. Replace the wash ers as requir ed.
(2) Position t he rear A/C conden ser cover over t he
rear A/C condenser h ousing.
(3) Lock the six quick-release fasten ers by turning
them 90 degrees in eit her direct ion.
A/CCONDENSERHOUSING
REMOVAL
WARNING: Refer to the applicable warnings and
cautions for this system before performing the fol-
lowing operation (Refer to 24 - HEATING & AIR
CONDITIONING/PLUMBING - WARNINGS) and (Refer
to 24 - HEATING & AIR CONDITIONING/PLUMBING -
CAUTIONS). Failure to follow the warnings and cau-
tions could result in possible personal injury or
death.
(1) Disconn ect and isolate the negat ive ba tter y
cable.
(2) Remove th e air filter from the rea r A/C evapo-
rator hou sing (Refer t o 24 - H EATING & AIR CON-
DITIONING/DISTRIBUTION - REAR/AIR F ILTER -
REMOVAL).
(3) Recover the refr iger ant from the rear r efriger-
ant system (Refer to 24 - HEATING & AIR CONDI-
TIONING/PLUMBING - STANDARD PROCEDURE -
REFRIGERANT RECOVERY).
(4) Remove the cover from the r ear A/C condenser
housin g (Refer to 24 - H EATING & AIR CONDI-
TIONING/DISTRIBUTION - REAR/A/C CON-
DENSER COVE R - REMOVAL).
(5) Disconn ect the r ear A/C wire harness from the
rear blower motor suppression filter a nd the rear A/C
high pr essure switch (Fig. 2).
(6) Remove t he r etaining straps th at secu re the
rear A/C wire har ness to t he rea r liqu id line an d
position t he wire harness ou t of the way.
(7) Remove th e screw and br acket th at secu res the
rear discha rge line t o the righ t side of the rea r con-
denser housing.
(8) Disconn ect the rea r discharge line from the
rear A/C condenser and r emove an d discar d the
O-rin g seal.
Fig. 1 Rear A/C Condenser Cover
1 - QUICK-RELEASE FASTENER AND WASHER (6)
2 - RUBBER DAMPING WASHER (6)
3 - REAR CONDENSER COVER
4 - REAR A/C CONDENSER HOUSING
24 - 52 DISTRIBUTION - REAR VA