INSTALLATION
NOTE: Be certain to add refrigerant oil if the rear
A/C condenser is being replaced. The refrigerant oil
must be drained from the old condenser and mea-
sured to determine the amount of refrigerant oil to
add to the new condenser. Use only refrigerant oil
of the type recommended for the rear A/C compres-
sor in the vehicle.
(1) If the rear A/C condenser is bein g replaced,
insta ll th e cor rect amount an d type of refrigerant oil
into the new rear A/C condenser. Drain the old con-
denser a nd mea su re the refrigera nt oil. Fill the new
condenser with the same amou nt of new refr iger ant
oil t hat wa s dr ained ou t of the old conden ser.
(2) In st all n ew body seala nt and any rem oved
sh ims onto the top of th e roof panel.
(3) With help from an a ssistan t, position t he rear
A/C condenser housing onto t he top of t he roof pa nel.
(4) In st all th e eight nut s and wa sh ers t hat secu re
the rea r A/C condenser housing to the roof pa nel.
Tighten t he nu ts to 25 N·m (18 ft. lbs.).
(5) Remove the ta pe or plu gs from t he rear liquid
lin e fitt ing and rea r refriger ant reservoir port.
(6) Lubricate a n ew O-ring sea l wit h clea n refr ig-
eran t oil a nd install it onto t he rear liquid line fit-
ting. Use only the specified O-ring seal as it is made
of a special m ater ial for th e R-134a system . Use on ly
refriger ant oil of the type recom mended for the r ear
A/C compressor in the vehicle.
(7) Connect t he rear liquid lin e to th e rea r r efrig-
eran t r eservoir outlet. Tighten the liquid line nut to
35 N·m (26 ft. lbs.).
(8) Remove the ta pe or plugs from the rea r dis-
charge line fitting and rea r condenser port .
(9) Lubricate a n ew O-ring sea l wit h clea n refr ig-
eran t oil a nd insta ll it onto the rear discha rge line
fitting. Use only t he specified O-ring seal as it is
made of a specia l material for th e R-134a system.
Use only refriger ant oil of the type r ecommen ded for
the r ear A/C compressor in t he vehicle.
(10) Connect the rear dischar ge lin e to t he rear
A/C condenser. Tight en t he dischar ge lin e nut to 35
N·m (26 ft. lbs.).
(11) In st all t he bracket an d screw th at secures the
rear discha rge line t o the righ t side of the rea r con-
denser housing. Tighten t he screw securely.
(12) Connect th e rear A/C wire harn ess to the r ear
blower m otor suppression filt er and to the rear A/C
high pr essure switch.
(13) Install new ret ain ing straps to secure the rea r
A/C wir e har ness to t he rear liquid lin e.
(14) Install a new rear receiver/drier (Refer to 24 -
HEATING & AIR CONDITIONING/PLUMBING/
REAR RE CEIVER/DRIE R - INSTALLATION).
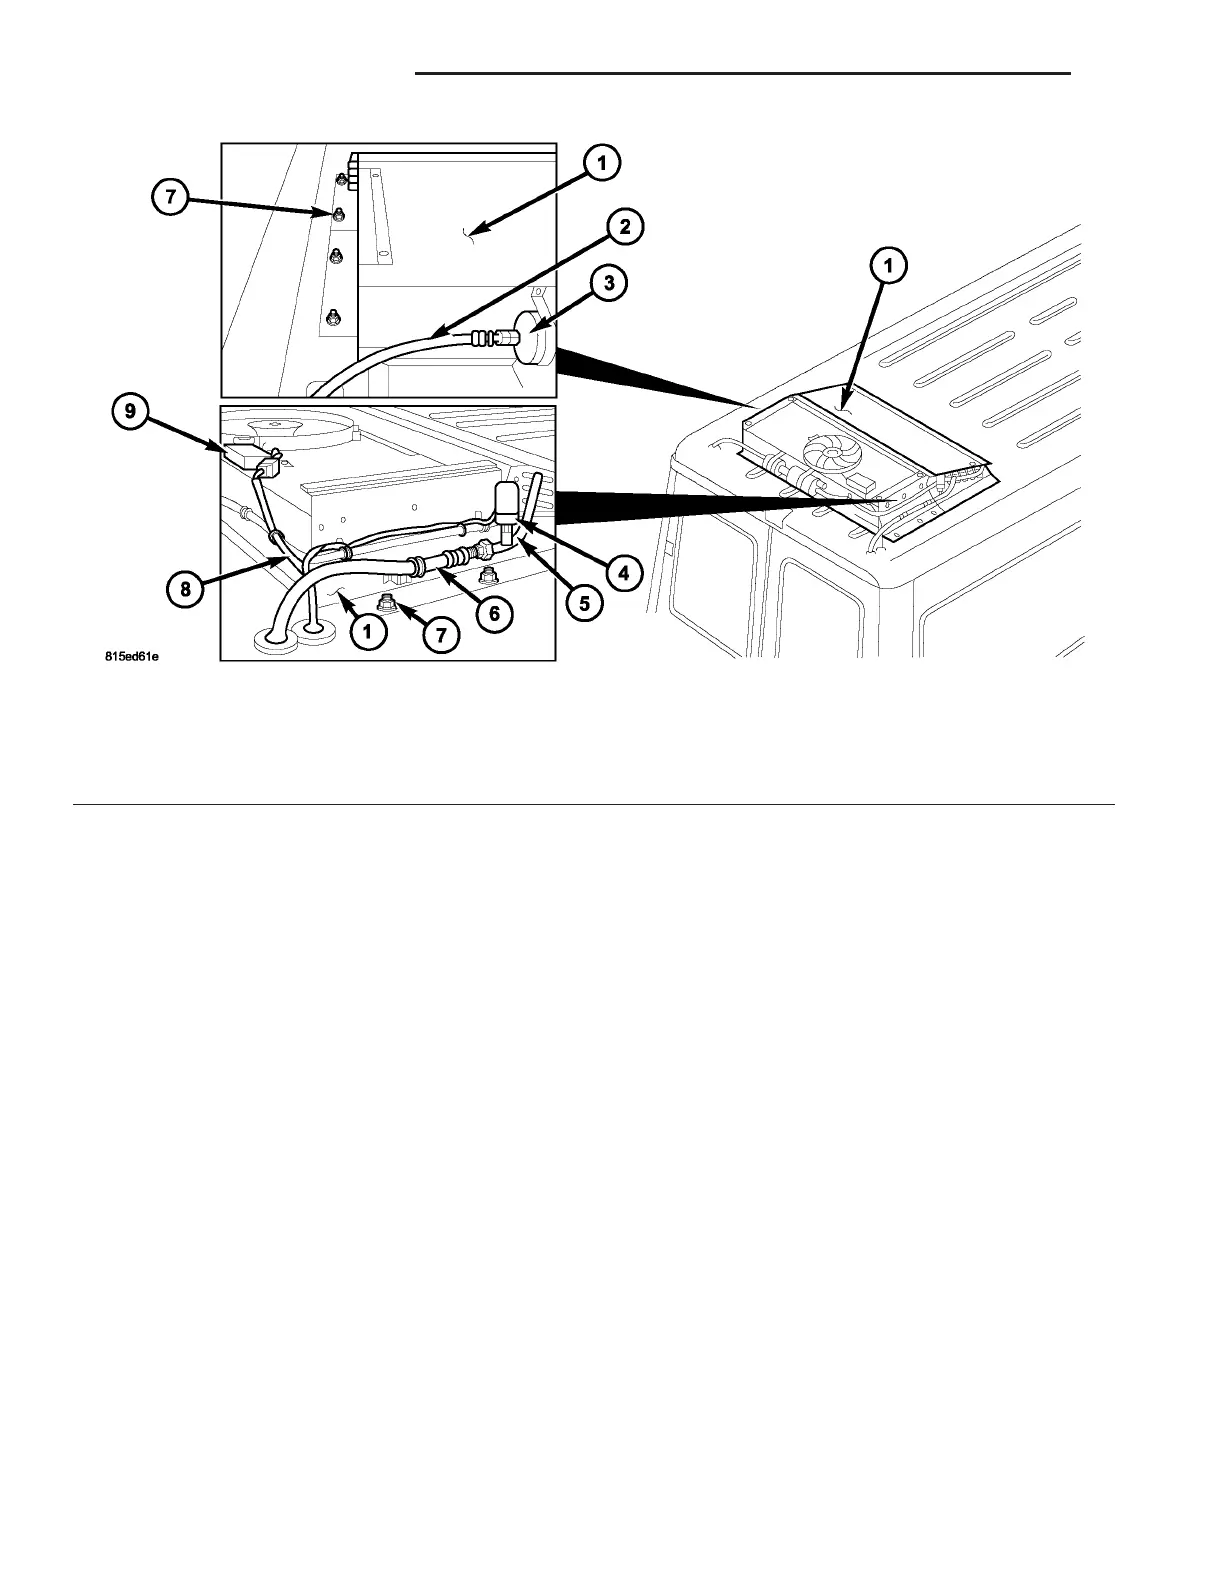
Fig. 2 Rear A/C Condenser Housing
1 - REAR A/C CONDENSER HOUSING
2 - LIQUID LINE
3 - REAR REFRIGERANT RESERVOIR
4 - REAR A/C HIGH PRESSURE SWITCH
5 - REAR CONDENSER OUTLET TUBE
6 - SUCTION LINE
7 - NUT AND WASHER (8)
8 - REAR A/C WIRE HARNESS
9 - REAR BLOWER MOTOR SUPPRESSION FILTER
24 - 54 DISTRIBUTION - REAR VA