refriger ant oil of the type recom mended for the r ear
A/C compressor in the vehicle.
(5) Connect the rea r liquid line to the rear receiv-
er/drier. Tigh ten the nut to 35 N·m (26 ft. lbs.).
(6) Lubricate a n ew O-ring sea l wit h clea n refr ig-
eran t oil an d install it onto th e receiver/drier outlet
fitting. Use only t he specified O-ring seal as it is
made of a specia l material for th e R-134a system.
Use only refriger ant oil of the type r ecommen ded for
the r ear A/C compressor in t he vehicle.
(7) Connect the rear refr iger ant reservoir to t he
rear receiver/drier. Tight en the nu t t o 35 N·m (26 ft.
lbs.).
(8) Reconnect t he negat ive batt ery cable.
(9) Eva cuate th e rear refr iger ant system (Refer to
24 - HEATING & AIR CONDITIONING/P LUMBING
- STANDARD PROCEDURE - REFRIGERANT SYS-
TEM EVACUATE).
(10) Charge th e rear refr iger ant syst em (Refer to
24 - HEATING & AIR CONDITIONING/P LUMBING
- STANDARD PROCEDURE - REFRIGERANT SYS-
TEM CH ARGE).
(11) In st all the rea r air filter (Refer to 24 - HE AT-
ING & AIR CONDITIONING/DISTRIBUTION -
REAR/AIR FILTE R - INSTALLATION).
(12) Install t he cover onto the rear A/C condenser
housin g (Refer to 24 - H EATING & AIR CONDI-
TIONING/DISTRIBUTION - REAR/A/C CON-
DENSER COVE R - INSTALLATION).
REAR REFRI GERAN T RESER-
VOIR
REMOVAL
WARNING: Refer to the applicable warnings and
cautions for this system before performing the fol-
lowing operation (Refer to 24 - HEATING & AIR
CONDITIONING/PLUMBING - WARNINGS) and (Refer
to 24 - HEATING & AIR CONDITIONING/PLUMBING -
CAUTIONS). Failure to follow the warnings and cau-
tions could result in possible personal injury or
death.
(1) Disconn ect and isolate the negat ive ba tter y
cable.
(2) Remove th e air filter from the rea r A/C evapo-
rator hou sing (Refer t o 24 - H EATING & AIR CON-
DITIONING/DISTRIBUTION - REAR/AIR F ILTER -
REMOVAL).
(3) Recover the refr iger ant from the rear r efriger-
ant system (Refer to 24 - HEATING & AIR CONDI-
TIONING/PLUMBING - STANDARD PROCEDURE -
REFRIGERANT RECOVERY).
(4) Remove the cover from the r ear A/C condenser
housin g (Refer to 24 - H EATING & AIR CONDI-
TIONING/DISTRIBUTION - REAR/A/C CON-
DENSER COVE R - REMOVAL).
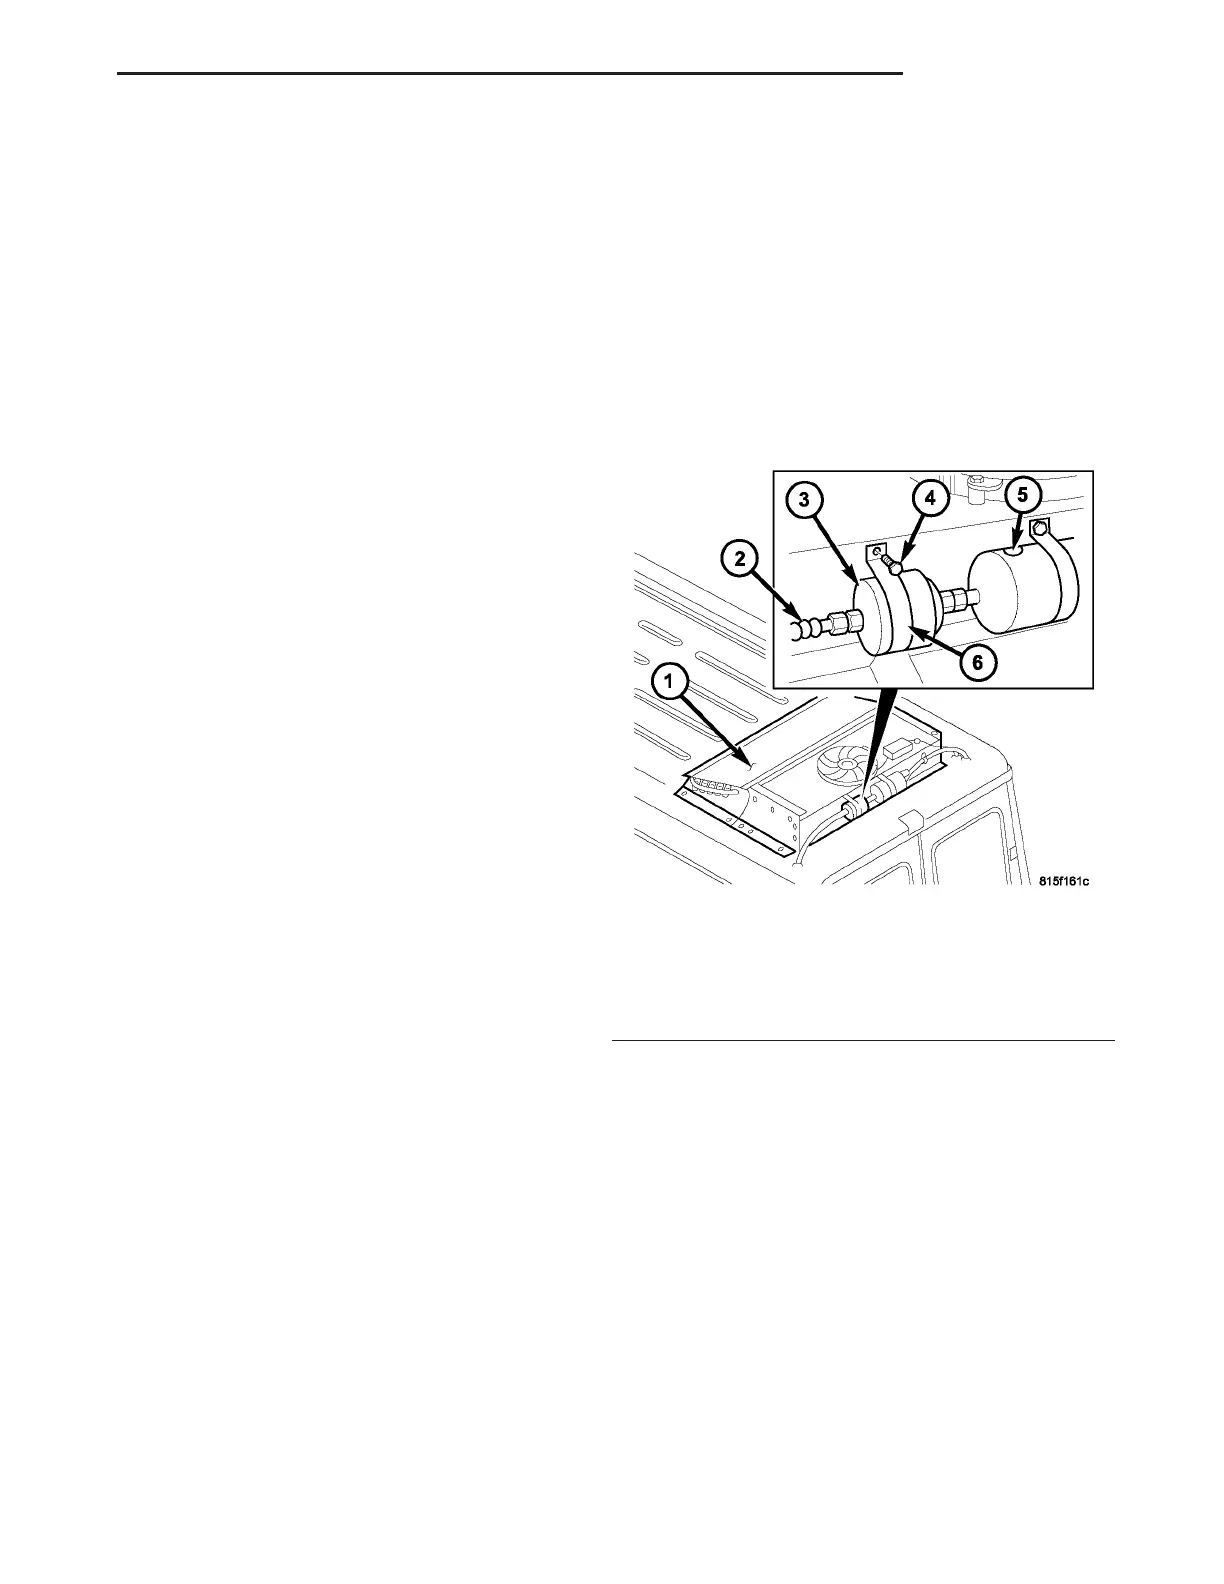
(5) Disconn ect th e r ear liqu id lin e from the rear
refriger ant reservoir and rem ove an d disca rd the
O-rin g seal (Fig. 34).
(6) Disconn ect the r ear refr igerant r eservoir from
the rear r eceiver/drier an d r emove and discard t he
O-rin g seal.
(7) Remove t he bolt an d reta ining br acket tha t
secures t he rea r refr igerant reservoir t o t he rear A/C
condenser housing and rem ove the reservoir.
(8) In st all plugs into, or t ape over th e opened rear
liquid line fitting and receiver/drier and reservoir
por ts.
INSTALLATION
NOTE: Be certain to add refrigerant oil if the rear
refrigerant reservoir is being replaced. The refriger-
ant oil must be drained from the old refrigerant res-
ervoir and measured to determine the amount of
refrigerant oil to add to the new reservoir. Use only
refrigerant oil of the type recommended for the rear
A/C compressor in the vehicle.
(1) If the rea r refriger ant reservoir is being
repla ced, in st all th e correct amount and type of
refriger ant oil into the new rear refr iger ant reservoir.
Drain th e old refrigerant r eservoir an d measure t he
refriger ant oil. Fill the new refrigerant reservoir with
the same am ount of new refr igerant oil t hat was
dr ained ou t of the old reservoir.
Fig. 34 Rear Refrigerant Reservoir
1 - REAR A/C CONDENSER HOUSING
2 - LIQUID LINE
3 - REAR REFRIGERANT RESERVOIR
4 - BOLT
5 - REAR RECEIVER/DRIER
6 - RETAINING BRACKET
VA PLUMBING 24 - 95