Variomat Touch — 09.09.2022-Rev. C
English —
• The button is highlighted green. The function is switched off.
Press the desired button:
• The button is highlighted blue. The function is switched on.
The change in the filling level and the vessel pressure are indicated on the
display.
Note!
Manual operations cannot be performed if safety
-relevant parameters
would be exceeded. Switching is then disabled.
9.1.3 Stop mode
Use:
For device commissioning
Start:
Press "STOP“.
Functions:
Except for the display of information, the device is non-functional in Stop mode.
Function monitoring is stopped.
The following functions are deactivated:
• The "PU" pump is switched off.
• The "PV" motor ball valve in the "PV" overflow line is closed.
• The solenoid valve in the "WV" make-up line is closed.
Note!
The system returns an alarm if the Stop mode is activated for more than
4 hours.
If "Floating alarm contact?" in the Customer menu is set to "Yes", the
system outputs the alarm to the group alarm contact.
9.1.4 Summer operation
Use:
In summer
Start:
Switch off degassing via the customer menu.
Functions:
The degassing of the network water is not necessary if the circulating pumps of
the system are shut down during Summer because gas-rich water cannot reach
the device. Energy is saved.
After Summer, select the "Interval degassing" degassing programme in the
Customer menu or "Continuous degassing", if required.
For a detailed description of the selection of degassing programmes, 10.3.4
"Setting degassing programmes", 45.
Note!
The pressurisation feature of the device must remain operative in
Summer.
– Automatic mode remains active.
9.2 Restarting
Risk of injury due to pump start-up
Hand injuries may occur when the pump starts up if you turn the pump
motor at the impeller using a screwdriver.
• Switch the pump to a zero-volts state before turning the pump at the
fan wheel with a screwdriver.
ATTENTION
Device damage due to pump start-up
Pump damage may occur when the pump starts up if you turn the pump
motor at the impeller using a screwdriver.
• Switch the pump to a zero-volts state before turning the pump at the
fan wheel with a screwdriver.
After an extended standstill time (the device is de-energised or in Stop mode),
the pumps may jam. For this reason, use a screwdriver to rotate the pumps at the
fan wheel of the pump motors before restarting.
Note!
A jamming of the pumps is prevented during operation thanks to forced
starting action (after 24 hours).
10 Controller
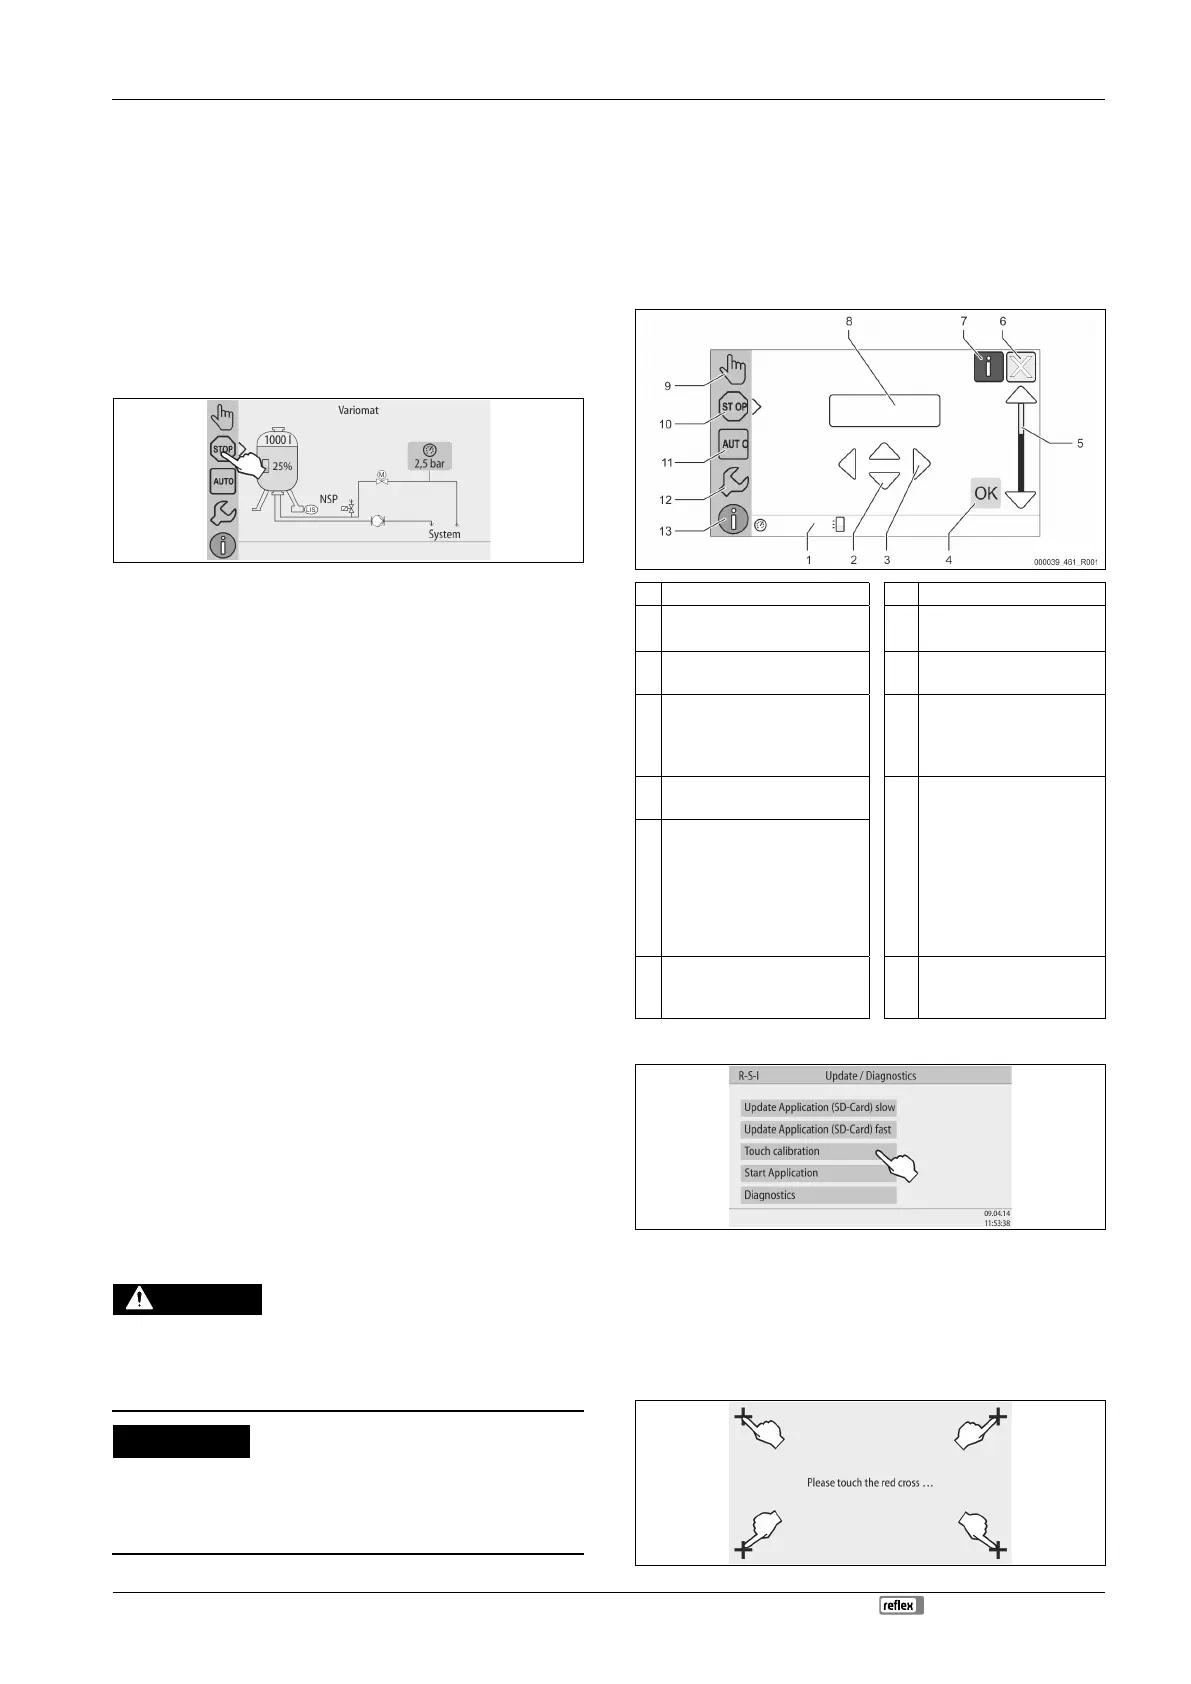
10.1 Operator panel
1 Message line 8 Display value
2
"▼"/ "▲" buttons
• Set digits.
9 "Manual mode" button
• For function tests.
3
""/"" buttons
• Select digits.
10 "Stop mode" button
• For commissioning.
4 "OK" button
• Confirm/acknowledge
input.
• Browse in the menu.
11 "Automatic mode" button
• For continuous
operation.
5 "Up" and "Down" scroll bar
• "Scroll" in the menu.
12 "Set-up menu" button
• For setting parameters.
• Fault memory.
• Parameter memory.
• Display settings.
• Primary vessel
information.
• Software version
information.
6 “Scroll back" button
• Cancel.
• Page back to the main
menu.
7 "Display help texts" button
• Opens help texts.
13 "Info menu" button
• Displays general
information.
10.2 Calibrating the touch screen
You can calibrate the touch screen when touching the desired buttons does not
work satisfactorily.
1. Switch the device off at the main switch.
2. Touch and hold the touch field with your finger.
3. Switch on the main switch while touching the touch field.
– When starting the program, the controller automatically switches to
the "Update/Diagnostics" function.
4. Touch the "Touch calibration" button.
 Loading...