Chapter 5: OPERATION
1. OPERATING THE REMOTE MICROPHONE BY USING A PASSWORD
5-2
1. OPERATING THE REMOTE MICROPHONE BY USING A PASSWORD
Only powering up the system enables the Remote Microphone operation when no password is set. In this case,
the operation procedures described herein are not required.
For password setting, refer to
p. 7-23.
Once a password (4-digit one comprised of the numbers 1 – 5) has been set, the Remote microphone cannot be
operated without entering the password. The password entry is made with the Remote Microphone's function
keys.
The Remote Microphone to which a password is set has its LEDs on the left of Function keys flashed orange
indicating standby for password entry.
1.1. Entering a Password
Function keys correspond to the numbers 1 – 5 as follows.
[RM-200XF]
[Entering a password when the VX-2000 Setting Software Version 2.1 or later is installed]
Press the Password Lock* key. The right-side LED (Password Lock LED) located beside this key flashes green.
Enter the 4-digit password by pressing the keys corresponding to the above numbers. When the password
entered is correct, the Password Lock LED changes to steady green, enabling the Remote Microphone to
operate. As the Password Lock LED remains flashing green if the password entered is wrong, enter the correct
password after pressing the Password Lock key again.
* This function must be assigned to the Function key. (Refer to
p. 7-54.)
[Entering a password when the VX-2000 Setting Software Version 2.0 or ealier is installed]
Enter the 4-digit password by pressing the Remote Microphone's Function keys.
Entering the first to third numbers of a password causes each right LED of the Function keys 2 – 4 to light up
green in order regardless of whether the entered password numbers of up to third digit are correct or not.
Entering the last (fourth) number enables the Remote Microphone's operation if the password entered is correct.
However, if it is wrong, the unit operation returns to the password entry status at this time.
Tip: If you forget the password, set a password in the System Setting File again and download its file to the
Remote Microphone.
1.2. Bringing the Remote Microphone into Password Entry Status
[When the VX-2000 Setting Software Version 2.1 or later is installed]
If the set timeout period expires without key operation in Remote Microphone's operation enabled condition,
the Remote Microphone is automatically placed in the status it cannot be operated without entering password.
Also it is possible to place the Remote Microphone in the Password Entry status by pressing the Password Lock
key in Remote Microphone's operable status.
[When the VX-2000 Setting Software Version 2.0 or earlier is installed]
The Remote Microphone can be placed in the Password Entry status by resetting the Remote Microphone.
For resetting method, refer to
p. 2-5 for RM-200XF and p. 2-7 for RM-200X.
Tip: Returning the unit operation to this status cancels all pre-selections for zone broadcast.
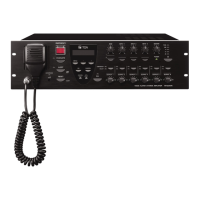
FIREMAN'S MICROPHONE
RM-200XF
MICSP CPU
OFFON
2
3
4
(Function key 4)
5
2
3
4 (Function key 4)
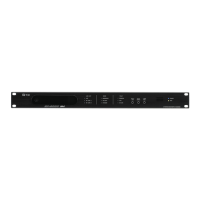
REMOTE MICROPHONE
RM-200X
Service Switch
Failure indicator
Failure indicator
Function key 6
Function key 7
[RM-200X]