(10) Lubr icate a n ew O-ring seal with clean r efrig-
eran t oil a nd install it on to the rea r suction line fit-
ting. Use only the specified O-ring seal as it is made
of a special m ater ial for th e R-134a system . Use on ly
refriger ant oil of the type recom mended for the r ear
A/C compressor in the vehicle.
(11) Connect t he rear suct ion line to the rea r evap-
orator outlet t ube. Tigh ten t he suct ion line nut to 35
N·m (26 ft. lbs.).
(12) Install n ew insulating ta pe aroun d the r ear
evapor ator conn ection s.
(13) Install the positive wir e lead on to the rea r
A/C system terminal block an d insta ll the retainin g
nut. Tigh ten th e nut secu rely.
(14) Reposition the rear dome lamp harn ess and
insta ll t he ret aining straps that secu re the h arness
to th e rea r A/C eva por ator housing.
(15) Connect the rear A/C wire h arn ess conn ector
to th e rea r body wir e harness.
(16) Route th e r ear A/C wire harness u p through
the r oof panel an d insta ll the grommet.
(17) Connect th e rear A/C wire harn ess to the r ear
condenser fan suppression filter and the r ear A/C
high pressu re switch an d install the ret ain ing stra ps
that secu re th e wire har ness to t he rear liquid lin e.
(18) Reconn ect the n egative battery cable.
(19) Eva cuat e th e rear refriger ant system (Refer t o
24 - HEATING & AIR CONDITIONING/P LUMBING
- STANDARD PROCEDURE - REFRIGERANT SYS-
TEM EVACUATE).
(20) Charge th e rear refr iger ant syst em (Refer to
24 - HEATING & AIR CONDITIONING/P LUMBING
- STANDARD PROCEDURE - REFRIGERANT SYS-
TEM CH ARGE).
(21) Install the cover onto the rea r A/C evaporator
housin g (Refer to 24 - H EATING & AIR CONDI-
TIONING/DISTRIBUTION - REAR/A/C EVAPORA-
TOR COVE R-REAR - INSTALLATION).
(22) Install t he cover onto the rear A/C condenser
housin g (Refer to 24 - H EATING & AIR CONDI-
TIONING/DISTRIBUTION - REAR/A/C CON-
DENSER COVE R - INSTALLATION).
AI R FI LT ER
REMOVAL
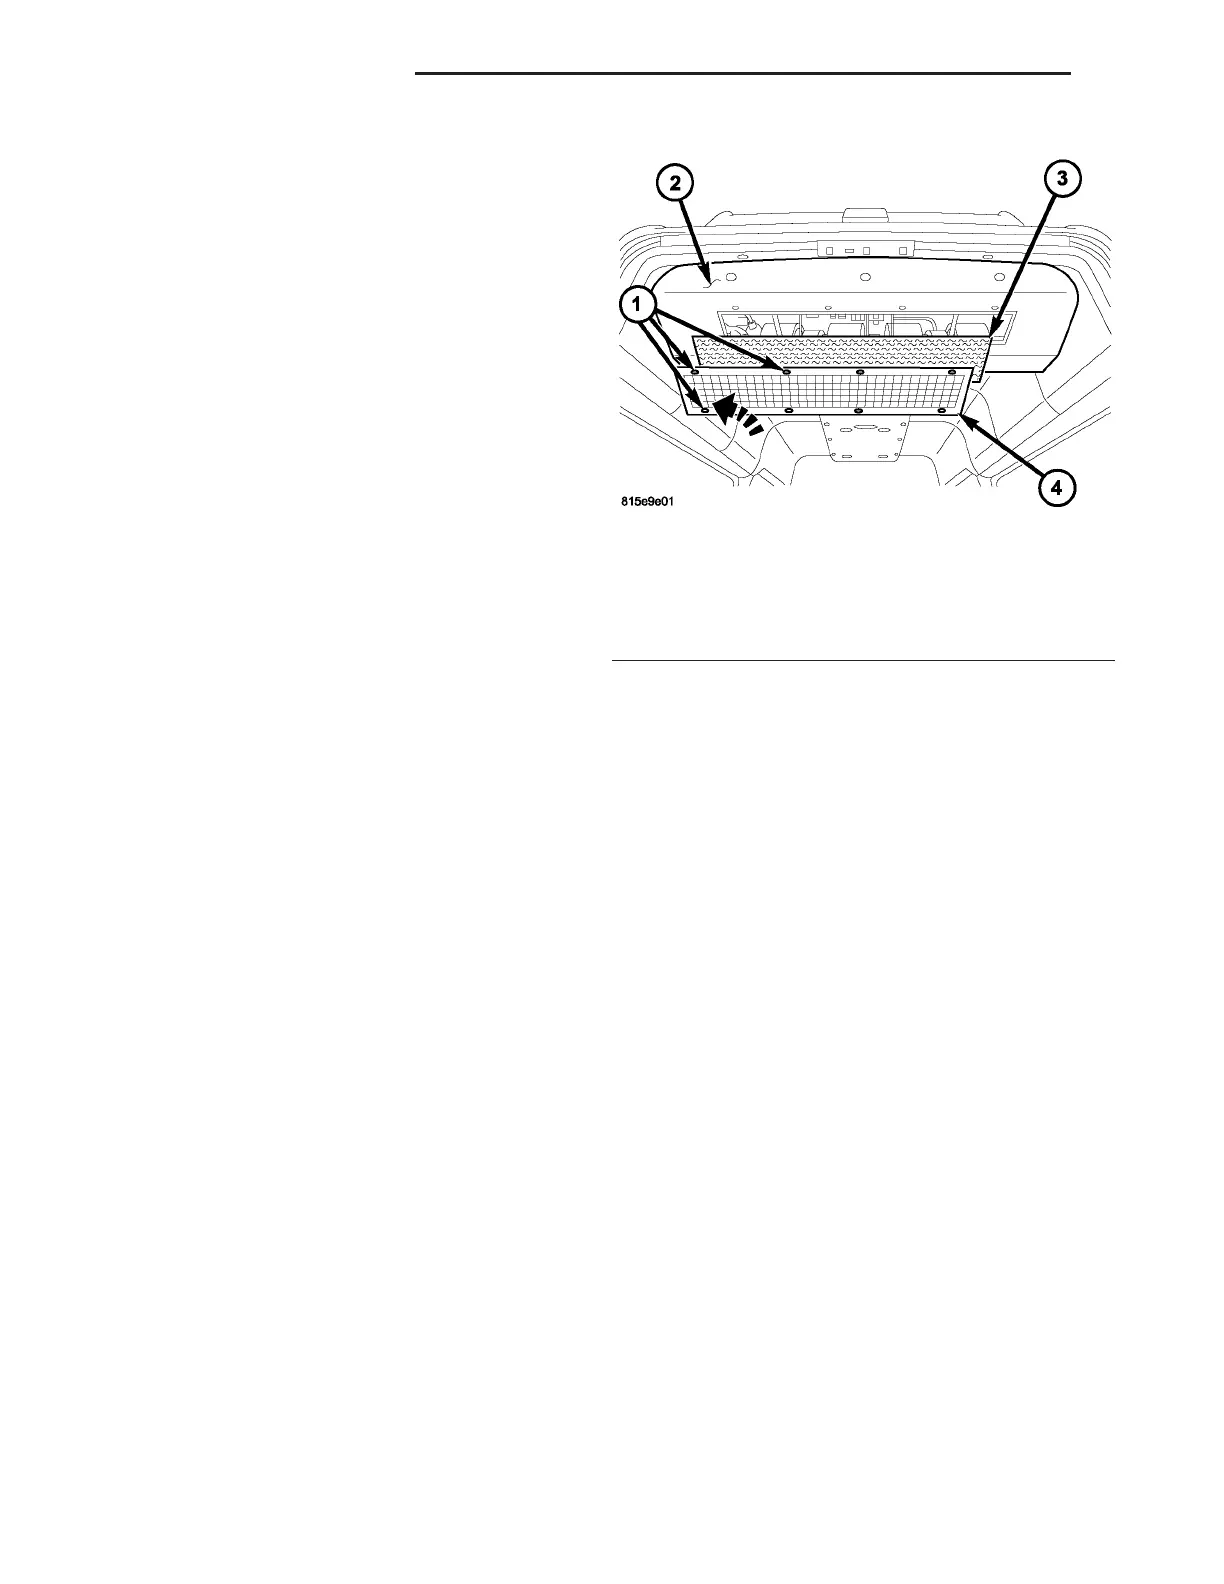
(1) Unlock the eigh t quick-r elease fasteners by
turning them 90 degr ees count er clockwise (F ig. 6).
(2) Remove the rear air inlet grate fr om the rear
A/C eva por ator cover.
(3) Remove the rear part iculate air filter by disen-
gaging th e velcro-type ret ain ers.
(4) Carefully clean the rear particulate a ir filter
using compressed a ir.
INSTALLATION
NOTE: Replace the rear particulate air filter if it is
heavily soiled or damaged.
(1) Position the rea r part iculate air filter a nd
enga ge the velcro-type ret ain ers.
(2) In st all th e rear a ir in let grate onto t he r ear
A/C eva por ator cover.
(3) Lock t he eight quick-release fa st eners by tu rn-
ing them 90 degr ees clockwise.
BLOWER M OT OR
REMOVAL
(1) Disconn ect and isolate the negat ive ba tter y
cable.
(2) Remove th e cover from the rea r A/C evapor ator
housin g (Refer to 24 - H EATING & AIR CONDI-
TIONING/DISTRIBUTION - REAR/A/C EVAPORA-
TOR COVE R-REAR - RE MOVAL).
(3) Disconn ect t he wire harness connect ors fr om
the rear blower mot or suppression filter and from the
rear blower motor being serviced and remove th e
su ppression filt er (Fig. 7).
(4) Remove the body sea ler fr om around th e rear
blower m otor area bein g serviced.
(5) Remove th e scr ews that secure each rea r
blower motor t o th e rea r eva por ator housing and
remove blower motor.
Fig. 6 Rear Particulate Air Filter
1 - QUICK-RELEASE FASTENER (8)
2 - REAR A/C EVAPORATOR COVER
3 - REAR PARTICULATE AIR FILTER
4 - REAR AIR INLET GRATE
24 - 58 DISTRIBUTION - REAR VA