A
B
C
D
E
F
G
H
L
M
N
P
Uso e manutenzione
Use and Maintenance operations
sezione / section
D 4
28 749/749 DARK/749S Aggiornamento/Update - M.Y. 2006 - edizione/edition 00
Controllo usura e
sostituzione pastiglie
freno
Attenzione
Il liquido impiegato nell’impianto
frenante, oltre a danneggiare la
vernice, è dannosissimo a contatto
degli occhi o della pelle; lavare quindi
abbondantemente con acqua corrente
la parte interessata in caso di
accidentale contatto.
Importante
Alla consegna del motoveicolo
o dopo la sostituzione delle pastiglie,
informare il Cliente che per almeno
100 Km dovrà utilizzare il freno
anteriore con cautela, al fine di
consentire un corretto e completo
assestamento dei materiali d'attrito.
Sostituzione pastiglie freno
anteriore
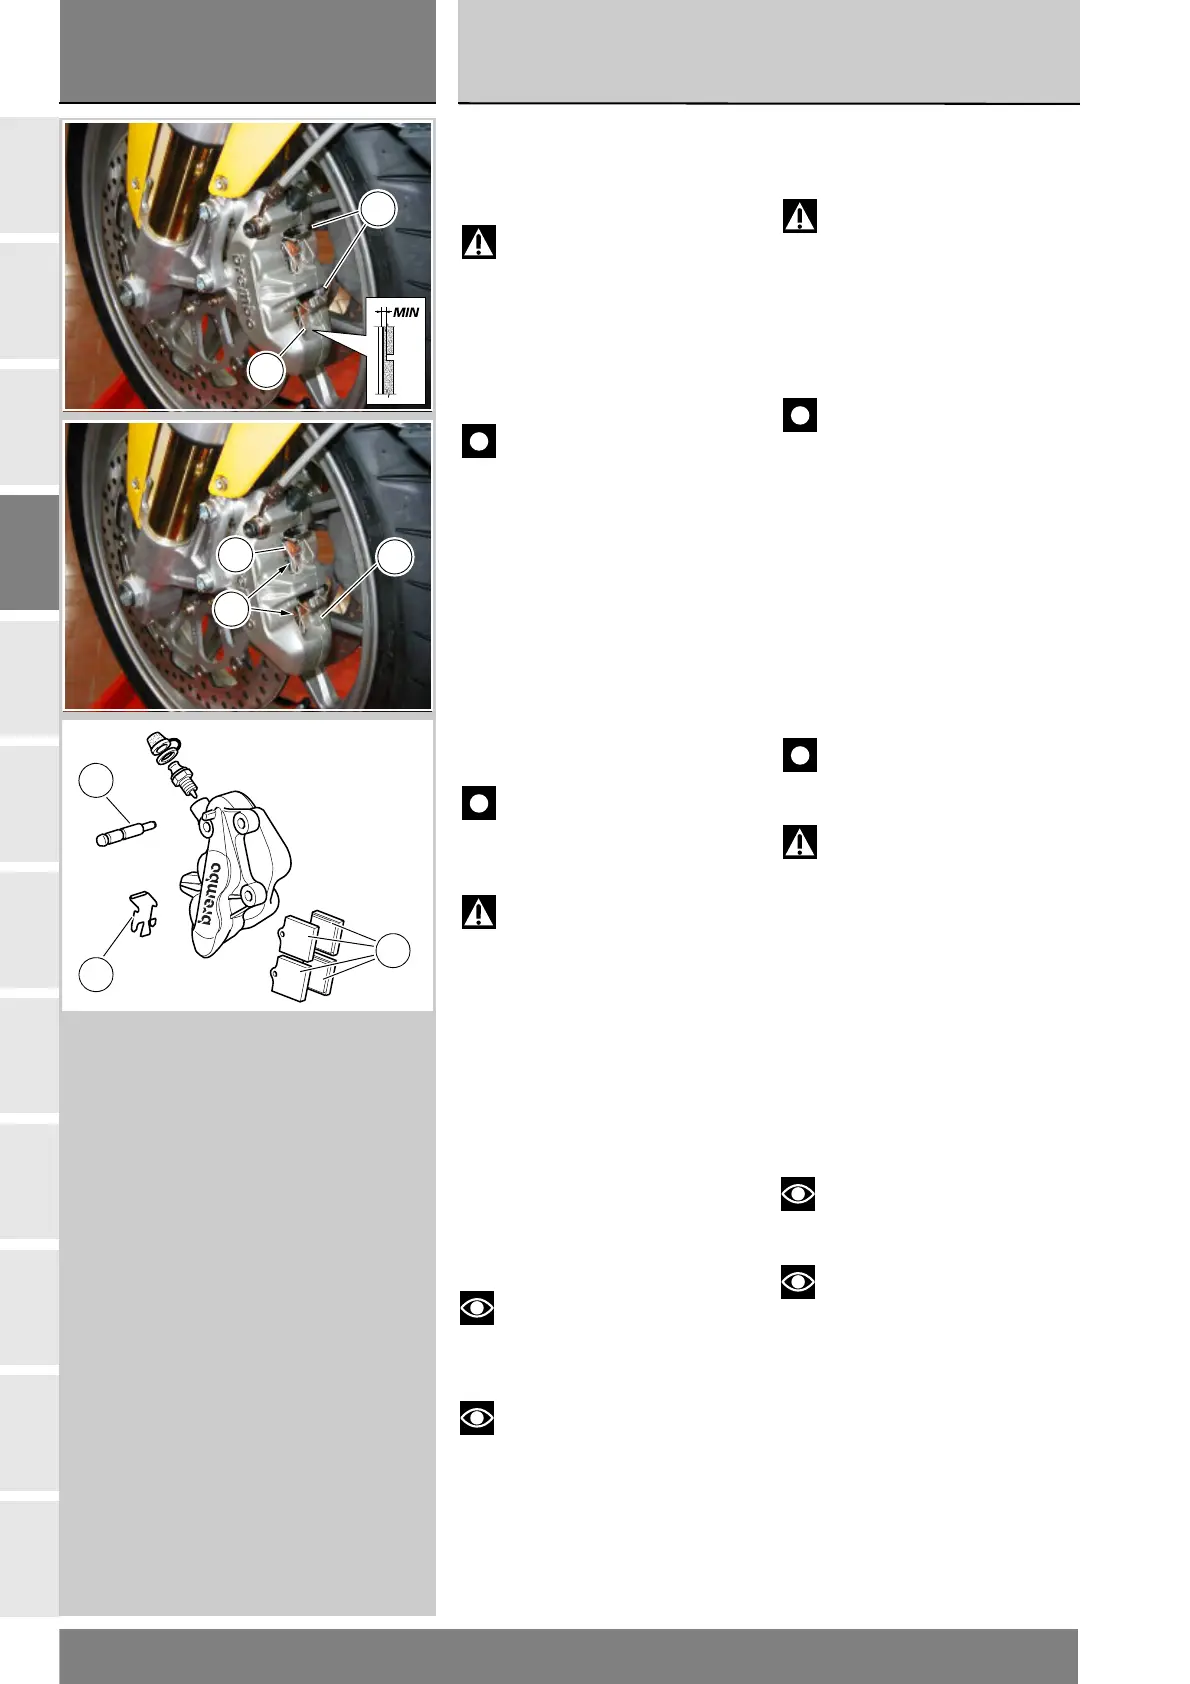
Controllare attraverso la fessura
ricavata tra le pinze che risulti visibile
il solco ricavato sulla superficie di
attrito delle pastiglie (3).
Importante
Se anche una sola delle
pastiglie risulta consumata sarà
necessario sostituirle tutte.
Attenzione
Controllare che nel serbatoio dei
freni l’olio non sia superiore alla traccia
MAX, perchè in caso contrario non
riusciremmo ad allargare i pistoncini.
Procedere alla sostituzione delle
pastiglie in questo modo.
Rimuovere i perni (2), tenendo
premuta la molla (1) nella sua parte
centrale (A), con l’aiuto di una pinza.
Rimuovere la molla (1) di tenuta
pastiglie posta tra le semipinze.
Spingere i pistoncini della pinza
completamente dentro ai propri
alloggiamenti, divaricando le pastiglie
usate. Sfilare le pastiglie usurate.
Note
Sostituire le pastiglie che
presentano un aspetto lucido o
“vetroso”.
Note
Se l’operazione di sostituzione
pastiglie dovesse risultare
difficoltoso rimuovere come
riportato alla (Sez. G 3).
Inserire le pastiglie nuove e relativa
molla (1). Infilare i perni di centraggio (2).
Checking brake pad wear
and changing brake pads.
Warning
Brake fluid will damage
painted surfaces if spilled on them.
In addition, it is very harmful in
contact with the skin or with the
eyes; in the event of accidental
contact wash the affected area
with abundant running water.
Important
On handing over the
motorcycle to the customer after
changing the brake pads, inform the
customer that the brake must be
used carefully for the first 100 km to
allow the friction material to bed in
completely.
Changing the front brake pads
Look through the slot between the
callipers to make sure the groove in
the brake pad friction material (3) is
still visible.
Important
If either of the pads is worn,
both pads must be changed.
Warning
Check the the fluid level in
the brake fluid reservoir is not above
the MAX otherwise it will not be
possible to push the pistons back
into their bores.
Change the brake pads as follows.
Press down on the centre (A) of clip (2)
and remove the pins (2) with pliers.
Remove the brake pad retaining clip (1)
from between the two calliper halves.
Force the calliper pistons back into
their bores by forcing the old brake
pads apart. Remove the worn pads.
Notes
Change pads that have a
shiny or “vitrified” appearance.
Notes
If it proves difficult to change
the brake pads, first remove the
calliper (Sect. G 3).
Insert the new pads and clip (1).
Insert the retaining pins (2).
2
1
A
3
A
3
1
2