A
B
C
D
E
F
G
H
L
M
N
P
Motore
Engine
sezione / section
N 4.5
95 749/749 DARK/749S - M.Y. 2005 - edizione/edition 00
Rimontaggio valvole
749S
Lubrificare lo stelo delle valvole di
aspirazione (14) e delle valvole di
scarico (11) con olio motore ed
introdurle nella testa.
Posizionare la testa sull'attrezzo
88713.2346 affinché le valvole
appoggino sul corrispettivo piano
in teflon.
Utilizzando il fermo (B) dell'attrezzo
cod. 88713.2068, mantenere
spinto verso il basso il bilanciere di
chiusura (4) ed inserire nello stelo
della valvola il registro di chiusura (7).
In caso di testa usata, partire con il
rimontaggio del registro originale.
Note
Pulire molto accuratamente i
semiconi con alcool prima di
procedere al montaggio.
Inserire la coppia dei semiconi (6) tra il
registro di chiusura (7) e lo stelo della
valvola, facendo scivolare lungo lo
stelo.
Posizionare il registro di apertura (5)
sulla sommità dello stelo e utilizzando
l'attrezzo 88713.2345 assestare
l'accoppiamento. Infilare il bilanciere
di apertura (3) nella feritoia ricavata
dell'attrezzo, appoggiare l'attrezzo al
bordo interno della testa e quindi
battere con un martello con battenti in
plastica sulla sommità dell'attrezzo.
Note
L'attrezzo è realizzato in modo
che la corsa venga arrestata dal
bilanciere di chiusura onde evitare
che urti il gommino o la testa,
entrambi danneggiabili.
Con l'attrezzo 041.1.191.1A serrare i
semiconi alla coppia di 10 Nm.
Attenzione
E' possibile utilizzare gli stessi
semiconi solo per 2 o 3 serraggi.
Procedere al rimontaggio degli alberi
distribuzione (Sez. N 4.4) ed
effettuare il controllo del gioco valvole
in chiusura e in apertura (Sez. N 4.1).
Nel caso il valore del gioco di chiusura
o di apertura non sia corretto,
è preferibile effettuare prima la
sostituzione dei registri e solo
successivamente dei semiconi.
Eseguire le stesse operazioni per
l'altra testa.
Rimontare le teste complete sul
blocco motore (Sez. N 4.5).
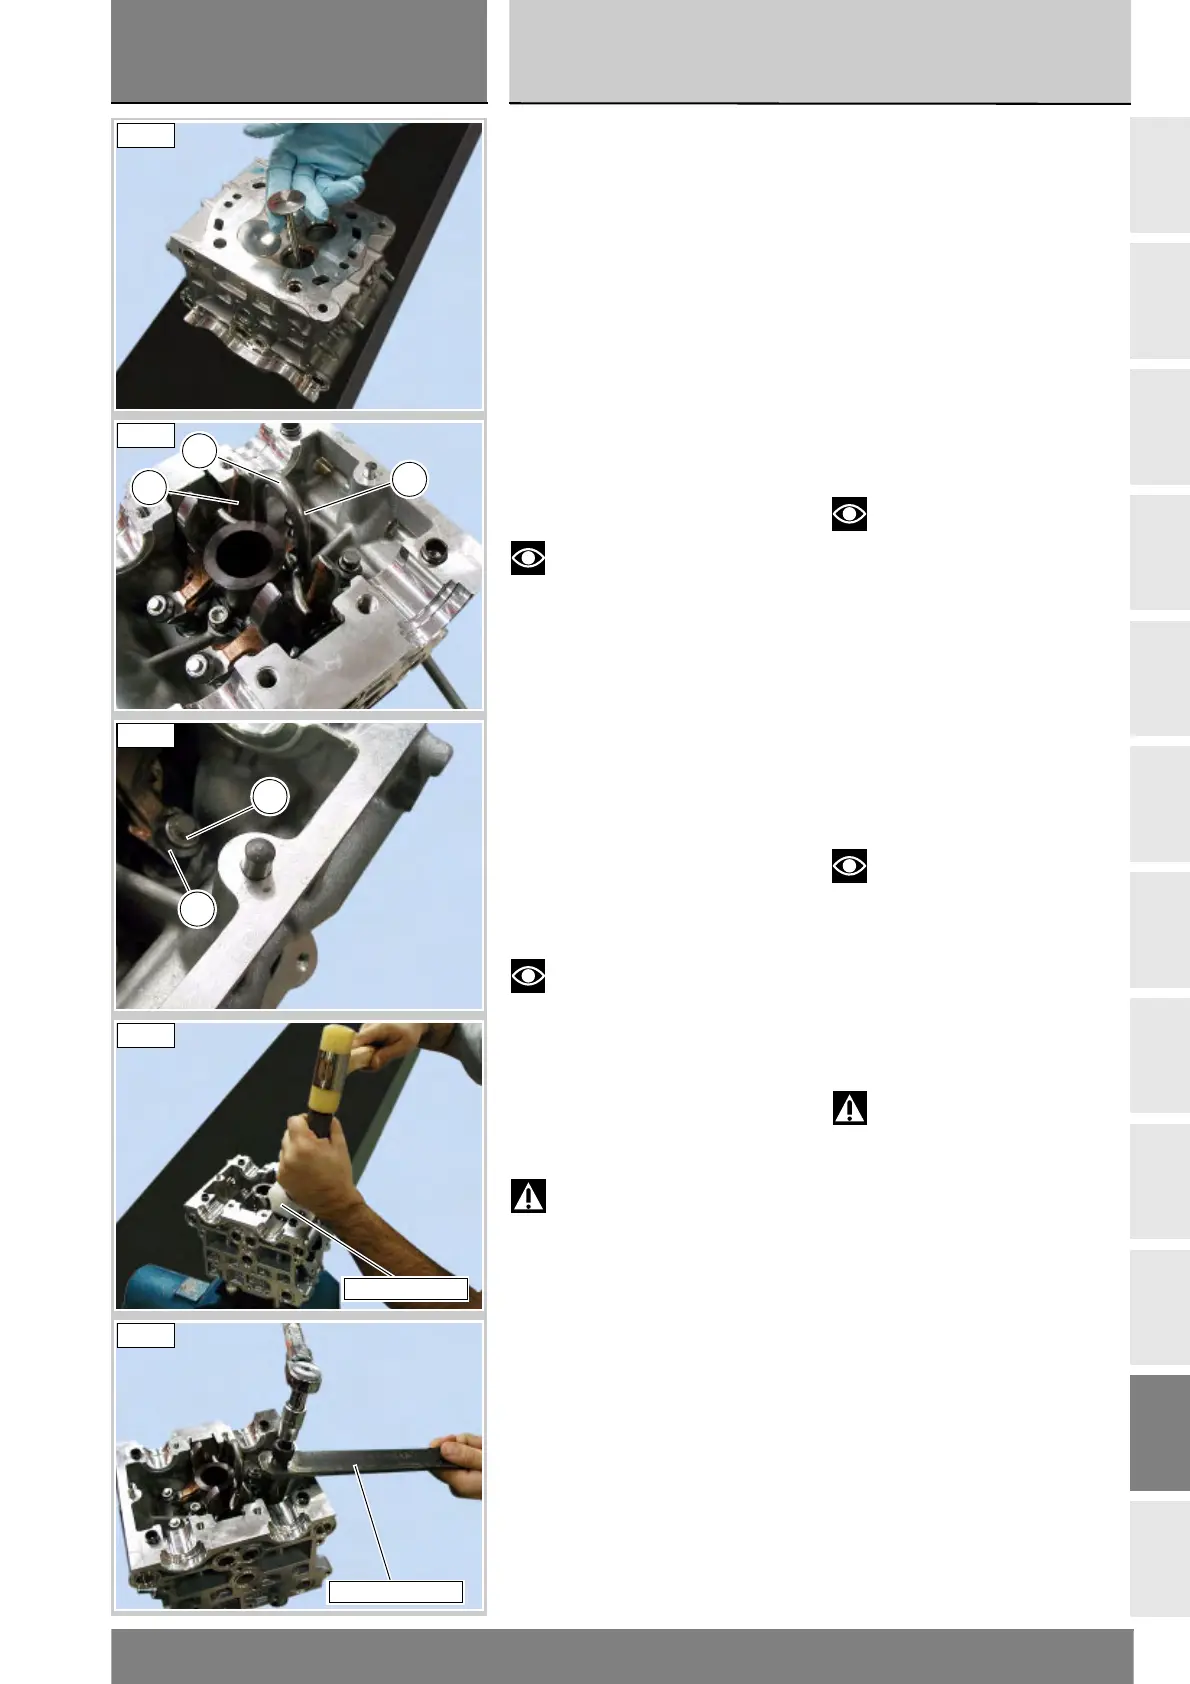
Refitting the valves -
749S
Lubricate the stems of the intake
valves (14) and exhaust valves (11)
with engine oil and fit them into the
head.
Position the head on tool 88713.2346
so that the valves are resting on the
respective Teflon surface.
Use the retainer (B) of tool part no.
88713.2068, to keep the closing
rocker arm (4) pushed down and fit
the closing shim (7) onto the valve
stem. If the head is worn, start by
reinstalling the original shim.
Notes
Thoroughly clean the valve
cotters with alcohol before fitting.
Insert the pair of valve cotters (6)
between the closing shim (7) and the
valve stem, and slide it along the stem.
Position the opening shim (5) on
the top of the valve, and use tool
88713.2345 to seat them. Insert the
opening rocker arm (3) in the slit in
the tool, place the tool on the inner
edge of the head and then tap the
top of the tool with a plastic-headed
hammer.
Notes
The tool is designed in such a
way that its travel is arrested by the
closing rocker arm so as to prevent it
from striking the rubber block or the
head, both of which are susceptible
to damage.
Using tool 041.1.191.1A, tighten the
valve cotters to a torque of 10 Nm.
Warning
The same valve cotters can be
used only 2 or 3 times.
Now refit the camshafts (Sect. N 4.4)
and check the clearance of the
valves when opening and closing
(Sect. N 4.1).
If the opening or closing clearance is
not correct, it is preferable to renew
the shims first and only then renew
the valve cotters.
Repeat the same procedure for the
other head.
Refit the complete heads on the
engine block (Sect. N 4.5).
749S
7
B
4
749S
6
7
749S
88713.2345
749S
041.1.191.1A
749S