A
B
C
D
E
F
G
H
L
M
N
P
Ruote - Sospensioni - Freni
Wheels - Suspensions - Brakes
sezione / section
G 8
53 749/749 DARK/749S - M.Y. 2005 - edizione/edition 00
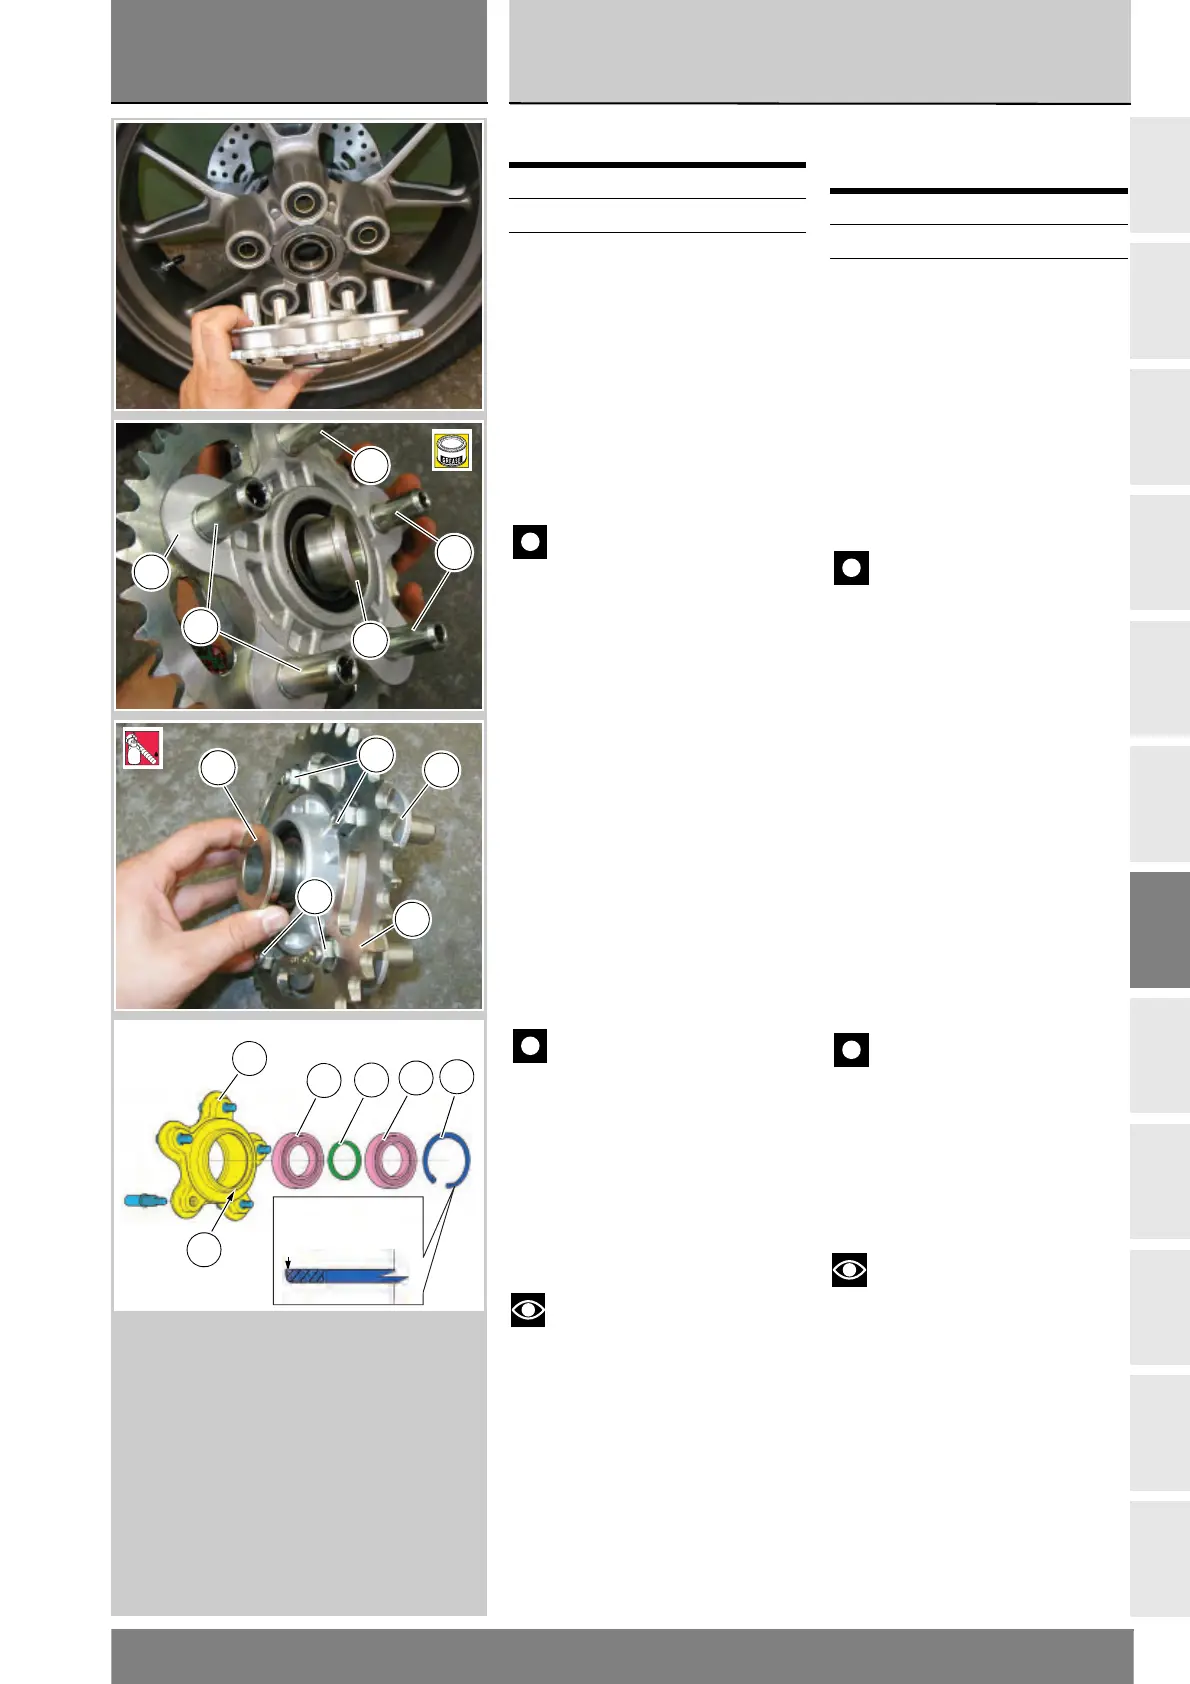
Sostituzione corona
Scomposizione corona
Sfilare la flangia porta corona (13)
completa dal cerchio ruota.
Sfilare la boccola (15) interna ed il
distanziale (10) esterno.
Tenere bloccati i perni (14) e svitare i
dadi (8) di fissaggio della corona (9)
alla flangia (13).
Importante
Le filettature dei perni (14) sono
sinistre.
Sfilare la corona (9).
Sostituzione cuscinetti flangia
portacorona
Rimuovere l’anello elastico (7).
Estrarre entrambi i cuscinetti (11)
mediante un adatto punzone, facendo
attenzione al distanziale interno (12).
Rimontaggio cuscinetti flangia
portacorona
Scaldare la flangia portacorona (13) ad
una temperatura di 180
÷200 °C.
Immediatamente dopo aver scaldato
la flangia, piantare fino a battuta i
cuscinetti (11), ponendo fra i
cuscinetti il distanziale (12).
Importante
Il distanziale deve essere
perfettamente in asse con l’anello
interno dei cuscinetti.
Installare l’anello seeger (7)
nell’apposita sede (A) sopra al
cuscinetto.
L’anello seeger deve essere orientato
in modo che il lato a spigolo vivo sia
rivolto verso l’alto.
Note
Prima di eseguire qualsiasi altra
operazione attendere che la flangia
portacorona torni a temperatura
ambiente.
Operazioni Rif. Sez.
Allentare la catena D 4
Rimuovere la ruota
posteriore
G 4
Replacing the rear
sprocket
Disassembling the rear
sprocket
Slide the complete rear sprocket
flange (13) off the rear wheel.
Slide off the inner bush (15) and outer
spacer (10).
Hold the pins (14) steady and undo
the nuts (8) securing the sprocket (9)
to the flange (13).
Important
Pins (14) have left-hand threads.
Remove the rear sprocket (9).
Replacing the rear sprocket
flange bearings
Remove the circlip (7).
Extract both bearings (11) with a drift,
taking care not to damage the inner
spacer (12).
Replacing the rear sprocket
flange bearings
Heat the rear sprocket flange (13)
to 180
-200 °C.
Immediately after having heated the
flange, drive the bearings (11) fully
home with the spacer (12) installed
between them.
Important
The spacer must be perfectly
square with the inner rings of the
bearings.
Install the circlip (7) in its groove (A)
above the bearing.
The circlip must be installed with its
sharp side facing upwards.
Notes
Wait for the rear sprocket
flange to return to ambient
temperature before proceeding.
Operation See Sect.
Slacken the chain D 4
Remove rear wheel G 4
13
14
14
15
14
B
13
10
8
8
9
2
LOCK
Lato con spigolo vivo
Sharp edge
13
11
12
11
7
A