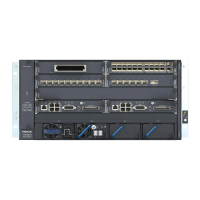
Installing a 7360 ISAM FX-8 shelf
244
ANSI Hardware Installation Manual
3HH-12893-AAAA-TCZZA Issue: 09
DRAFT
•
horizontal shelf mount kit containing:
• shelf horizontal brackets (x2)
• 12-24 × 1/2 in. (12.7 mm) screws
• 6-32 × 3/8 in. (9.53 mm) screws
• vertical shelf mount kit containing:
• rack adapter brackets
• pre-assembled top cross bracket, rear skirt and front skirt
• pre-assembled shelf horizontal mount bracket and air intake baffle/drip tray
• intumescent panel
• top baffle
• 12-24 × 1/2 in. (12.7 mm) screws
• M3 × 5/16 in. (8 mm) screws
• M3 × 9/16 in. (14 mm) screws
• M3 × 9/16 in. (14 mm) screws
• 12-24 × 1/2 in. (12.7 mm) screws
• fan unit (BFAN-E))
• 8 AWG power lug
• general facilities card, if replacing (NGFC-H)
• cables:
• 50-pin micro DSUB connector
• DB-9 connector
• RJ-45 connector
• 6-pin wire-wrap right angle header connector
• 120-pin FCI power blade connector
Procedure 50 To mount the 7360 ISAM FX-8 shelf horizontally in a 23 in. rack
Use this procedure to mount a 7360 ISAM FX-8 shelf horizontally in a 23 in. rack.
1 Unpack and inspect the shelf visually for physical damage.
2 If anything is missing or damaged, notify the transportation carrier and Nokia immediately.
Photograph all the damaged equipment. Keep all the inspection and packing documents as
a reference.
3 Put on the antistatic wrist strap and connect it to a grounding point.
4 Verify the 7360 ISAM FX-8 shelf mounting locations on the rack; see Figure 128.
Warning — Possibility of equipment damage.
Do not install damaged equipment, as it can adversely affect other
equipment.
 Loading...