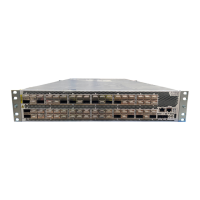
Removing a 16-Port QSFP+ Front Card from a QFX3008-I Interconnect Device
You can install up to eight 16-port QSFP+ front cards in a QFX3008-I Interconnect device.
The front cards are installed vertically in the front of the chassis in the slots labeled 0
through 7. See “Slot Numbering for a QFX3008-I Interconnect Device” on page 40.
CAUTION: Before you remove a front card, we recommend that you take it
offline to prevent the loss of data packets. See “Taking a 16-Port QSFP+
Front Card Offline in a QFX3008-I Interconnect Device” on page 351.
CAUTION: Do not lift modules by holding the ejector levers. The levers cannot
support the weight of the module. Lifting the module by the levers might
bend the levers, and the bent levers prevent the board from being properly
seated in the chassis.
Before you begin to remove a front card:
•
Ensure that you understand how to prevent ESD damage. See “Prevention of
Electrostatic Discharge Damage” on page 192.
•
(Recommended) Take the front card offline. See “Taking a 16-Port QSFP+ Front Card
Offline in a QFX3008-I Interconnect Device” on page 351.
Ensure that you have the following parts and tools available to remove a front card from
a QFX3008-I Interconnect device:
•
Electrostatic discharge (ESD) grounding strap
•
Antistatic bag or antistatic mat
•
Replacement front card or front card cover panel
To remove a front card (see Figure 114 on page 353):
1. Attach the ESD grounding strap to your bare wrist, and connect the strap to the ESD
point on the chassis.
2. Place the antistatic bag or antistatic mat on a flat, stable surface.
3. Pull both the ejector levers outward simultaneously, away from the faceplate of the
front card, until they go no further. This action causes the card to slide out of the
chassis slightly.
4. Grasp the handle on the faceplate of the front card with one hand, and pull the card
about halfway out.
5. Taking care not to touch the leads, pins, or solder connections, place the other hand
on the base of the front card to support its weight and slide it out of the chassis
completely.
Copyright © 2012, Juniper Networks, Inc.352
QFX3000 Hardware Documentation