05/2014
4-108
DC SC2020
56. DADF
Version 1.1
Disassembly/Assembly and Adjustment
ADJ 56.1.2 DADF Side Registration
Purpose
To adjust the original to the proper position (drum shaft direction) on
the Platen.
NOTE: The following adjustments must be made before carrying out
checking and adjustment.
• IOT Lead Edge/Side Edge Registration (ADJ 18.1.1)
• IIT Side Registration (ADJ 1.3.2)
• DADF Lead-Skew Adjustment (ADJ 56.1.1)
NOTE: DADF Side Registration is adjusted using the NVM for every
paper width.
Check
1. Place the Test Chart (499T283) such that there is no gap
between the chart and the DADF Guide.
2. Make a copy using the following settings in Copy mode. Take
this copy as the original.
• 1 to 1 Sided mode
• Paper Tray: "A3"
• Reduce/Enlarge: "100%"
• No. of Copies: "2"
3. Mark the output copies as ’1’ and ’2’ in the order of their output.
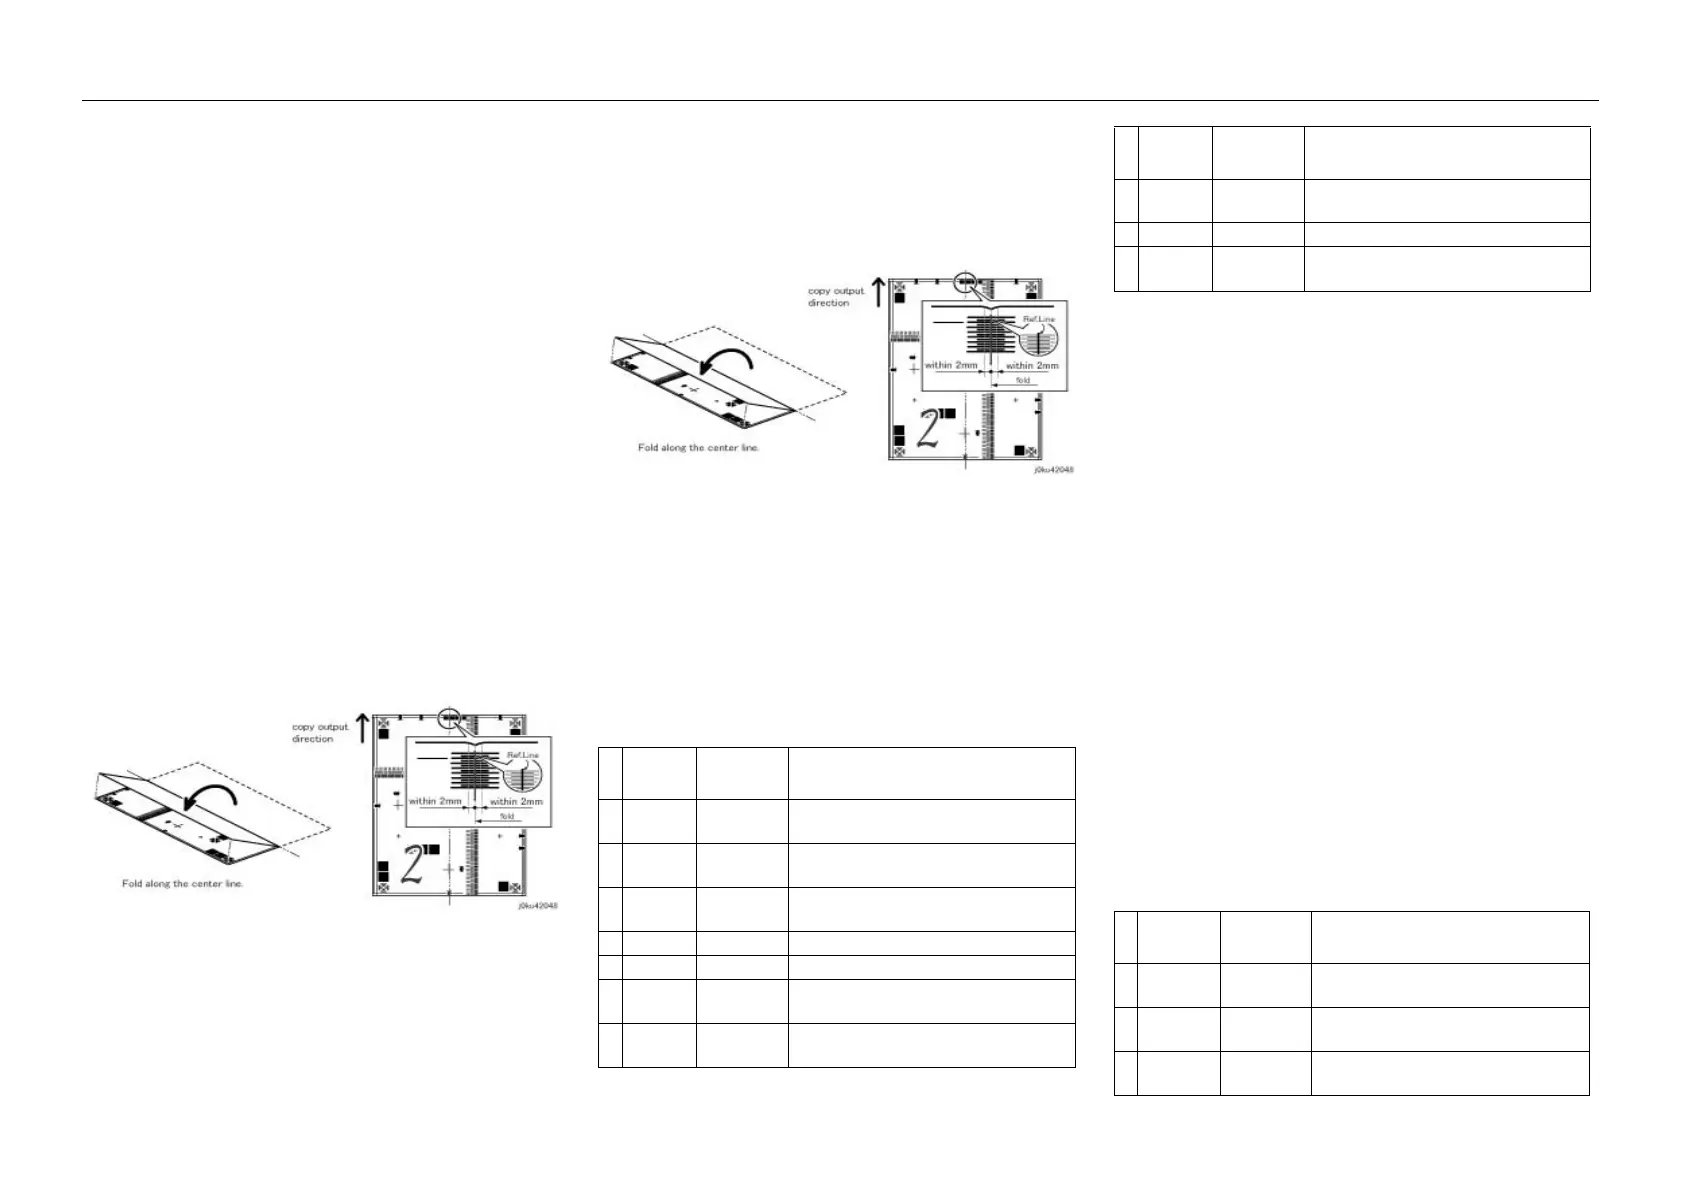
4. Make a Single Fold on the second copy. Check the fold line
with the reference line on the Test Chart. (Figure 1)
Figure 1 j0ku42048
5. Check that the fold line is within 2.0mm from the reference line.
If the value is not specified, carry out the following adjustment
procedure.
6. Place the Test Chart (499T283) on the DADF facing down with
the Test Chart fed from the lead edge.
7. Make a copy using the following settings in Copy mode.
• 2 to 1 Sided mode
• Paper Tray: "A3"
• Reduce/Enlarge: "100%"
• No. of Copies: "2"
8. Make a Single Fold on the two copies. Check the fold line with
the reference line on the Test Chart. (Figure 2)
Figure 2 j0ku42048
9. Check that the fold line is within 2.0mm from the reference line.
If the value is not specified, carry out the following adjustment
procedure.
Adjustment
• Side 1 Adjustment
1. Enter the CE Mode to perform correction for all sizes.
Enter the value to perform correction for all sizes in the
NVM [711-272].
2. Enter the value to perform correction for each size in the
NVM [715-056 to 072].
3. If it is not within the specified range in Check Step 5,
change the NVM value.
– By increasing the NVM value, the image moves
towards the right.
(an increment of 1 in NVM = 0.1 mm)
4. Repeat Check Steps 1 to 5 and Adjustment Steps 1 to 3
until the measurement is within the specified range.
• Side 2 Adjustment
1. After adjusting for 1 Sided copies, place Side 1 of the Test
Chart face down and make copies using the following set-
tings to check the Side Registration for 2 Sided copies.
– Paper Tray: "A3"
– Reduce/Enlarge: "100%"
– No. of Copies: "2"
– 2 Sided: 2 -> 1 Sided
2. Check the Side Regi of the 2 copies with the above-men-
tioned items in "Check".
3. If adjustment is required, enter the CE Mode to perform
correction for all sizes, and then adjust each document
size width using the following NVM.
Enter the value to perform correction for all sizes in the
NVM [711-274].
Table 1 Side 1 of 1 Sided or 2 Sided mode
NVM
Document
Width Document Size
1 711-272 For all
sizes
For all sizes
2 715-056 139.7~148
mm
A5 SEF, 5.5x8.5" SEF
3 715-058 182~194m
m
B5 SEF, 16K SEF
4 715-060 203.2mm 8x10" SEF, 8x10.5" SEF
5 715-062 210mm A4 SEF, A5 LEF
6 715-064 214.9~215.
9mm
Letter SEF, Legal SEF, 5.5x8.5" LEF,
8.46x12.4" SEF, 8.5x13" SEF
7 715-066 254~257m
m
B4 SEF, B5 LEF, 8x10" LEF
8 715-068 266.7~267
mm
16K LEF, 8K LEF, 8x10.5" LEF
9 715-070 279.4mm Letter LEF, 11x15" SEF, 11x17" SEF
1
0
715-072 297mm A4 LEF, A3 SEF
Table 2 Side 2 of 2 Sided mode
NVM
Document
Width Document Size
1 711-274 For all
sizes
For all sizes
2 715-057 139.7~148
mm
A5 SEF, 5.5x8.5" SEF
3 715-059 182~194m
m
B5 SEF, 16K SEF
Table 1 Side 1 of 1 Sided or 2 Sided mode
NVM
Document
Width Document Size

 Loading...


