6 Data Management on P30
If a project is scanned onboard the data has to be transferred from the Scanner to a computer
for further processing. In the MMI -
Management menu
the projects available on the internal
HDD can be edited. Then the data can be transferred.
There are 3 different ways transferring the data from the scanner. Transferring the data via:
•
USB device
•
WiFi connection with Data Copy Tool
•
Ethernet connection with Data Copy Tool
Ethernet with the Data Copy Tool is the fastest and most secure option.
6.1 Data Transfer via USB device
Make sure that the used USB-device has enough free space to store the data.
Remove the P30’s USB dust protection cap and plug in USB drive.
Some USB devices (e.g. HDDs) have high power consumption. Make sure the
scanner has enough power for the transfer left or use an external power supply
for the USB drive.
When the status bar is showing both the external memory device and the status with a green
arrow the transfer can be started.
There are two ways to transfer the dataset:
a)
From the
Main Menu
go to
Manage | Projects
press
Trans
,
select the project and start the transfer with
Cont
.
b)
From the
Main Menu
go to
Tools | Transfer | Projects
select the project from the scroll
bar and start the transfer with
Cont
.
Depending on the project’s size it may take a while to proceed. During the transfer the
“do not remove” icon is shown in the status bar. When the transfer is finished the green
arrow is shown again and the USB device can be removed.
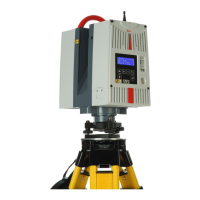
The data on the USB device is stored in following structure:
Figure 53
The collected data can now be imported into Cyclone.