SEQUENCER > Home 0–1: Mixer
445
If MIDI Clock (GLOBAL 1–1a) is set to “Internal,” the
above tempo setting (040.00–240.00) is used. If you’ve
selected Auto, operation will automatically switch from
Internal to External if MIDI Clock data is received from an
external MIDI device connected to the MIDI IN connector,
and this indication will appear.
Note: You can set the tempo by pressing the TAP button at
the desired interval.
Note: If Tempo is selected as an alternate modulation source,
= 120.00 will be the base value.
To record tempo changes
First, set Track Select to a MIDI Track.
Press the SEQUENCER REC button to enter recording-
standby mode, you will be able to select REC.
Set Tempo M ode to REC, start recording, and change the
system tempo. You can also vary the tempo by pressing the
TAP button at the desired timing.
This cannot be selected when the Preferences page item
Recording Setup is set to Loop All Tracks.
When you change the “ (Tempo)” value while recording, the
tempo changes will be recorded, causing the tempo to
change as the song progresses.
You can’t record tempo changes during audio recording.
Tempo changes can also be created using the “MIDI Event
Edit” or “Create Control Data” menu commands.
Note: If you wish to record only the tempo changes, set
Recording Setup (0–5a) to Overdub, and the tempo will be
recorded on the master track without being affected by the
musical data of Track Select.
Song Select [000…199]
Select the song that you want to record or play back.
Either select the song name from the popup menu.
When the Song Select window is open, you can use the Find
button to search for Songs by name. For more information,
see “Find dialog” on page 7.
Selecting a new song
Choose a Song from the popup menu whose name starts with
“New Song,” to specify the song number and press the
ENTER button to open the dialog box. Then use the Set
Song Length menu command (on P4: Track Edit) to specify
the number of measures in the song, and press the OK
button.
Note: You can use Set Song Length to change the length of
a song at any time. For instance, when creating a new song
you might set the length to be somewhat longer than
necessary, and then after you have finished recording and
editing, use Set Song Length to specify the correct length.
If MIDI Clock (GLOBAL 1–1a) is set to Internal (or
Auto, if no MIDI clocks are being received), changing
the song will cause Song Select and Song Position
Pointer messages to be transmitted.
If MIDI Clock is set to External MIDI or USB (or Auto
MIDI or USB, if MIDI clocks are currently being
received), the NAUTILUS will change songs in response
to received Song Select messages.
When the song changes, tracks whose track Status is
EXT, EX2 or Both will transmit Bank Select, Program
Change, Volume, Pan, Portamento, Send1, 2, Post IFX
Pan, and Post IFX send 1, 2 messages on their respective
MIDI channels.
Track Select[MIDI Track01…MIDI Track16, Master
Track, Audio Track01…Audio Track16]
MIDI Track 01–MIDI Track 16: Select the MIDI track that
you want to record. This is also where you make your
selection when editing a MIDI track in Track Edit page.
When Multi Rec is off, this also selects the record-enabled
track.
When Multi Rec is on, the Play/Rec/Mute buttons (0–1b,
0–2a) select the record-enabled tracks, regardless of the
Track Select setting.
Use Track Edit– MIDI Track Name page, Audio Track
Name page to give the track a descriptive name.
If other tracks are set to the same MIDI channel as the
selected track, and their Status is set to INT or Both,
they’ll be controlled by the keyboard as well.
Also, if other tracks are set to the same MIDI channel as
the selected track, and their Status is set to EXT, EX2, or
Both, they’ll transmit MIDI to external devices. For
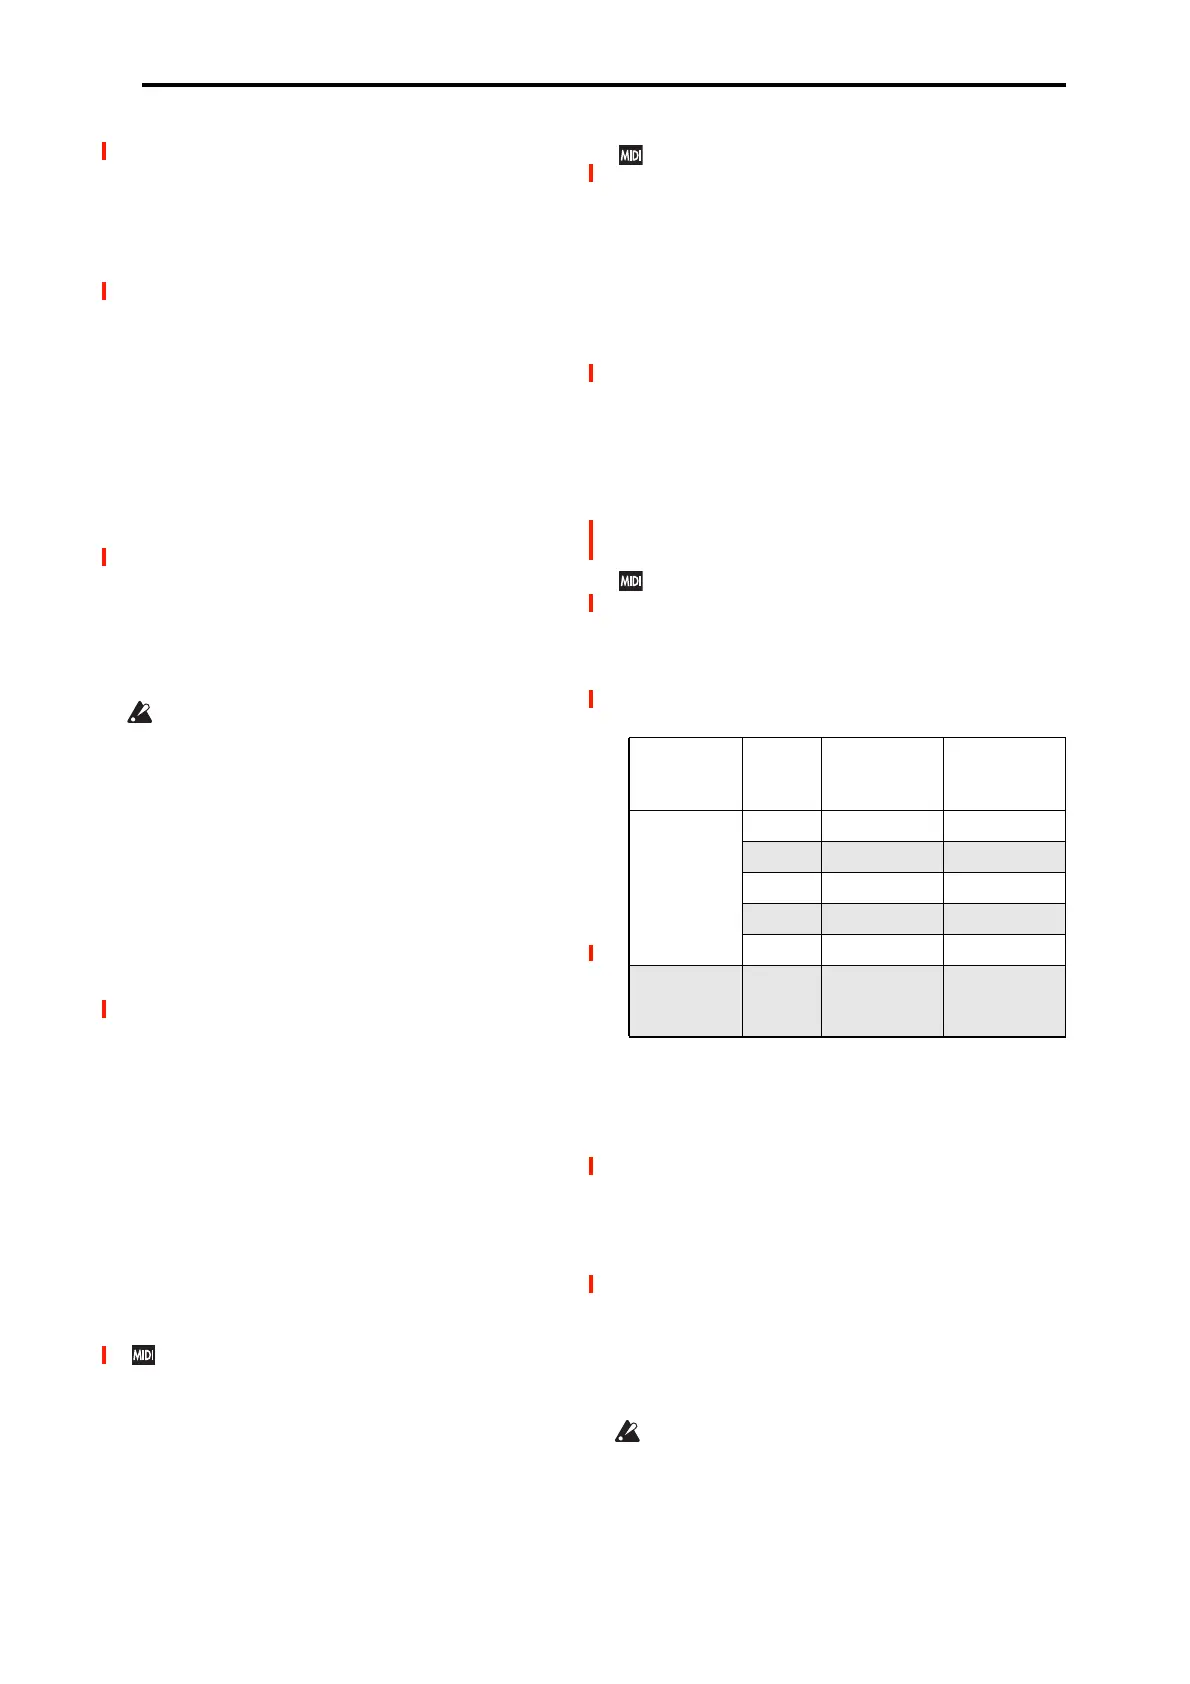
another look at this, see the table below.
If you’ve selected Master Track or Audio Track 01–16,
the settings of the most recently selected MIDI track will
be used.
Master Track: Select the master track if you want to use the
Track Edit page menu commands to edit the master track.
You cannot perform realtime recording or step recording on
the master track by itself.
Audio Track 01…Audio Track 16: Select the audio track
you want to record. You will also select one of these when
you want to edit an audio track in Track Edit page, etc.
In the same way as for MIDI tracks, the data will be recorded
on the selected track if you’re using single-track recording.
If you want to perform multi-track recording, turn on Multi
REC (0–1a), and use the Play/Rec/Mute buttons (0–1b, 0–
2a) to select the tracks you want to record.
You can record up to four audio tracks simultaneously.
MIDI
Channel
Status
Keyboard
plays Internal
Sounds
Keyboard
Transmits
MIDI Out
Same as the
selected MIDI
Track
OFF No No
INT Yes No
EXT No Yes
EX2 No Yes
Both Yes Yes
Different from
the selected
MIDI Track
Any
setting
No No

 Loading...


