SEQUENCER > Home 0–6: Recording Setup
457
Auto Punch In Start Measure [M001…M999]
Auto Punch In End Measure [M001…M999]
When Recording Setup is set to Auto Punch In, specify the
measures at which recording will start and end.
Loop All Tracks
Select this method when you wish to repeatedly record a
specified area of a track, and continue adding data. This is
suitable for creating drum patterns, etc.
If you select Loop All Tracks, the display will indicate
“M***–M*** (Loop Start Measure–Loop End Measure)” at
the right, allowing you to specify the range of measures that
will be recorded repeatedly.
Press the SEQUENCER REC button and then the
SEQUENCER START/STOP button, and playback will
occur until the specified measure is reached. Then, recording
will occur repeatedly over the specified area (“Loop Start
Measure”–“Loop End Measure”). Previously-recorded data
will remain, and the new data will be added. This applies
only to MIDI data.
While recording, you can check “Remove Data” to delete
unwanted data.
You can’t record audio events to audio tracks while using
Loop All Tracks. If you set Track Select to an audio
track, and leave “Automation Only” (0–5b) unchecked,
you won’t be able to start recording. Checking
“Automation Only” will allow you to start recording so
that you can record automation events d. You can use
“Remove Data” to delete audio track automation events.
If Multi REC is checked, this parameter will not be
available.
Loop Start Measure [M001…M999]
Loop End Measure [M001…M999]
Specifies the range of measures over which recording will
repeat when Recording Setup is set to Loop All Tracks.
Remove Data [Off, On]
Use this to delete unwanted MIDI data or audio track
automation events that you recorded while using Loop All
Tracks. This is available when Recording Setup is set to
Loop All Tracks.
On (checked): You can delete unwanted MIDI data while
recording with Loop All Tracks. During recording, press the
key (note number) that corresponds to the MIDI data you
wish to delete. All occurrences of that note number will be
deleted for the interval that you continue holding down the
key. Controller data can also be erased in a similar way. For
example while you move and hold the joystick in the X
(horizontal) direction, bender data will be erased. This
applies to Joystick+Y (CC#01)/–Y (CC#02), Joystick X
(Pitch Bend).
Also, you can press and hold down the SEQUENCER
REC button to delete all MIDI data for as long as the key
is held.
If you want to delete audio track automation events, check
“Automation Only” (0–6b), choose Loop All Tracks, and
begin recording. Then check “Remove Data” (0–5a) and
hold down the SEQUENCER REC button to delete the
automation events that occur while you’re holding down that
switch.
0–6b: Recording Setup (Audio Track)
Automation Only [Off, On]
On (checked): Only audio track automation events will be
recorded. Audio events will not be changed.
Off (unchecked): Both audio track automation events and
audio events will be recorded.
Auto Input [Off, On]
This switches the monitor channel (REC Source/ track
playback) for the audio track selected in Track Select. See
the table that follows.
If “Multi REC” is on, this applies to all tracks whose
Play/Rec/Mute is set to REC.
On (checked): When performing auto/manual punch-in
recording, the audio track selected in Track Select will be
monitored via its REC Source during the measures being
recorded, and the track playback will be monitored during
measures that are not being recorded.
For the audio tracks not selected in Track Select, you will
always be monitoring the track playback.
When performing auto/manual punch-in recording with
“Multi REC” on, audio tracks whose Play/Rec/Mute is set
to REC will be monitored via REC Source during the
measures being recorded, and will automatically switch to
monitoring the track playback during measures that are not
being recorded.
For the audio tracks that are not set to REC, you will always
be monitoring the track playback.
Off (unchecked): The audio track selected in Track Select
will always be monitored via its “REC Source.”
For the audio tracks not selected in Track Select, you will
always be monitoring the track playback.
If “Multi REC” is on, you will always be monitoring the
REC Source of audio tracks whose Play/Rec/Mute is set to
REC.
For the audio tracks that are not set to REC, you will always
be monitoring the track playback.
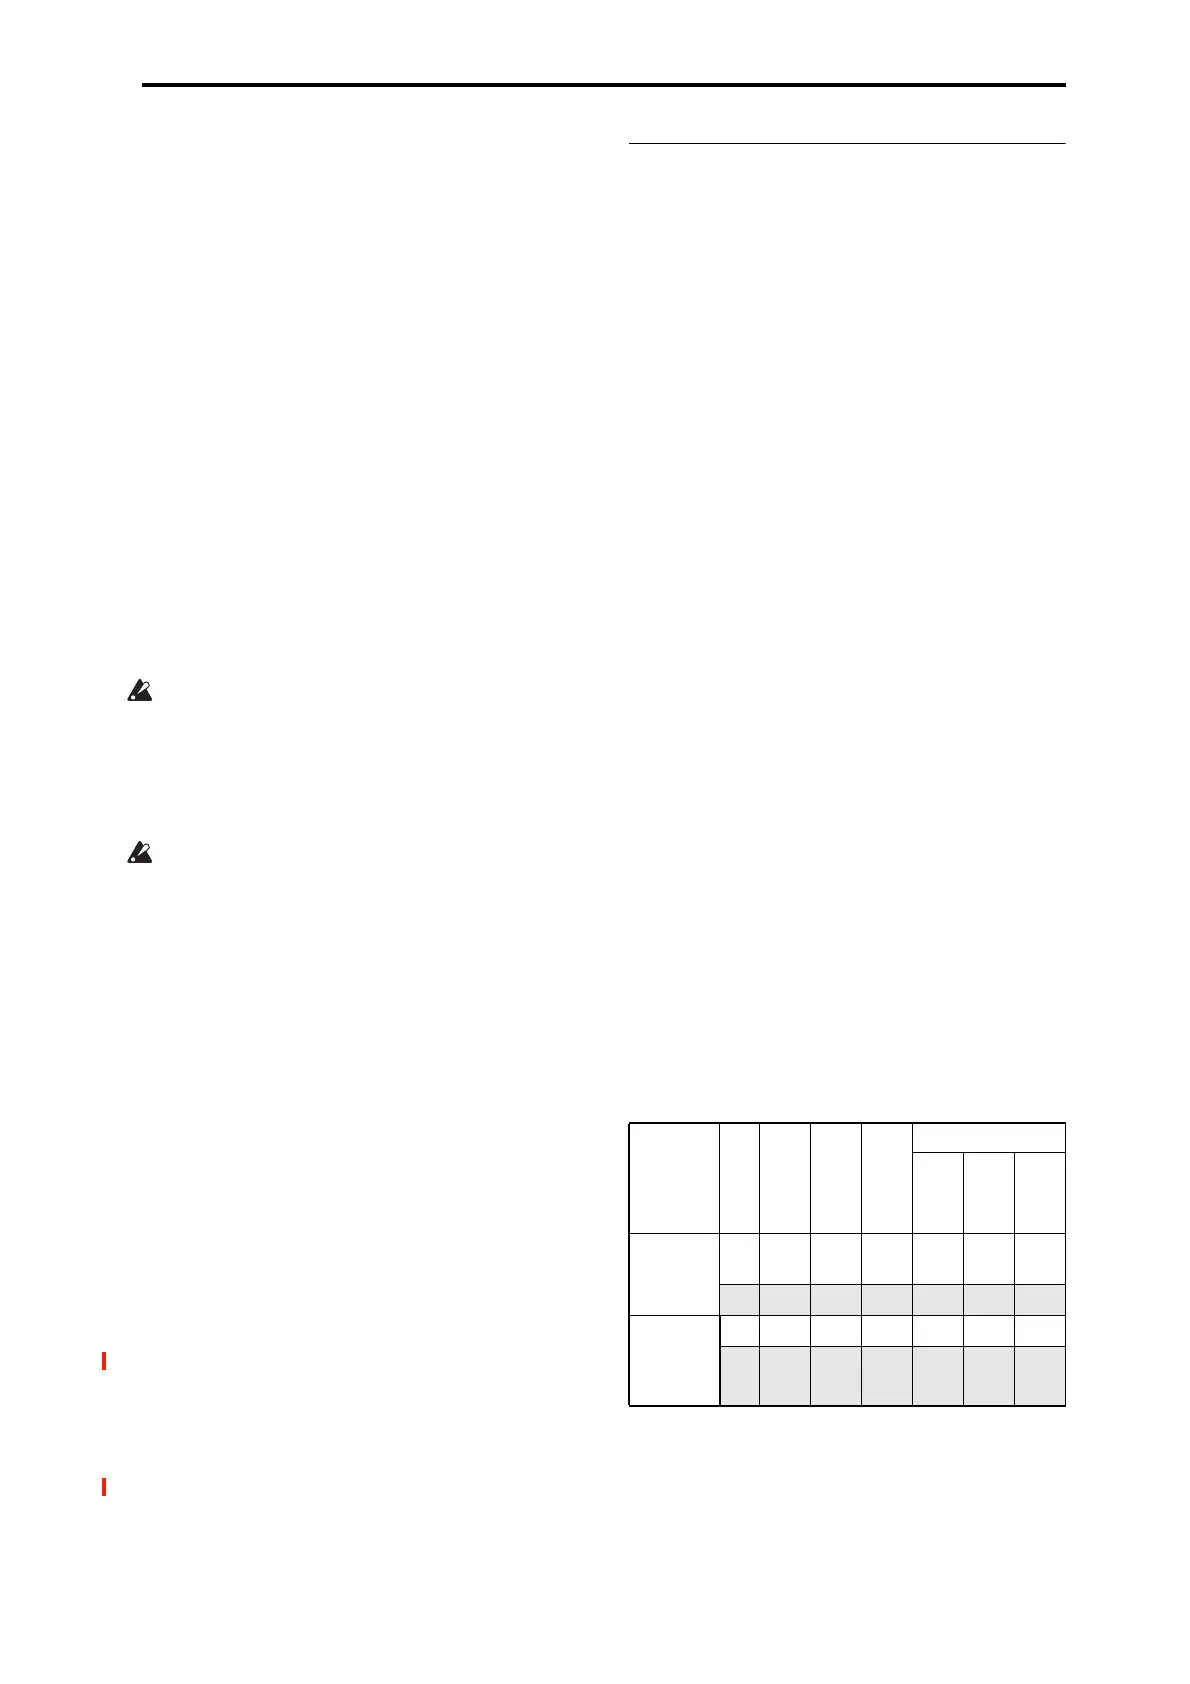
Audio track monitor channels
(Line: REC Source, Track: track playback)
Source Direct Solo [Off, On]
On (checked): Only the signal of the bus line specified by
REC Source will be output to the L/R jacks and the
headphone jack. Check this if you want to monitor only the
sound that’s being recorded. When using Multi REC, you’ll
hear the sound from the REC Source buses whose
Play/Rec/Mute setting is set to REC.
Auto Input
During Stop
During Play
During Rec
During Punch Rec
…In
In…Out
Out…
Track Select
track
On Line Track Line Track Line
Track
*
Off Line Line Line Line Line Line
Tracks
other than
“Track
Select”
On Track Track Track Track Track Track
Off Track Track Track Track Track Track
 Loading...