SEQUENCER mode
546
specify the number (“No.”). To quantize all control
changes, select All.
After Touch: Quantize both Channel Pressure and
Polyphonic Key Pressure messages.
Pitch Bend: Pitch bend data will be quantized.
Program Change: Program change data will be
quantized.
5. In “Resolution,” specify the timing resolution to
which the data will be corrected.
Lower resolutions can save memory, but if you set it too
low, the timing may not be acceptable.
6. In “Offset,” specify the number of clock ticks by
which the data will be moved forward or backward
relative to the standard timing.
48 is a 16th-note; 96 is an 8th-note. Positive (+) settings
move the timing forwards, and negative (–) settings move
it backwards. This allows you to “push” or “drag” the
beat.
7. In “Intensity,” specify the degree of sensitivity to
which the timing will be corrected; i.e., how close to
the locations specified by step 5 and 6 the data will be
moved.
With a setting of 0, no correction will take place. With a
setting of 100, the data will be moved all the way to the
timing intervals specified by step 5 and 6.
By varying the Offset and Intensity settings, you can
create quantization effects such as the following:
8. Use “Swing” to add a sense of swing to the rhythm.
For example, this is an easy way to give a slight shuffle
groove to a “square” 16-beat rhythm.
Settings other than 0% will adjust the positions of notes
at even-numbered beats relative to the specified
“Resolution.”
With a setting of +100%, notes will be moved one third
of the way toward the specified “Resolution.” With a
setting of +300%, notes of even-numbered beats will be
moved all the way to the next even-numbered beat.
By varying the Swing settings, you can create effects
such as the following:
9. To execute the Quantize command, press the OK
button. To cancel, press the Cancel button.
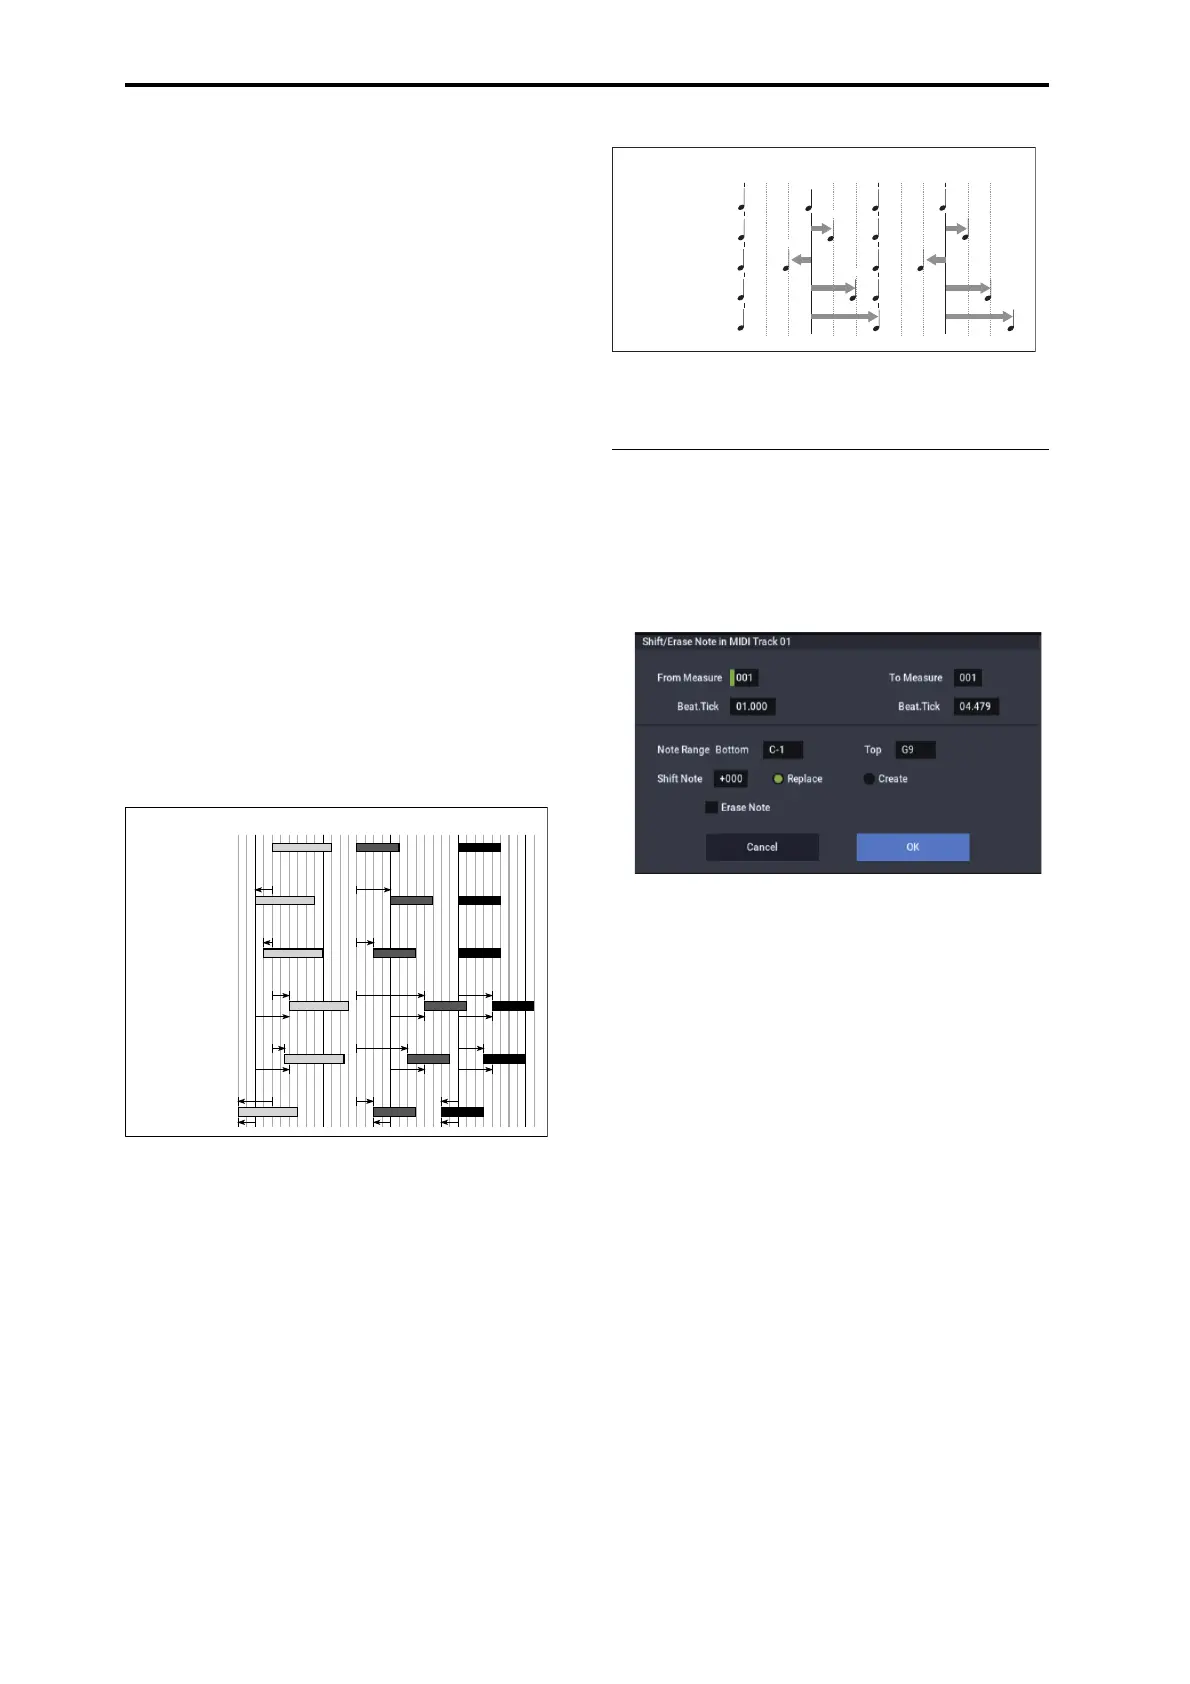
Shift/Erase Note
This command shifts (moves) or erases the specified note
numbers in a specified MIDI track and range of measures.
1. In Track Select, select the MIDI track on which you
wish to execute the Shift/Erase Note command.
2. Select “Shift/Erase Note” to open the dialog box.
3. Specify the range in which you wish to shift or erase
note numbers.
In From Measure and To End of Measure, specify the
measures. In Beat.Tick, specify the beat and clock. (By
default, From Measure and To End of Measure will be
the range that you specified in the Track Edit page.)
4. Specify the range of notes that you wish to shift or
erase.
Note Range: Bottom specifies the lower limit, and Top
specifies the upper limit. If you wish to edit all notes, set
Bottom to C–1 and Top to G9. These settings can also be
made by holding down the ENTER button as you play a
note.
• Shifting notes
5. In “Shift Note,” specify the amount by which you wish
to move the note.
The amount of shift is set in semitone steps over a range
of –127–+127. +1 will shift the note a semitone upward.
6. Select either “Replace” to move the note numbers, or
“Create” to generate additional notes.
For example if you are editing a track that uses a drum
program, you can use “Replace” to exchange the current
snare sound for a different snare sound assigned to a
different key, or use “Create” to add a sound effect at a
different note # to the snare sound. Alternatively, you can
use “Create” to add an octave doubling to an existing
guitar phrase, etc.
7. To execute the Shift Note command, press the OK
button. To cancel, press the Cancel button.
Original
Quantize Resolution =
Offset = 0, Intensity = 100%
Quantize Resolution =
Offset = 0, Intensity = 50%
Quantize Resolution =
Offset = +48, Intensity = 100%
Quantize Resolution =
Offset = +48, Intensity = 75%
Quantize Resolution =
Offset = –24, Intensity = 100%
100%
100%
50% 50%
100%
75%
100%
100% 100%
75% 75%
100% 100%
100%
100%
50%
50%
100%
+48
+48 +48
+48
75%
100%
+48+48
–24
–24
–24
+48 +48
100%
100%
+48
+48
+48
+48
75%
75%
100% 100%
Resolution= のとき
Swing=0%
Swing=+100%
Swing=-100%
Swing=+200%
Swing=+300%
+100
0%
+200
+300
-100
1拍 2拍 3拍 4拍

 Loading...


