SAMPLING mode
626
would set Beat to 4. The Source BPM will be calculated
automatically. If the Source BPM is not calculated as
120.00 due to inaccuracies in the start address (or loop
start address) or end address, adjust Source BPM to the
correct value of 120.00.
Next, set New BPM to 150.00. The Ratio will be
calculated automatically.
It is not possible to make settings that would cause
Source BPM or New BPM to exceed the range of 40.00–
480.00.
It is not possible to make settings that would cause Ratio
to exceed the range of 50.00–200.00.
Depending on the sample, the length may not be exactly
as you specify, due to limitations in processing accuracy.
7. To execute the Time Stretch operation, press the OK
button. To cancel without executing, press the Cancel
button.
When you press the OK button, the Time Stretch dialog
box will appear.
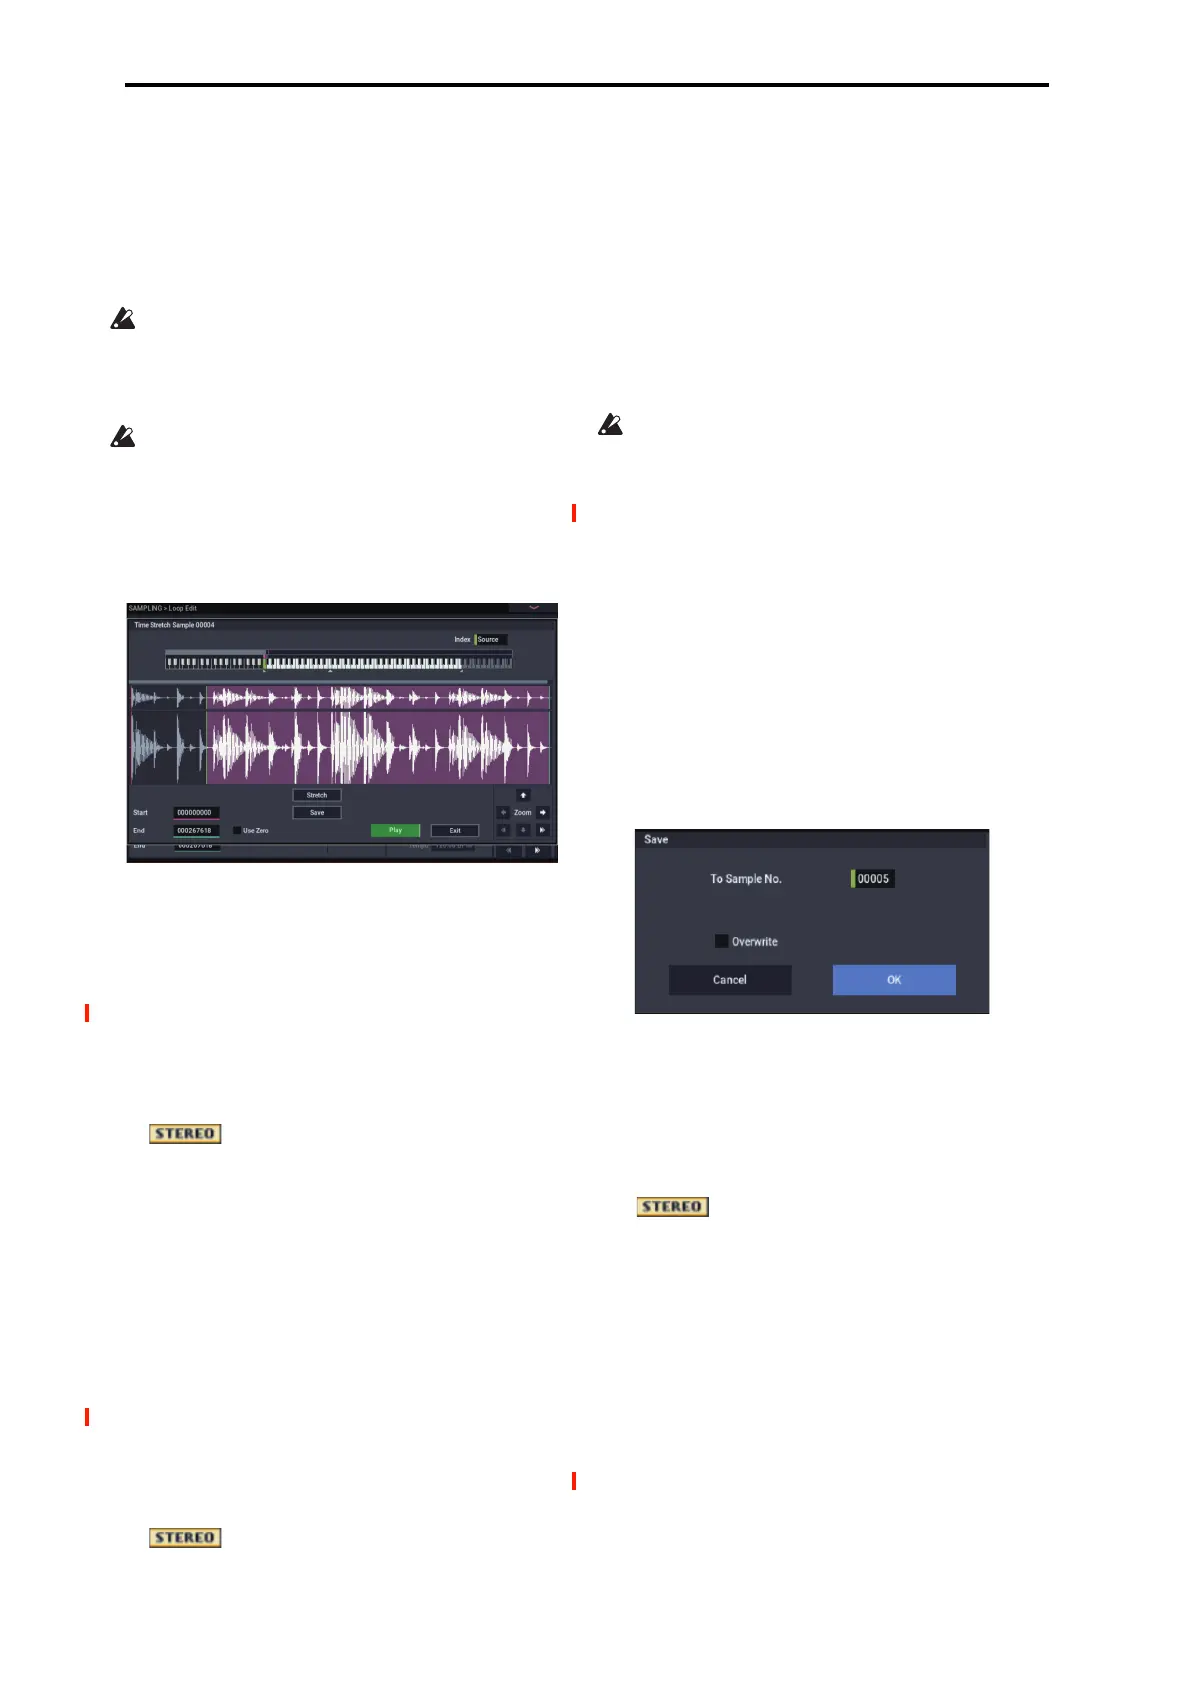
8. Audition the sample that was created by Time Stretch.
The sample before being time-stretched is assigned to the
C2 note of the keyboard, and the sample that was time-
stretched is assigned to C#2. You can change the Index to
check the waveform.
Keyboard: This shows the multisample that is used
temporarily in this dialog box.
When you play the keyboard, this multisample will
sound. It will behave just as in normal pages (e.g., the
Recording page). (0–1a)
In the case of a stereo sample, a stereo
multisample will be used temporarily. The sample at each
index will sound in stereo.
Index [Source, Result]
Selects the index for the sample whose waveform you
wish to display.
If you select Source, the original waveform before time-
stretching will be selected.
If you select Result, the time-stretched sample will be
selected.
You can also select the index by holding down the
ENTER button and pressing a note on the keyboard. The
index that includes that note will be selected.
Sample waveform display: This shows the waveform of
the selected sample. As in 2–1: Loop Edit, the Start, Loop
Start, and End addresses are shown by a solid line.
In the case of a stereo sample, the L channel
sample data will be displayed above, and the R channel
data below.
ZOOM: This controls horizontal and vertical zoom
in/out for the waveform shown in the “Sample waveform
display.” (1–1f)
Start:
End:
Specify the start address and end address of the sample
for the currently selected index.
When you execute Time Stretch, the addresses will be
specified automatically, but the playback may be slightly
skewed due to inaccuracies in the end address, etc. If this
occurs, you can correct the addresses manually.
When you change the start address, the loop start address
will also be changed simultaneously. If you wish to
independently adjust the start address and loop start
address, save the data in step 10, and then make settings
in the Loop Edit page.
To audition the sound in the specified range, play the
keyboard or press the SAMPLING START/STOP button.
When you press the SAMPLING START/STOP button,
the sample in the range specified by Start and End will
sound at the original key.
Use Zero: (1–1d)
9. If you press the Stretch button, the Time Stretch
dialog box will appear, and you can re-do the time
stretch once again. Execute Time Stretch as described
in step 6.
10.Save the sample that you created. Press the Save
button, and the Save dialog box will appear.
In “To Sample No.,” specify the save destination sample
number. By default, an unused sample number will be
selected. If Overwrite is checked, this cannot be
selected.
If Overwrite is checked, the sample number will be fixed
to the current sample, and cannot be changed. See “About
Overwrite” on page 605.
For stereo samples, use “Save to No.(L)” and
“(R)” to specify the save-destination of the L and R
channels.
To execute the Save operation, press the OK button. To
cancel without saving press the Cancel button.
11.By repeating steps 9–10 you can create more samples
as desired.
12.Press the Exit button to exit the Time Stretch
operation.
The index will specify the last-saved sample number.
Note: If you to use the saved sample in PROGRAM
mode or SEQUENCER mode, you can use the Convert
MS To Program menu command, or you can select that
multisample for the “2–1c: OSC1 Multisample/Wave
Sequence” or “2–5: OSC2 Basic” parameters “MS1”–
“M4” (if “Type” = Multisample)
and create a program.

 Loading...


