SEQUENCER: Page Menu Commands Audio Event Edit
537
If you check “Trim Audio Event Start,” editing the
“Start” value will simultaneously modify the location
(Measure and “Beat Tick”) of the audio event. Check
this option if you want to adjust the length without
changing the position at which the entire event will
sound. This will operate in the same way as if “Trim
Region Start” is checked in step 4.
The region will be modified when you press the Done
button. If you press the Cancel button, the region will not
be modified.
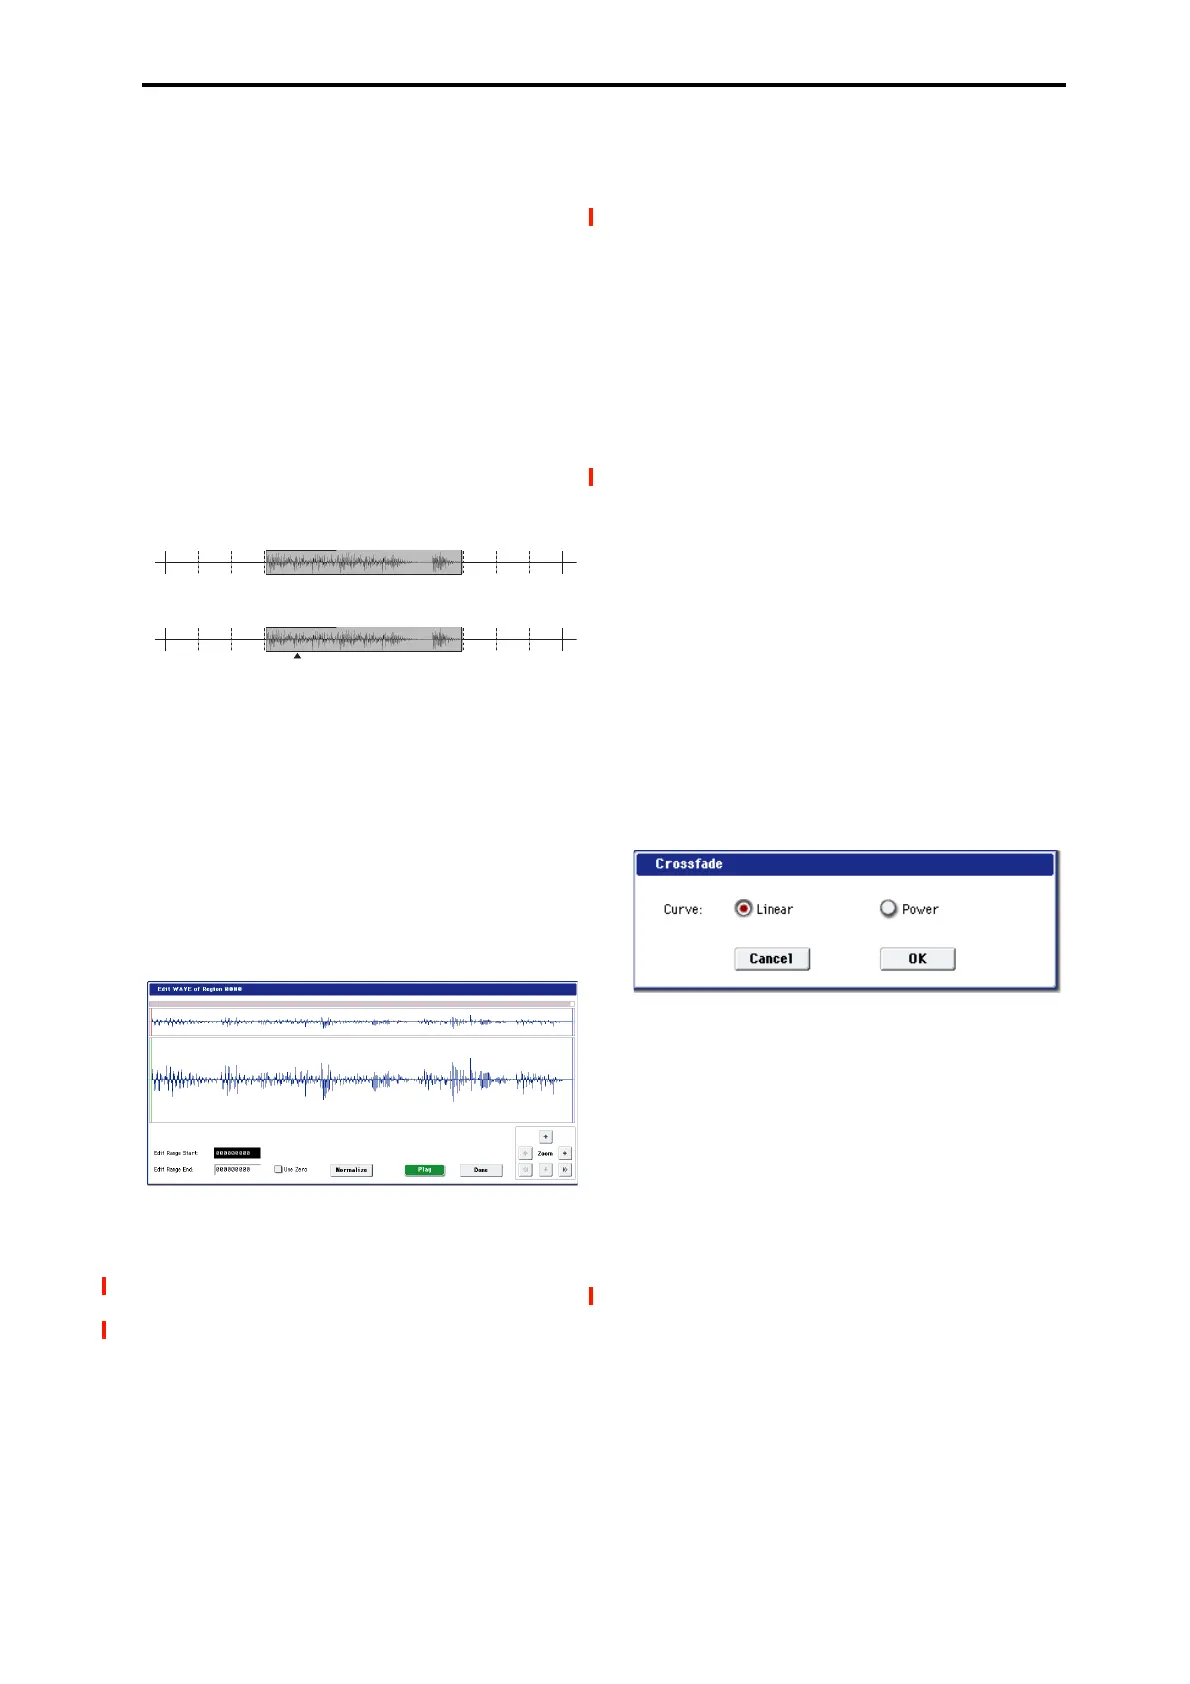
8. “Set Anchor”: This sets the anchor point at the
beginning of the first measure from where the audio
event is placed.
Select the event that uses the region in which you want to
specify an anchor point, and press the Set Anchor button.
For more about how to use anchor points, refer to step 4.
Note: If you want to edit the anchor point that is
automatically set here, use TRIM to make adjustments in
units of samples.
Tip: For example, you can specify the anchor point as the
starting location of a region. Then you can turn on “Use
Anchor,” and easily place that phrase at the beginning of
another measure.
9. Edit the waveform data of the WAVE file assigned to
the region.
Select an event that uses the region you want to edit, and
press the Edit button to open the edit dialog box.
WAVE file waveform display, ZOOM
This area displays the waveform of the WAV file assigned
to the region. the waveform display and ZOOM buttons
operate in the same way as in SAMPLING mode, except
that the displayed data is a WAVE file. Refer to the
SAMPLING mode sections “1–1c: Sample waveform
display” on page 586 and “1–1f: ZOOM” on page 587.
Edit Range Start [0000000…230399998]
Edit Range End [0000001…230399999]
“Edit Range Start” and “Edit Range End” set the range of
the waveform that will be edited.
This range is highlighted in the “WAVE file display.” To
audition the selected region, press the PLAY or
SAMPLING START/STOP buttons.
Use Zero [Off, On]
On (checked): When you set “Edit Range Start” or “Edit
Range End,” you will only be able to select zero-cross
points; i.e., addresses at which the waveform level is at
the center “zero” line. Use the VALUE dial, or +/−
buttons to move to the previous or next zero-cross
address. If you use the numeric keypad to enter a value
directly, you will move to the zero-cross point that is
nearest that value.
Off (unchecked): You can adjust the “Edit Range Start”
and “Edit Range End” address in units of 1. This is the
normal mode of operation.
Normalize
This command processes a WAVE file in the same way as
the “Normalize/Level Adj.” menu command in
SAMPLING mode. For more information, see
“Normalize/Level Adjust” on page 617.
The “Normalize” command applies a uniform change to
the sample levels between “Edit Range Start” and “Edit
Range End.” It boosts the level of the sample data in the
specified range as much as possible without causing it to
clip. If the data was sampled at a low level, you can use
this command to increase the dynamic range of the
sample data. You can use Level to raise or lower the level
as necessary.
10.“Crossfade”: This creates an event in which the
volume is gradually modified
in the area where two
audio events overlap, causing them to be mixed.
Edit the location and end location so that the two events
overlap. Then select the first of the two events, and press
the Crossfade button to display the dialog box.
Use “Curve” to specify how the volume will change in
the crossfaded portion.
Linear: The volume will change linearly.
Power: The volume will change in a non-linear power
curve. Sometimes, using the Linear setting will produce
the impression that the volume is less during the middle
of the curve. If so, use the Power curve.
Press the OK button to execute the crossfade, or press the
Cancel button if you decide to cancel.
11.When you’re finished with audio event editing, press
the Done button.
By selecting the page menu command “Compare”, you
can return to the state prior to your audio event editing
operations.
Measure
004 005 006 007
Use Anchor=O
Edit: Set Anchor
M=005, BT=01.000
Use Anchor=O
M=004, BT=04.000
Anchor
Point

 Loading...


