SAMPLING: Page Menu Commands Crossfade Loop
629
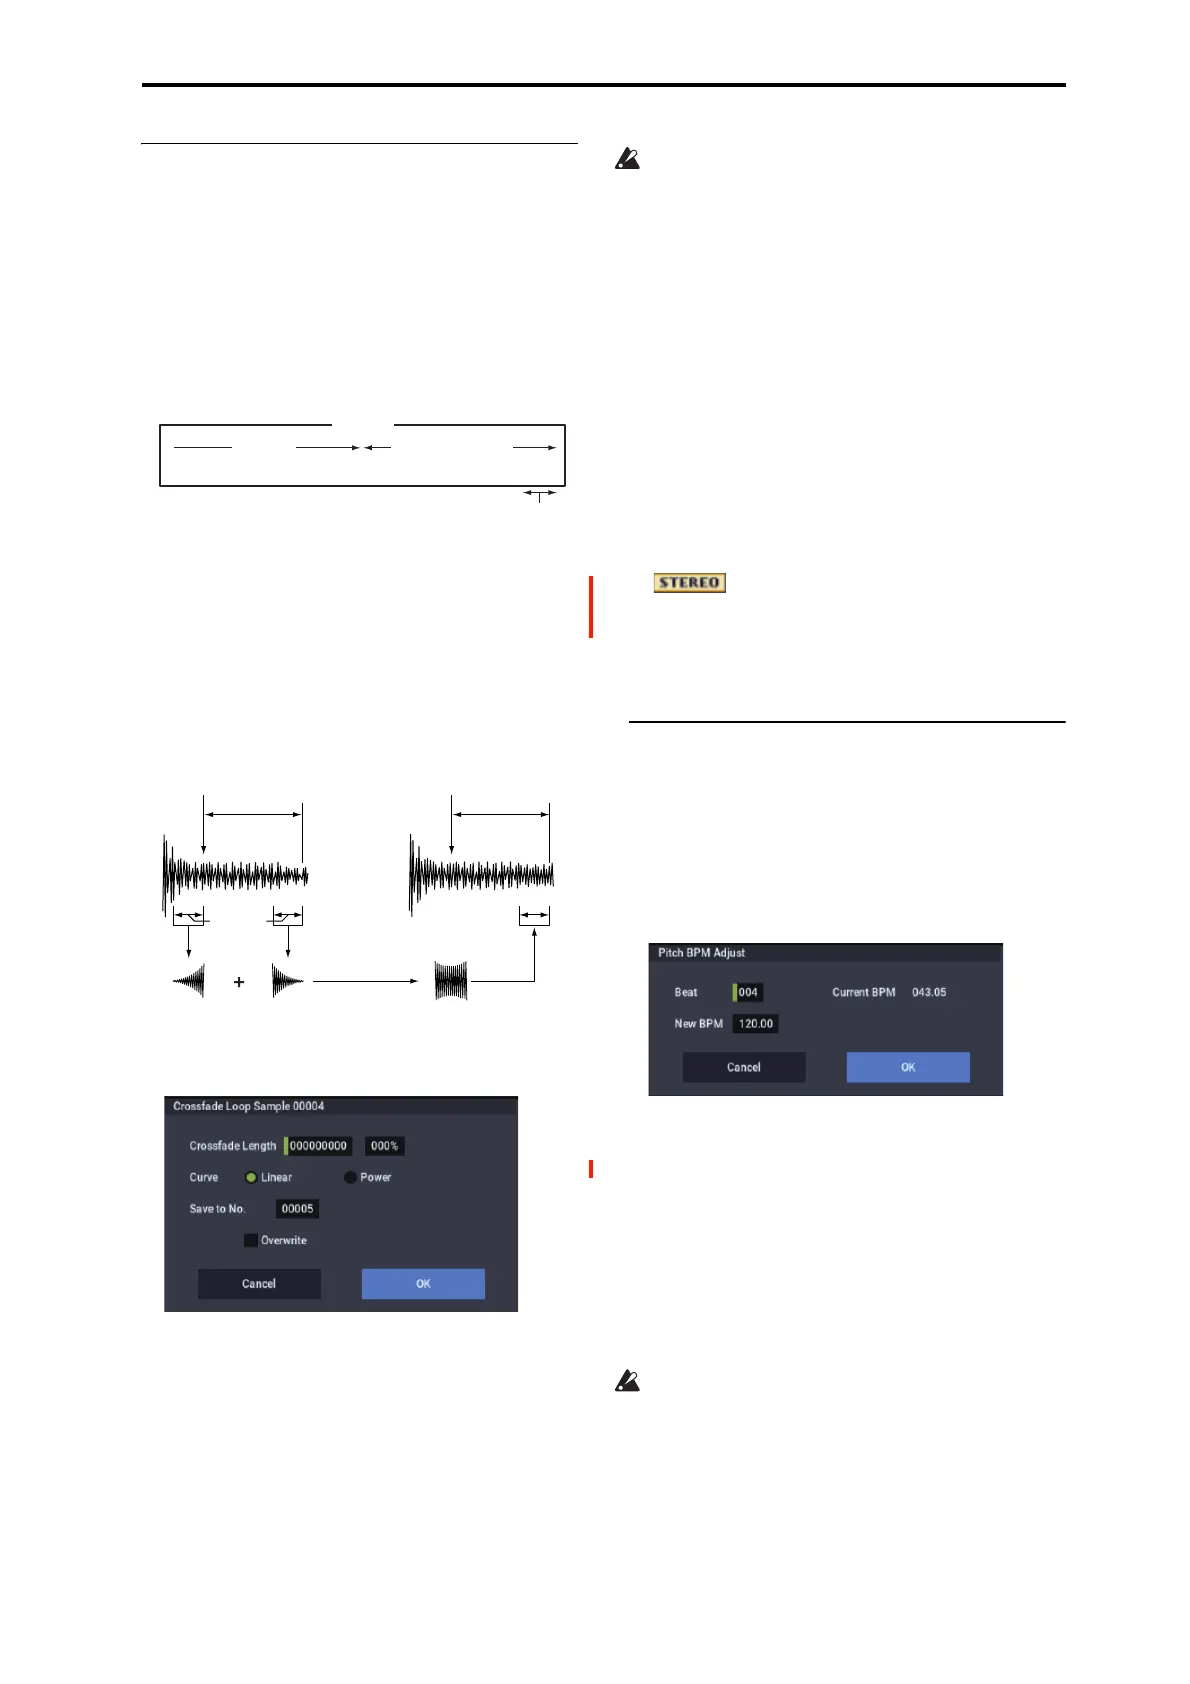
Crossfade Loop
When looping a pitched instrument sample of a complex
sound such as strings or woodwinds to make the sound
sustain, it is necessary to create a long loop to preserve the
rich character of the sound. Crossfade Loop can be used to
minimize the difference in sound between the two regions to
create a natural-sounding loop.
In order to solve such problems, Crossfade Loop causes the
sound to change gradually from the end to the beginning of
the loop.
In actuality, the sample data is created as follows.
A specific length (the Crossfade Length) of the waveform
immediately before the beginning of the loop is taken and
mixed with the end portion.
At this time, the waveform level of the portion immediately
before the end (the length specified by Crossfade Length)
will gradually decrease, and the waveform level immediately
before the beginning of the loop will gradually increase as
the two are mixed.
1. Select the sample that you wish to Crossfade Loop.
2. Select Crossfade Loop to open the dialog box.
3. In Crossfade Length, specify the length of the sample
that you wish to crossfade.
If you set this as %, Crossfade Length will be calculated
automatically. Specify the proportion of the Crossfade
Length relative to the length between the loop start and
loop end. If you set this to 50%, crossfade will be
performed on the second half of the region between loop
start and loop end.
If the length from the beginning of the sample to the loop
start is shorter than the length from the loop start to the
loop end, Crossfade Length can be set only up to the
length from the beginning of the sample to the loop start.
In this case, a setting of 100% will not be possible.
4. Set “Curve” to specify how the volume will change in
the crossfaded region.
Linear: The volume will change linearly.
Power: The volume will change non-linearly. Sometimes
a setting of Linear will produce the impression that the
volume has dropped in the middle of the curve. In such
cases, use Power.
5. In Save to No., specify the save destination sample
number. By default, an unused sample number will be
selected.
If Overwrite is checked, the sample number will be fixed
to the current sample, and cannot be changed. See “About
Overwrite” on page 605.
For stereo samples, use “Save to No.(L)” and
“(R)” to specify the save-destination of the L and R
channels.
6. To execute Crossfade Loop, press the OK button. To
cancel without executing, press the Cancel button.
Pitch BPM Adjust
This command sets the Pitch (3–1b) of the selected index on
the basis of a BPM value. Raising the pitch of sample
playback will increase the playback speed. Lowering the
pitch will slow down the playback speed. This can be used to
match the loop length etc. of the sample to a tempo of the
desired BPM value.
1. Select Pitch BPM Adjust to open the dialog box.
2. Specify Beat. This is specified in quarter-note beats.
3. Current BPM will show the BPM value at the base
key (displayed in green). This BPM value is calculated
automatically from the start address to the end
address of the sample (if looping is off) or from the
loop start address to the end address (if looping is on).
For example if the start and end address of the sample are
two seconds apart, the original key is specified as the
base key, and Beat is set to 4, Current BPM would be
120.00. If Beat is set to 2, the display would indicate
Current BPM as 60.00.
It is not possible for this display to exceed the range of
40.00–480.00.
4. In New BPM specify the BPM value that will result
from the conversion of the Current BPM value.
5. To execute the Pitch BPM Adjust command, press the
OK button. To cancel, press the Cancel button.
When you execute this command, the Pitch (3–1b) value
will be set automatically. For example if you modify a
Sound
Playback Repeated playback
(first half of loop) (second half of loop)
Gradually changes to first half
Loop
Start
Loop
End
Crossfade
Length
Loop
Start
Loop
End

 Loading...


