A
B
C
D
E
F
G
H
L
M
N
P
Motore
Engine
sezione / section
N 9.2
177ST3 - M.Y. 2004 - edizione/edition 00
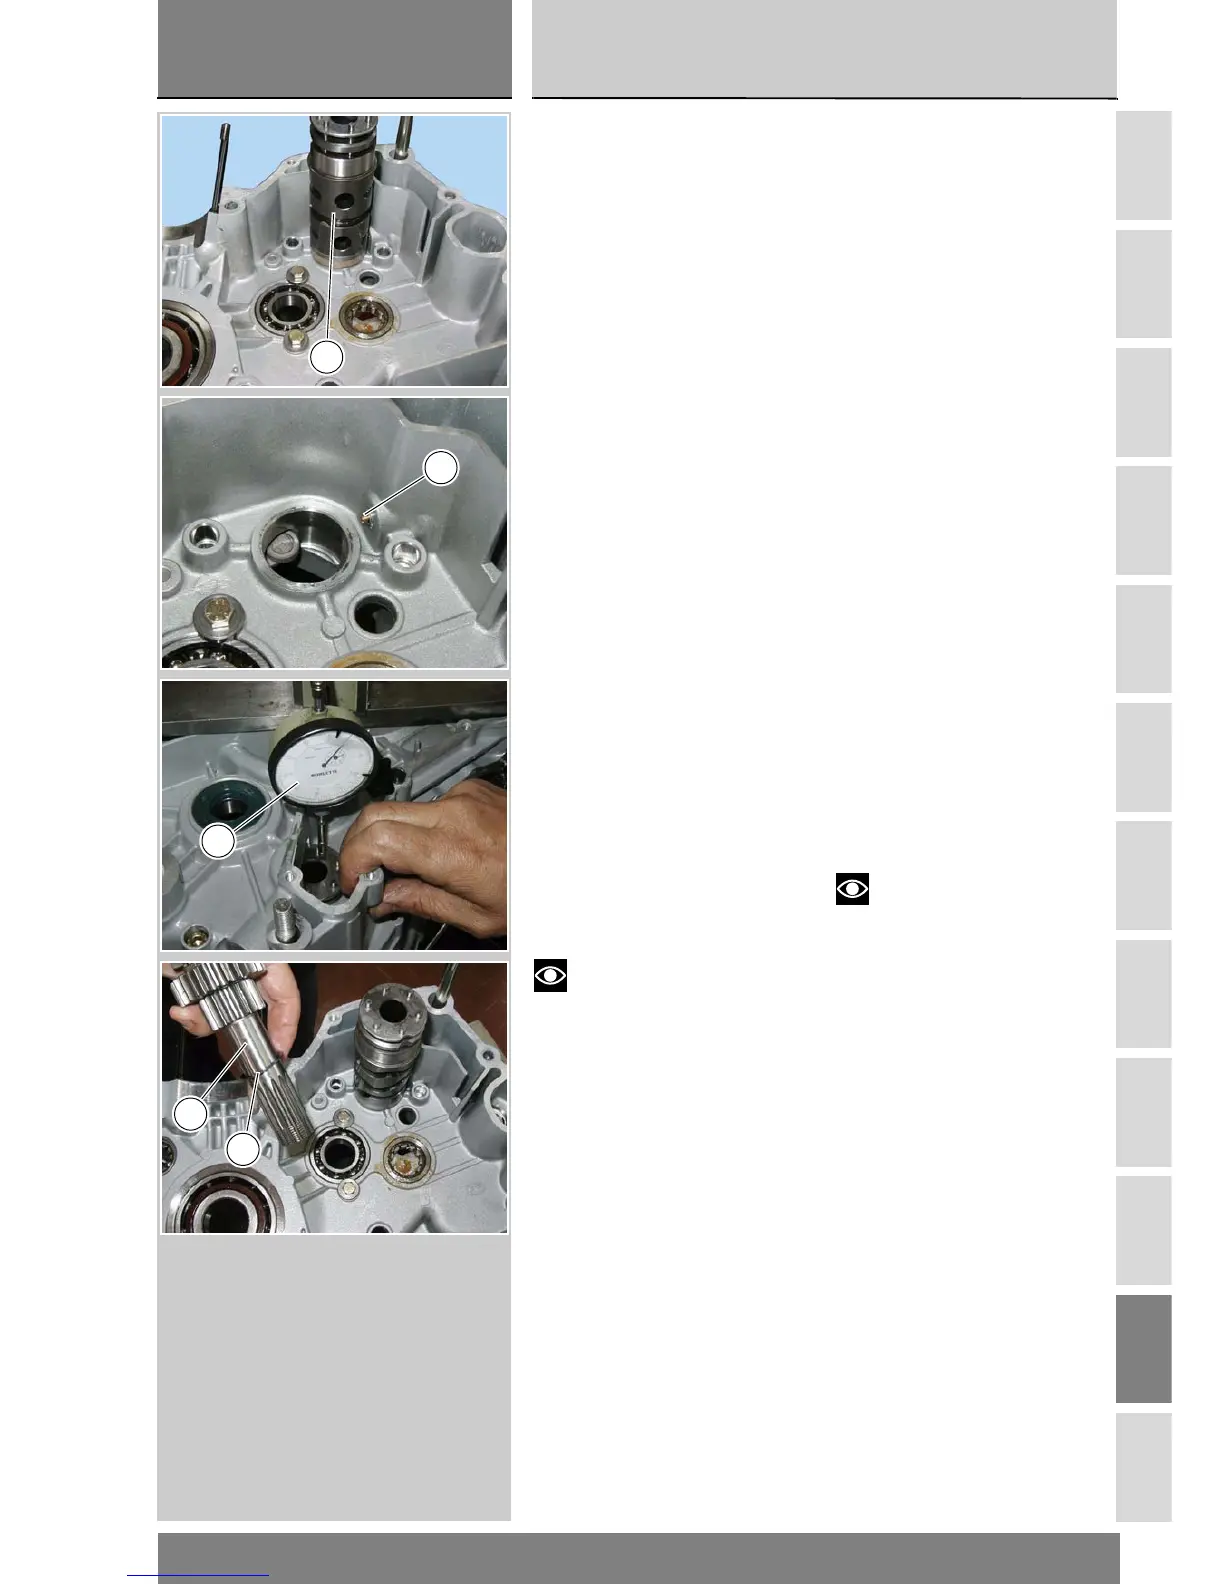
Metodo pratico per determin-
are gli spessori del tamburo
cambio e alberi cambio
Oltre a quanto riportato, illustriamo
anche una pratica procedura che per-
mette di determinare correttamente
gli spessori del tamburo cambio (E) e
gli spessori dell’albero primario e
dell’albero secondario.
Inizialmente determinare il gioco as-
siale del tamburo senza spessori.
Aprire il carter, togliere l’albero mo-
tore con le spessorazioni corrette,
precedentemente calcolate.
Per non danneggiare l’interruttore del
folle (N), prima di inserire il tamburo
nel carter, rimuoverlo.
Inserire il tamburo senza spessori e
fissare il semicarter bloccando alcune
viti in prossimità del tamburo.
Posizionare un comparatore (T) con
base magnetica utilizzando una pias-
tra di appoggio fissata al carter mo-
tore. Sistemare il tastatore in
appoggio sull’estremità del tamburo e
azzerare il comparatore in questa po-
sizione. Fare leva sul tamburo e rilev-
are il gioco totale assiale,
considerando che il gioco finale deve
essere compreso tra 0,10 e 0,40 mm.
Determinare gli spessori da ag-
giungere.
Il gioco totale dovrà essere diviso per
due per ottenere il medesimo spes-
sore dei rasamenti da posizionare su
ogni lato del tamburo cambio.
Note
E’ preferibile che il valore otte-
nuto sia prossimo ai 0,40 piuttosto
che ai 0,10 mm.
Riaprire i carter e inserire gli spessori
calcolati ai lati del tamburo cambio.
Per quanto riguarda l’albero primario
cambio (G), come punto di partenza
utilizzare un rasamento (L) dello stes-
so spessore determinato per il tambu-
ro cambio.
Practical shimming procedure
for the selector drum and
gearbox shafts
Following is a practical shimming
procedure for gearbox selector drum
(E), primary and secondary shaft.
Firstly, measure end float of the
selector drum with no shims.
Separate the casings and remove the
crankshaft with its shims (crankshaft
has been shimmed previously).
Extract the neutral switch (N) before
fitting the selector drum into the
casing to avoid damage to the switch.
Position the selector drum with no
shims. Secure the casing by fitting a
few screws in the holes near the
drum position.
Place a dial gauge (T) with magnetic
base on a support plate fixed to
crankcase.
Bring stylus in contact with selector
drum end and set dial gauge to zero
with the stylus touching the drum.
Lever drum and note dial gauge
reading. This will be total end float.
Determine the amount of shimming
required to obtain a final end float
between 0.10 and 0.40 mm.
Divide total play by two to determine
the amount of shimming required on
each side of the selector drum.
Note
Final end float should be closer
to 0.40 rather than 0.10 mm.
Separate the casings and insert the
necessary shims on each side of the
selector drum.
To shim the gearbox primary shaft
(G), begin with a shim (L) of the same
size used for the selector drum.
E
N
T
G
L