A
B
C
D
E
F
G
H
L
M
N
P
Ruote - Sospensioni - Freni
Wheels - Suspensions - Brakes
sezione / section
G 2
17ST3 - M.Y. 2004 - edizione/edition 00
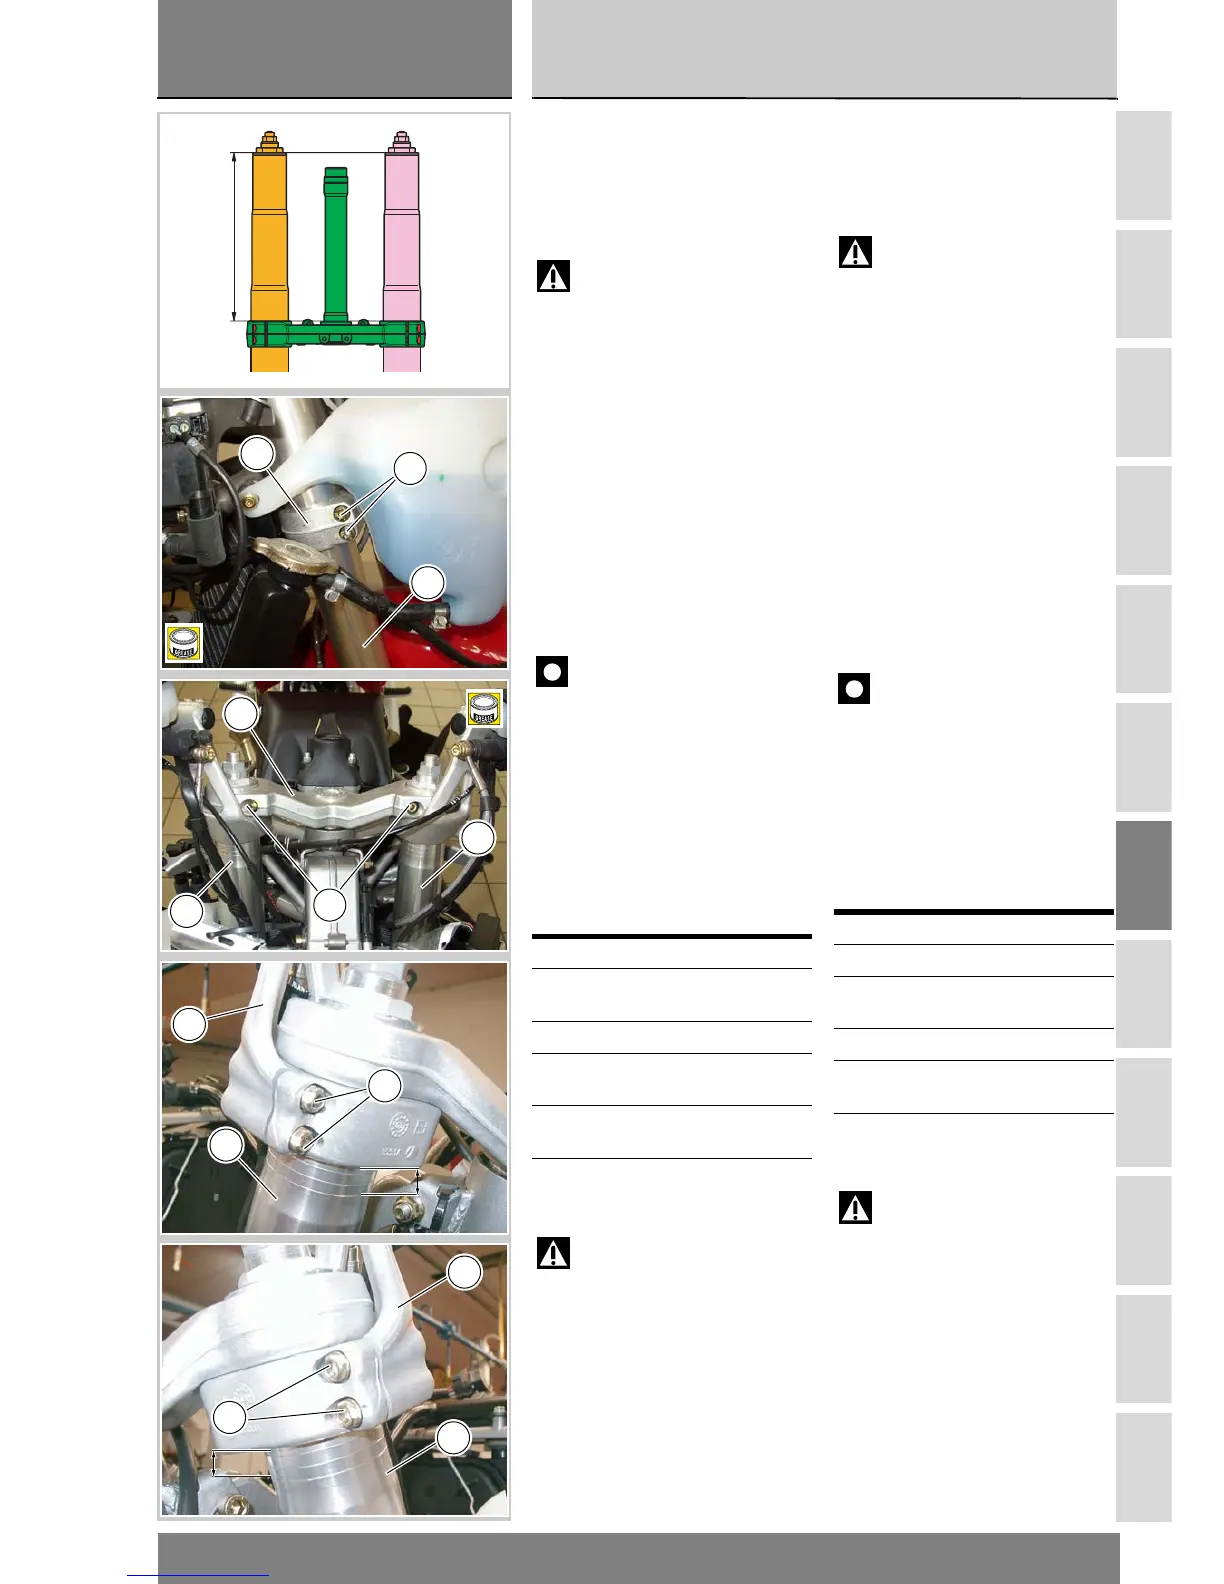
Rimontaggio forcella
anteriore
Procedere al rimontaggio degli steli
posizionandoli, rispetto alla base di
sterzo, all’altezza indicata in figura.
Attenzione
La differenza di posizionamento
fra i due steli non deve essere
superiore a 0,5 mm.
Inserire gli steli forcella sulla base di
sterzo (8), sui supporti semimanibri
(4), (5) e sulla testa di sterzo (3).
Bloccare alla coppia di serraggio
prescritta (Sez. C 3) le viti (1) e (9) di
fissaggio degli steli alla base (8) e alla
testa di sterzo (3).
Regolare l’altezza (h) dei supporti
semimanubri destro (5) e sinistro (4)
quindi bloccarli sugli steli forcella (19)
e (29) con le viti di serraggio (7).
Importante
Se durante lo smontaggio sono
state rimosse dalla loro sede,
applicare grasso prescritto sul filetto
delle viti (1), (9) e (7) prima di
procedere al relativo bloccaggio.
Serrare le viti (7) di fissaggio
semimanubri alla coppia prescritta
(Sez. C 3).
Rimontare le strutture rimosse dal
mototelaio:
Attenzione
Non utilizzare il motociclo senza
il parafango anteriore in quanto
questo elemento funge da supporto
alle tubazioni freno, evitando che
queste vadano ad interferire con la
ruota durante la frenata.
Operazioni Rif. Sez.
Installare le
semicarenature laterali
E 2
Installare il cupolino E 1
Installare la ruota
anteriore
G 1
Installare il parafango
anteriore
E 4
Installare le pinze freno
anteriori
G 3
Refitting the front fork
Refit the fork legs. Fork leg height
above bottom yoke top face is
reported in the figure.
Warning
Positioning difference between
the two legs must not exceed
0.5 mm.
Fit the fork legs through the bottom
yoke (8), fit the handlebar mountings
(4) and (5) and then fit the legs
through the top yoke (3).
Tighten the screws (1) and (9) to the
specified torque (Section C 3)
securing the fork legs to the bottom
yoke (8) and the steering head (3).
Adjust the height (h) of the left and
right handlebar mountings (4) and (5)
then tighten the pinch bolts (7) to fix
them in place on the fork legs (19) and
(29).
Caution
If the pinch bolts (1), (9) and (7)
have been removed on disassembly,
smear the threads with the specified
grease before tightening.
Tighten handlebars retaining screws
(7) to the specified torque (Sect. C 3).
Install previously removed parts to
the frame:
Warning
Never ride the motorcycle if the
front mudguard is removed
otherwise brake hoses might get in
touch with the front wheel while
braking.
Operations See Sect.
Refit the side fairings E 2
Refit the headlight
fairing
E 1
Refit the front wheel G 1
Refit the front
mudguard
E 4
Refit the front brake
calipers
G 3
227,5 ± 0,5 mm
8
9
19
B
3
1
19
29
B
hh
7
4
29
hh
7
5
19