Home
AudioCodes
Gateway
MP-26 series
AudioCodes MP-26 series User Manual
4
of 1
of 1 rating
464 pages
Give review
Manual
Specs
To Next Page
To Next Page
To Previous Page
To Previous Page
Loading...
User's
Manual
74
Docum
ent #: LTRT
-
23510
MP
-
26x/MP
-
27x Mult
imedia Hom
e Gatewa
y
Figure
8-1
: Qui
ck Setup Screen
You can c
onfigure o
ne of
three
main Inter
net connect
ion types
:
W
AN ATM over D
SL
–
see Secti
on
8.1.1
on page
75
W
AN PTM over D
SL
–
see Secti
on
8.1.2
on page
77
W
AN Ethernet
–
s
ee Sectio
n
8.1.3
o
n page
80
73
75
Table of Contents
Default Chapter
3
Table of Contents
3
Version 4.4.0
19
Abbreviations and Terminology
21
Customer Support
21
Regulatory Information
21
Related Documentation
21
Weee Eu Directive
21
1 Introduction
23
Table 1-1: Available Models
24
Figure 1-1: Device Typical Application (E.g., MP-264)
25
2 Package Contents and Prerequisites
27
3 Hardware Description
29
Physical Description
29
Front Panel
29
Figure 3-1: Front Panel of Models Without DECT (E.g., MP-264)
29
Figure 3-2: Front Panel of Models with DECT (E.g., MP-264-DB)
30
Front-Panel Buttons Description
30
Table 3-1: Front-Panel Buttons Description
30
Front-Panel Leds Description
31
Table 3-2: Front-Panel Leds Description
31
Table 3-3: Front-Panel LED Descriptions for Automatic Dialer Feature
33
Rear Panel
34
Figure 3-3: Rear Panel Model (E.g., MP-264-DB)
34
Device Rear-Panel Port Description
35
Table 3-4: Rear-Panel Ports Description (E.g., MP-264-DB)
35
Rear-Panel Leds Description
36
Table 3-5: Rear-Panel Leds Description
36
Cabling the Device
37
Figure 3-4: Cabling the Device (E.g., MP-264)
37
Mounting the Device
39
Figure 3-5: Wall Mount Bracket (E.g., MP-264)
39
Figure 3-6: Attaching Phone Base to Wall Mount
40
Device Gateway
41
4 Device Quick Setup
43
Preparing Initial Configuration
43
Figure 4-1: Language Selection (E.g., MP-264)
43
Figure 4-2: Login Screen
43
Configuring WAN Access
44
Configuring Xdsl
44
Configuring WAN ATM over DSL (ADSL)
44
Figure 4-3: WAN ATM over DSL
44
Configuring WAN PTM over DSL (VDSL)
45
Configuring WAN Ethernet
45
Figure 4-4: Automatic IP Address WAN Ethernet Connection
45
Configuring 3G USB Modem
46
Figure 4-5: WAN 3G USB Modem
46
Figure 4-6: Advanced 3G Settings
46
Configuring Wireless LAN (Wi-Fi)
47
Figure 4-7: Wi-Fi Settings
47
Configuring SIP Signaling Protocol
48
Figure 4-8: Signaling Protocol
48
Figure 4-9: Line Settings
48
Figure 4-10: Line Settings
49
Registering the Handset to the Base Unit
50
5 Getting Started with the Web Interface
51
Logging into the Web Interface
51
Figure 5-1: Login Screen
51
Menu Bar Description
52
Table 5-1: Menu Description
52
Managing Tables
55
Figure 5-2: Typical Table Structure
55
Table 5-2: Table Action Icons Description
55
Configuring Users
56
Figure 5-3: Users Screen
56
Figure 5-4: Users Settings Screen
57
Figure 5-5: Group Settings Screen
58
Associated Elements
59
Configuring Scheduler Rules
59
Figure 5-6: Scheduler Rules Screen
59
Figure 5-7: Edit Scheduler Rule Screen
59
Figure 5-8: Edit Time Segment Screen
60
Figure 5-9: Edit Hour Range Screen
60
Configuring Network Objects
61
Figure 5-10: Network Objects Screen
61
Figure 5-11: Edit Network Objects Screen
61
Figure 5-12: Edit Item Screen
62
Configuring Protocols
63
Figure 5-13: Advanced - Protocols
63
Logging out the Web Interface
64
Figure 5-14: Advanced - Protocols - Edit Service
64
Figure 5-15: Advanced - Protocols - Edit Service - Server Ports
64
6 Viewing a Graphical Display of the Device's Network
65
Figure 6-1: Map View Screen (E.g., MP-264)
65
Table 6-1: Map View Icon Description
66
7 Configuring Computers for Connecting to the Device's Network
69
Wired Computers
69
Configuring Computers Running on Windows XP
69
Configuring Computers Running on Linux
70
Figure 7-1: Internet Protocol (TCP/IP) Properties Dialog Box
70
Connecting Computers to the Device's Wireless Network
71
Figure 7-2: Available Wireless Networks (E.g., MP-264)
71
Figure 7-3: Connect to a Network - PIN Code
72
8 Setting up Your Device
73
Setting up an Internet Connection Using the Web Interface
73
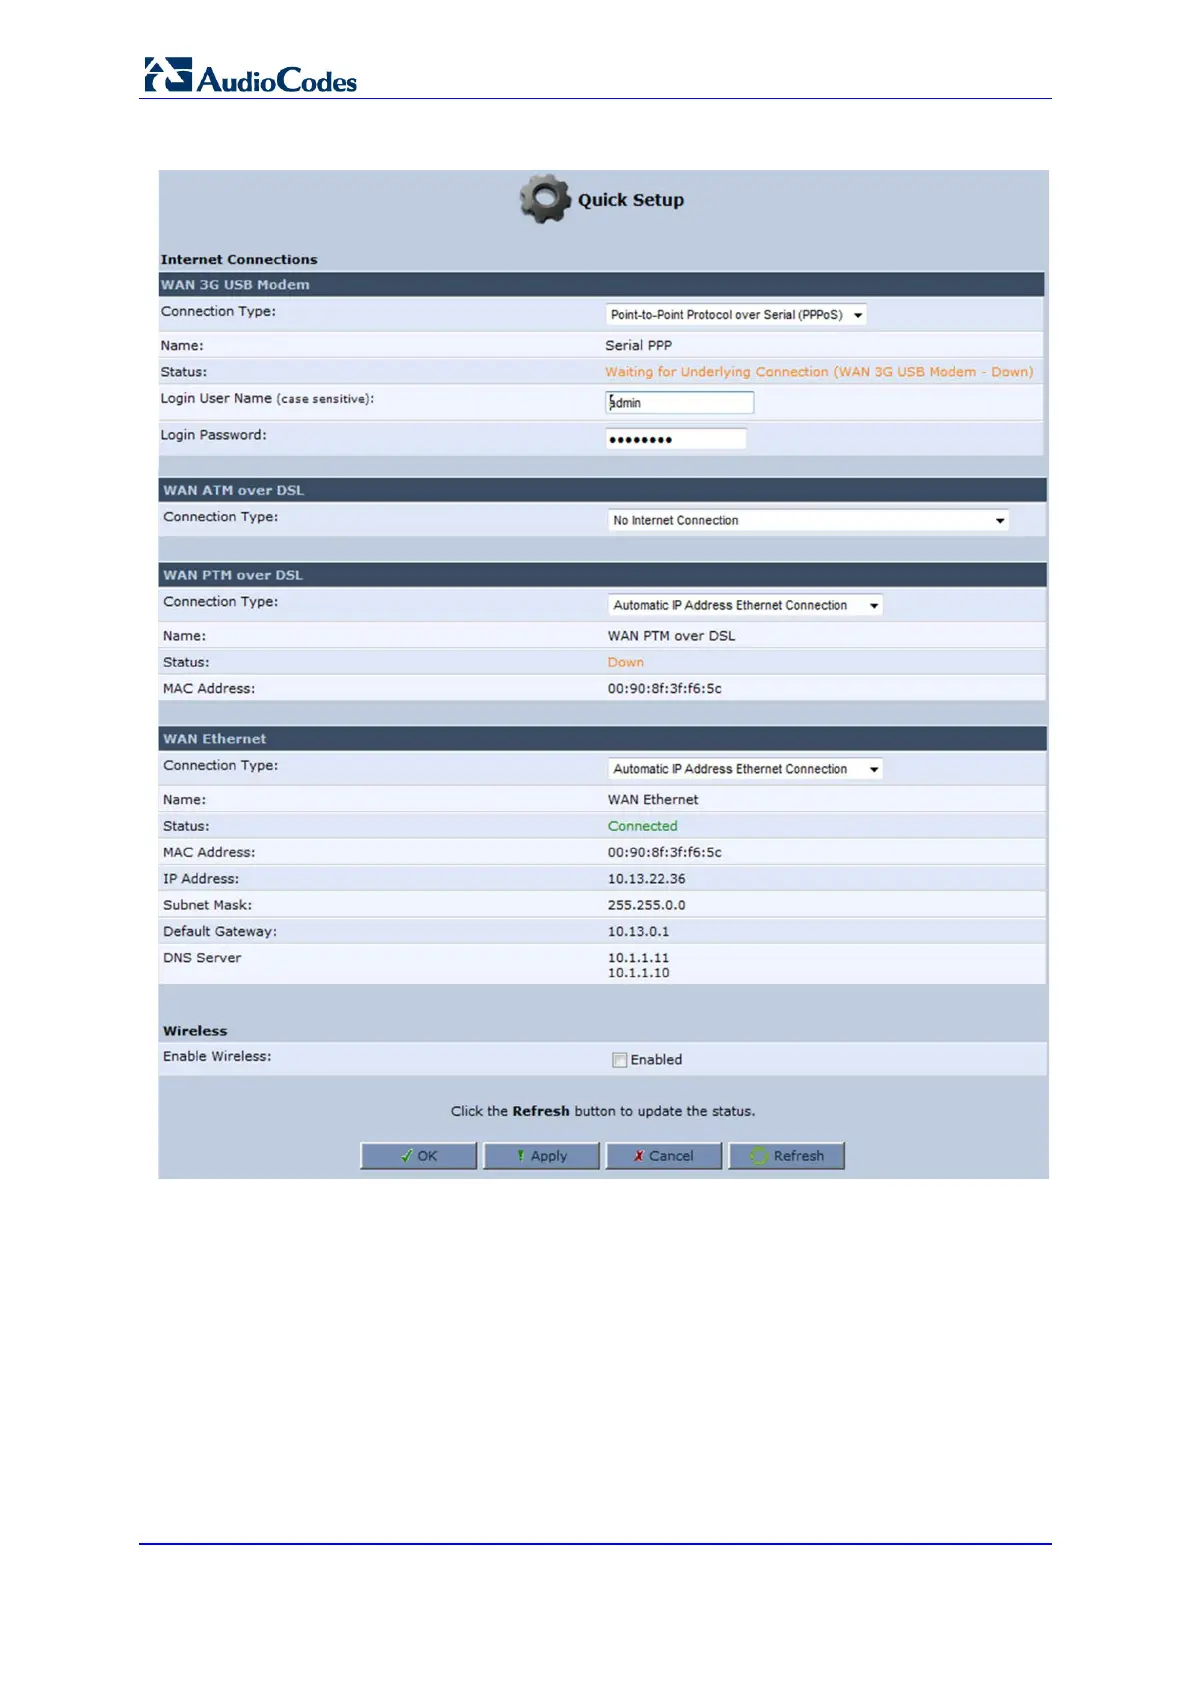
Figure 8-1: Quick Setup Screen
74
WAN ATM over DSL
75
Point-To-Point Protocol over Ethernet (Pppoe)
75
Figure 8-2: Pppoe WAN DSL Internet Connection
75
Pppoa
76
Routed Ethoa
76
Bridged Ethoa
76
Figure 8-3: Pppoa WAN DSL Internet Connection
76
Figure 8-4: Routed Ethoa WAN DSL Internet Connection
76
Figure 8-5: Bridged Ethoa WAN DSL Internet Connection
76
WAN PTM over DSL
77
Manual IP Address Ethernet Connection
77
Figure 8-6: PTM Manual IP Address Ethernet Connection
77
Automatic IP Address Ethernet Connection
78
Point-To-Point Protocol over Ethernet (Pppoe)
78
Figure 8-7: PTM Automatic IP Address Ethernet Connection
78
Figure 8-8: PTM Point-To-Point Protocol over Ethernet (Pppoe)
78
Point-To-Point Tunneling Protocol (PPTP)
79
Layer 2 Tunneling Protocol (L2TP)
79
Figure 8-9: PTM Point-To-Point Tunneling Protocol (PPTP)
79
Figure 8-10: PTM Layer 2 Tunneling Protocol (L2TP)
79
WAN Ethernet
80
Manual IP Address Ethernet Connection
80
Figure 8-11: WAN Ethernet - Manual IP Address Ethernet Connection
80
Automatic IP Address Ethernet Connection
81
Pppoe
81
Figure 8-12: Automatic IP Address WAN Ethernet Connection
81
Figure 8-13: Pppoe WAN Ethernet Connection
81
Pptp
82
Figure 8-14: PPTP WAN Ethernet Connection
82
L2Tp
83
Figure 8-15: L2TP WAN Ethernet Connection
83
Using the Automatic Dialer for Internet Connection
84
Recommended Configuration
84
Setting up and Starting the Automatic Dialer
86
Quitting Automatic Dialer for Manual Configuration
87
Setting up a Wireless LAN Network
88
Figure 8-16: Wireless Group in Quick Setup Screen
88
9 Configuring Voip Parameters
89
Configuring the SIP Signaling Protocol
90
Figure 9-1: Signaling Protocol Tab Screen
90
Table 9-1: Signaling Protocol Tab Parameters Description
91
Configuring Proxy Redundancy
95
Figure 9-2: Configuring Proxy Redundancy
96
Configuring Dialing Parameters
97
Figure 9-3: Dialing Tab Screen
97
Table 9-2: Dialing Tab Parameters Description
98
Syntax for Digit Maps and Dial Plans
100
Table 9-3: Dial Plan (for Left of '=' Sign) and Digit Map Syntax
100
Table 9-4: Digit Map Example
101
Configuring Media Streaming
102
Figure 9-4: Media Streaming Tab Screen
102
Configuring Codecs
103
Supported Codecs
103
Packetization Time
103
Table 9-5: Media Streaming Tab Parameters Description
103
Configuring Voice and Fax
104
Figure 9-5: Voice and Fax Tab Screen
104
Table 9-6: Voice and Fax Tab Parameters Description
105
Configuring Supplementary Services
108
Figure 9-6: Services Tab Screen
108
Table 9-7: Services Tab Parameters Description
109
Auto Attendant
111
Creating an Auto Attendant Message
111
Figure 9-7: Sound Recorder
111
Figure 9-8: Save as Dialog Box
112
Figure 9-9: Sound Selection Dialog Box
112
Figure 9-10: Audacity Window
113
Figure 9-11: Export File Dialog Box
114
Figure 9-12: Specify Uncompressed Options Dialog Box
114
Configuring Auto Attendant on Device
115
Saving Auto Attendant Recordings on USB
115
Configuring Auto Attendant Using Web Interface
116
Figure 9-13: Auto Attendant Web Fields
116
Figure 9-14: Line Settings Tab
116
Configuring Micro PBX Line Settings
117
Figure 9-15: Line Settings Tab Screen
117
Figure 9-16: Line Settings Screen for a New Line
118
Configuring Line Extensions
119
Figure 9-17: Extension Settings Tab Screen
119
Figure 9-18: Extension Settings Screen
120
Configuring Speed Dialing
121
Figure 9-19: Speed Dial Tab Screen
121
Figure 9-20: Speed Dial Settings Screen (Proxy Destination)
121
Figure 9-21: Speed Dial Settings Screen (Local Line Destination)
122
Figure 9-22: Speed Dial Settings Screen (Direct Call Destination)
122
Enabling Polarity Reversal
123
Figure 9-23: Telephone Interface Tab Screen
123
Bluetooth
124
Pairing Mobile Devices to Device Using Bluetooth
124
Figure 9-24: Bluetooth Screen (E.g., MP-264)
124
Unpairing a Mobile Device Using the Web
125
Figure 9-25: Device Names Screen
125
Figure 9-26: Bluetooth Initial Screen (E.g., MP-264)
125
Auto Connecting a Mobile Device
126
Figure 9-27: Unpairing Device Screen
126
Figure 9-28: Auto Connect Screen
126
Synchronizing the Phonebook
127
Synchronizing the Phonebook Using the Device
127
Synchronizing the Phonebook Using the Web
127
Figure 9-29: Bluetooth Tab Screen (E.g., MP-264)
127
Associating DECT Handset with a Synchronized Phonebook
129
Figure 9-30: Bluetooth Initial Screen (E.g., MP-264)
129
Figure 9-31: Phonebooks Screen
129
Deleting a Phonebook
130
Routing an Incoming Call
130
Figure 9-32: Bluetooth Initial Screen
130
10 Making Voip Calls with Your Analog Telephones
131
Making a Call
131
Answering a Waiting Call
131
Putting a Call on Hold
132
Transferring a Call
132
Forwarding Calls to Another Phone
133
Establishing a 3-Way Conference Call
134
11 Quality of Service
135
Qos Wizard
136
Figure 11-1: Qos Wizard Tab Screen
136
Configuring Traffic Shaping
137
Configuring Traffic Shaping
138
Figure 11-2: Quality of Service - Traffic Shaping Screen
138
Figure 11-3: Add Device Traffic Shaping Screen
138
Figure 11-4: Edit Device Traffic Shaping Screen
139
Configuring Shaping Classes
140
Figure 11-5: Add Shaping Class Screen
140
Figure 11-6: Edit Shaping Class
140
Class Rules
141
Configuring Traffic Priority
143
Figure 11-7: Traffic Priority Screen
144
Figure 11-8: Add Traffic Priority Rule Screen
145
Configuring DSCP Mapping
147
Figure 11-9: DSCP Settings Screen
147
Figure 11-10: Edit DSCP Settings
148
Configuring 802.1P Mapping
149
Figure 11-11: 802.1P Settings Screen
149
Configuring Class Statistics
150
Figure 11-12: Class Statistics Screen
150
Configuring Basic Voip Qos Example
151
Figure 11-13: Edit Device Traffic Shaping
151
Figure 11-14: Qos - Edit Device Traffic Shaping - Submitting the Configuration
152
12 Network Connections
153
Configuring a WAN Connection
153
Figure 12-1: Network Connections Screen
154
Figure 12-2: Connection Wizard Screen
154
Figure 12-3: WAN ATM over DSL Properties
155
Figure 12-4: WAN PTM over DSL Properties
156
Determine Protocol Type Automatically (PVC Scan)
157
Figure 12-5: Determine Protocol Type Automatically (PVC Scan) Screen
157
Figure 12-6: Scan User Defined VPI/VCI Screen
157
Figure 12-7: DSL PVC Parameters Configuration Screen
158
Figure 12-8: Configuring Point-To-Point Protocol over Ethernet (Pppoe) Screen
158
Pppoe
158
Figure 12-9: Connection Summary Screen
159
Figure 12-10: DSL PVC Parameters Configuration Screen
160
Figure 12-11: Point-To-Point Protocol over ATM (Pppoa) Screen
160
Pppoa
160
Figure 12-12: Connection Summary Screen
161
Routed Ethoa or Bridged Ethoa
161
Figure 12-13: DSL PVC Parameters Configuration Screen
162
Figure 12-14: Ethernet Connection over ATM (Ethoa) Screen
162
Figure 12-15: Connection Summary Screen
163
Figure 12-16: Routed IP over ATM (Ipoa) Screen
163
Ipoa
163
Figure 12-17: Connection Summary Screen
164
WAN DSL Connections
155
WAN Ethernet Connections
165
External DSL Modem Using Pppoe
165
Figure 12-18: Internet Connection
165
External Cable Modem Without Authentication
166
Figure 12-22: Internet Connection – External Cable Modem
167
External Cable Modem with L2TP
169
Figure 12-27: Internet Cable Modem Connection - L2TP
170
Figure 12-29: L2TP Connection Summary
171
Dhcp
172
Figure 12-32: Internet Connection – External Cable Modem
173
Manual IP Address
174
Figure 12-37: Ethernet Connection Screen
175
Figure 12-39: Manual IP Connection Summary
176
LAN Connection
177
Wireless LAN
177
Enabling and Disabling the Wireless Network
178
Configuring Wireless Properties under the Settings Tab
179
Configuring Wireless Properties under the Wireless Tab
180
Table 12-1: Wireless Tab - Basic Wireless Access Point Parameters Description
181
Figure 12-44: Wireless Network Group in Wireless Tab Screen
181
Figure 12-45: MAC Filtering
182
Figure 12-48: Network Connections
183
Figure 12-49: LAN Wireless 802.11N Access Point Properties
184
Figure 12-50: Wireless Tab – WPS
185
Figure 12-51: Click Go Button
186
Figure 12-53: Client Pin Code
187
Figure 12-54: WPS Group in Wireless Tab Screen
188
Figure 12-55: Configuring WPA Security
189
Figure 12-56: Configuring WPA2 Security
190
Figure 12-58: Configuring Encryption Key in Windows Wireless Client
191
Figure 12-59: Configuring Authentication Only Security
192
Figure 12-60: Transmission Parameters in Wireless Tab Screen
193
Figure 12-61: Virtual Aps Table
194
Figure 12-63: Firewall Blocking Access to All Other Lans
195
Figure 12-64: Example Virtual AP
196
Advanced Tab
197
LAN Hardware Ethernet Switch
198
General Tab
199
Settings Tab
199
Switch Tab
200
Advanced Tab
201
Editing Network Connections and Advanced Configuration
202
General Tab
202
Settings Tab
203
Internet Protocol Settings
204
Table 12-2: Settings Tab - Parameter Descriptions
204
Figure 12-75: Manually Defining DNS Server
205
Figure 12-76: IP Address Distribution - DHCP Server
206
Routing Tab
207
Table 12-3: Routing Parameters
207
Wireless Tab
208
Switch Tab
208
Bridging Tab
209
PPP Tab
209
Table 12-4: PPP Tab Parameter Descriptions
210
PPTP Tab
211
Table 12-5: PPTP Tab Parameter Descriptions
211
Advanced Tab
212
VLAN Settings
213
Figure 12-86: Advanced Connection
214
Figure 12-88: Connection Summary
215
Settings Tab
216
Table 12-6: VLAN Interface - General Communication Parameters
216
IP Address Distribution
217
Table 12-7: IP Address Distribution Parameters
217
Table 12-8: DHCP Relay
217
Figure 12-90: IP Address Distribution - DHCP Relay
218
Table 12-9: Assigning Static IP Addresses to Network Computers
218
Routing Tab
219
Table 12-10: Routing Parameters
219
Advanced Tab
220
LAN-WAN Bridge Settings
221
Figure 12-97: Adding New Network Bridging
222
Editing LAN-WAN Bridging
223
Figure 12-100: VLAN Settings Screen
224
13 Remote Device Management
225
Overview
225
Remote Configuration
225
Table 13-1: Main Configuration Parameter Groups
226
Remote Management
227
Firmware Upgrade
227
Status and Performance Monitoring
228
Table 13-2: Status and Performance Monitoring Parameters
228
Alarms, Notifications and Logging
229
Table 13-3: Notifications and Logged Events
229
Table 13-4: Severity of Logged Events
229
Enabling Remote Management
230
Figure 13-2: Remote Administration Screen
231
Securing Remote Management with Certificates
232
Figure 13-4: Create Self Signed X509 Certificate Screen
233
Figure 13-10: Load Ca's Certificate
235
Remote Configuration and Management Interfaces
236
Embedded Web Server
236
Table 13-5: Operations Per Configuration/Management Interface
236
And TR-104 CPE WAN Management Protocol
237
Configuring the Device Via TR-069 and TR-104
238
Table 13-6: Internetgatewaydevice.wandevice.I.wanconnectiondevice.I.wanipconnection.I
238
Table 13-7: Internetgatewaydevice.landevice.I.lanethernetinterfaceconfig
240
Table 13-8: Internetgatewaydevice.landevice.I.lanhostconfigmanagement
240
Table 13-9: Internetgatewaydevice.services.voiceservice.I.capabilities
241
Table 13-10: Internetgatewaydevice.services.voiceservice.I.capabilities.codecs
244
Table 13-11: Internetgatewaydevice.services.voiceservice.I.voiceprofile
244
Table 13-12: Internetgatewaydevice.services.voiceservice.I.voiceprofile.I.sip
245
Monitoring the Device Status Via TR-069 and TR-104
246
Table 13-13: Internetgatewaydevice.deviceinfo
246
Table 13-14: Internetgatewaydevice.wandevice.I.wanconnectiondevice.I
247
Wanipconnection.I.stats
247
Table 13-15: Internetgatewaydevice.landevice.I.lanethernetinterfaceconfig.I.stats
248
Table 13-16: Internetgatewaydevice.services.voiceservice.I.voiceprofile.I.line.I.stats
248
Security Concerns and Measures
250
Automatic File Download
251
Firmware File Download
251
Configuration File Download
251
Security Concerns and Measures
252
Telnet CLI
252
Syslog
251
14 Security
253
General Security Level Settings
254
Table 14-1: Behavior for the Three Security Levels
255
Configuring Access Control
256
Configuring Port Forwarding
258
Figure 14-5: Port Forwarding Screen
259
Figure 14-8: Specifying Public IP Address
260
Figure 14-9: Select Check Box of Port Forwarding Rule (Active)
261
Configuring a DMZ Host
262
Configuring Port Triggering
263
Figure 14-12: Adding Port Triggering Rules
264
Figure 14-15: Edit Service Opened Ports
265
Configuring Website Restrictions
266
Figure 14-19: Add a Specific Host
267
Configuring NAT
269
Figure 14-23: Adding NAT/NAPT Rule
270
Viewing Current Connections
272
Configuring Advanced Filtering
273
Figure 14-26: Add Advanced Filter
274
Figure 14-27: Add a Specific Host
275
Viewing the Security Log
277
Figure 14-30: Security Log Settings
278
15 Advanced Networking Features
281
IP Address Distribution
281
Configuring the DHCP Server
282
Configuring DHCP Relay
283
Viewing DHCP Clients
284
Configuring Static DHCP Clients
284
Figure 15-6: DHCP Connection Settings Screen
285
Configuring a DNS Server
286
Configuring Dynamic DNS
288
Figure 15-10: Personal Domain Name (Dynamic DNS) - Adding
289
Configuring Routing Rules
291
Managing Routing Table Rules
291
Configuring Routing Protocols
292
Enabling Pppoe Relay
293
Selecting Regional Settings for Analog Lines
294
16 Home Media
295
Universal Plug and Play
295
Enabling Universal Plug and Play on the Device
295
Adding Upnp-Enabled PC to Home Network
296
Monitoring Connection between the Device and Internet
297
Making Local Services Available to Pcs on Internet
298
Figure 16-5: Advanced Settings
299
Figure 16-7: Service Settings – Add Service
300
17 Add-On Servers and Disk Management
301
External File Server
301
Automatic File Sharing
302
Figure 17-3: User Screen
303
Disk Management
304
Figure 17-6: Manually Defining System Storage Area
305
Disk Partitions
306
Connecting a Mass Storage Device
306
Figure 17-8: Partition Type
307
Figure 17-11: Partition File System
308
Formatting a Partition
309
Checking a Partition
310
Deleting a Partition
310
System Storage Area
311
Figure 17-17: Disk Management Screen – Check Box Cleared
312
RAID Management
313
Creating a RAID Device
313
Figure 17-19: Partition Format Screen
314
Using a RAID Device
315
Maintaining a RAID Device
315
Replacing RAID Underlying Devices
315
Print Server
317
Connecting and Setting up a Printer on Windows
318
Print Protocols
319
Table 17-1: IPP, Samba, and LPD Specifications
319
Internet Printing Protocol
320
Figure 17-27: Local or Network Printer
321
Figure 17-29: Printer Screen – IPP URL (Linux)
322
Figure 17-31: Add Printer
323
Figure 17-33: Printing Protocol
324
Figure 17-35: Print & Fax
325
Figure 17-36: Printer Browser – IP Printer
326
Figure 17-37: Print & Fax – New IPP Printer
327
Microsoft Shared Printing (Samba)
328
Figure 17-39: Printer Browser – Default Browser
329
Figure 17-41: Printer Browser – MP264
330
Line Printer Daemon (LPD)
331
Figure 17-44: Local Printer
332
Figure 17-46: Add Port
333
Figure 17-48: Printer Port Monitor Configuration
334
Figure 17-49: Add Printer Wizard
335
Figure 17-50: Print & Fax
336
Figure 17-51: Printer Browser – LPD Printer
337
Figure 17-52: Print & Fax – New LPD Printer
338
Storing and Using Printer Drivers
339
18 Media Sharing
341
Share Music, Pictures and Video on My Local Network
342
Automatically Share Media in All Folders
343
Figure 18-4: Shared Partitions
344
19 Maintenance
345
Enabling the Feature Key
345
Figure 19-2: Reboot Screen
346
Viewing the Device Software Version
347
Configuring Date and Time
348
Figure 19-5: Time Server Settings Screen
349
Backup and Restore
350
Backing up Data
350
Figure 19-7: Edit Backup Screen
351
Restoring Data
352
Configuration File
353
Uploading Configuration File from PC on the Network
355
Uploading Configuration File from a Remote Server
357
Encrypting the Configuration File Using CLI
359
Automatic Upload Using SIP NOTIFY Message
360
Firmware Upgrade
361
Upgrading the Device from a Computer on the Network
362
Figure 19-15: Upgrade from a Computer in the Network Screen
363
Upgrading the Device from the Internet
364
Configuring System Settings
366
Rebooting the Device
369
Restoring Factory Settings
370
20 Diagnostics and Performance Monitoring
371
Diagnostics
371
Running the Ping Test
372
Running the ARP Test
372
Running a Traceroute
373
Running the PVC Scan Test
373
Running the OAM Ping Test
374
Performance Monitoring
375
Viewing Network Connections Status
375
Viewing the System Log
376
Viewing CPU Statistics
377
Figure 20-9: CPU Screen
379
Viewing Voip Traffic Statistics
381
Viewing Internet Connection Utilization
382
21 Local Support and Troubleshooting
383
Table 21-1: LST Messages in Web Interface
383
Table 21-2: LST Voice Messages
384
Figure 21-2: Example - no Voip Service / Service Not Configured Error
384
Table 21-3: Field Descriptions
385
Device Cordless DECT Phone
387
22 Overview
389
23 Safety Instructions
391
24 Getting Started
393
Installing the DECT Phone
393
Powering the Handset
394
Charging the Handset
394
Checking the Battery Level
395
Switching the Base Unit on or off
395
Switching the Handset on or off
395
Replacing the Batteries
396
Getting to Know Your Phone
397
Overview of the Handset
397
Table 24-1: Handset Description
398
Handset LCD Screen Description
400
Table 24-2: Handset LCD Icon Descriptions
400
Menu Structure
401
Table 24-3: Handset LCD Menus and Submenus
401
Table 24-4: Handset LCD Menus and Submenus Accessed Using Navigation Keys
402
Entering Text and Digits
403
Viewing the Device Base Unit Status Using DECT LED
404
Table 24-5: DECT LED Description
404
Upgrading the Device and the Base Unit
405
Defining the Device Handset Line
406
Registering the Handset to Base Unit
407
Checking the Handset Signal Strength
408
25 General Phone Operation
409
Making an External Call
409
Pre-Dialing
409
Direct Dialing
409
Calling from Your Phonebook
409
Calling from the Call List
410
Establishing a Second Call
410
Redialing a Number
410
Answering a Call
411
Answering or Rejecting a Second Call
411
Ending a Call
411
Adjusting Earpiece and Speakerphone Volume During a Call
412
Muting a Call
412
Rejecting Incoming Calls
412
Turning off the Ringer
413
Using the Speakerphone
413
Redial List
414
Saving a Redial Number to the Phonebook
414
Deleting a Number from the Redial List
415
Deleting the Entire Redial List
415
Locking the Keypad
416
Paging the Handset
416
Call Handling for Multiple, Registered Handsets
417
Calling (Intercom) Another Handset
417
Transferring an External Call to Another Extension
417
Announced Call Transfer
417
Unannounced Call Transfer
418
Transferring an External Call to Another External Call
418
Toggling between External and Internal Calls
418
Three-Way Conference Calls
419
Making a Three-Way Conference Call with Another Handset and an External Party
419
Making a Three-Way Conference Call with Your Handset and Two External Calls
419
26 Phonebook
421
Adding a New Contact
421
Editing a Contact
422
Viewing Contacts
422
Deleting a Contact
423
Deleting All Contacts
424
27 Call List
425
Viewing the Call List
425
Saving a Call List Number to the Phonebook
426
Dialing a Call List Number
426
Deleting a Call List Number
427
Deleting the Entire Call List
428
28 Retrieving Voice Messages
429
29 Clock and Alarm
431
Date and Time
431
Changing the Date Format
431
Changing the Time Format
431
Setting the Time and Date
432
Alarm
433
Setting the Alarm
433
Defining the Alarm Melody
434
Disabling the Alarm
434
Switching off or Snoozing the Alarm
434
30 Customizing the Handset
435
Adjusting Speaker and Earpiece Volume
435
Ring Settings
436
Choosing the Internal Ringer Melody
436
Choosing the External Ringer Melody
436
Adjusting the Ringer Volume
437
Alert Tones
438
Setting the Key Tone
438
Setting the Battery Low Tone
438
Setting the Display Language
439
Selecting a Wallpaper
439
Setting the Contrast Level
439
Activating or Deactivating Automatic Answer
440
Selecting a Base Station
440
Resetting Handset to Factory Defaults
441
31 Base Settings
443
Manage Handsets
443
Renaming the Handset
443
De-Registering a Handset
444
Changing the PIN Number
445
Resetting the Base to Factory Defaults
445
Viewing the Product Version
446
32 Factory Defaults
447
Table 32-1: Factory Defaults
447
33 Troubleshooting
449
Table 33-1: Troubleshooting
449
Appendices
451
A Backup Battery Pack
453
Figure A-1: Backup Battery Pack
455
Table A-1: Backup Battery Pack LED Descriptions
456
Table A-2: Backup Battery Pack Environment Operating Conditions
457
B Specifications
459
4
Based on 1 rating
Ask a question
Give review
Questions and Answers:
Need help?
Do you have a question about the AudioCodes MP-26 series and is the answer not in the manual?
Ask a question
AudioCodes MP-26 series Specifications
General
Brand
AudioCodes
Model
MP-26 series
Category
Gateway
Language
English
Related product manuals
AudioCodes MP-252
2 pages
AudioCodes MP-124
486 pages
AudioCodes MP-112
34 pages
AudioCodes MediaPack MP-112
120 pages
AudioCodes MediaPack MP-118
584 pages
AudioCodes MediaPack MP-124
504 pages
AudioCodes MediaPack MP-102
238 pages
AudioCodes MediaPack MP-114
120 pages
AudioCodes mediapack MP-500
574 pages
AudioCodes Media Pack MP-124
486 pages
MediaPack Series MP-11x
622 pages
MediaPack MP-11x Series
120 pages