Site Preparation and Installation
28
Magellan™ 9800i Scanner
Counter Cutout
The most important consideration when planning the counter opening for the scanner is the
operator’s comfortable reaching distance. The ideal, ergonomically sound installation allows
items to be directed within easy reach, and a scanning area requiring no lifting or special
orientation of items. If you haven’t already read the information at the beginning of this section
titled,
Pre-Installation Considerations, please do so before continuing these instructions.
The symmetrical design of the scanner permits the operator to easily pass items from one hand
to the other while scanning (either from right-to-left or left-to-right). With the unique multi-
side scan zone, scanning is accomplished in one fluid motion. The operator simply slides the
item from the conveyor belt or diverter area through the scanning area and passes the item to
the other hand, which in turn bags it or places it on a take-away conveyor belt. Movement
should flow naturally over the surface of the scanner.
Note that the following guidelines for preparing an existing checkstand to accept a scanner, or
incorporating the unit into a new checkstand design will not be accurate for all installations.
Although these guidelines will suffice for most standard installations, the installer may need to
make adjustments for varying counter heights and thicknesses, support design, or other
checkstand limitations.
Figure 15 shows a typical “left-hand-take-away” checkstand design.
Follow these basic steps to install the unit:
1. Select a position for the scanner that offers a smooth product flow which best accom-
modates the reaching distance of the average operator.
2. Cut the opening in the countertop. Select the appropriate drawing from Figure 17, or
Figure 20 for your model.
3. Install the AC/DC Power Supply, the Remote Scale Display cable and the interface
cable(s) observing the following:
Interface cables (and display cable, if applicable) should be routed away from all
highly inductive electrical devices, like motors and conveyor belts, and even away
from the unit’s power cable if possible.
Cables should be easy to remove in the event that replacement is required. A little
planning now will save a lot of frustration later.
4. Connect and verify all system operations.
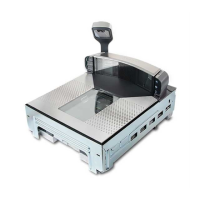
The scanner should be installed so that leading and trailing edges of the All Weighs™ Platter are
flush with the countertop to enhance smooth, slide-through scanning (reference
Figure 16).
Keep in mind that the debris chutes on both sides of the platter provide the necessary clearance
for proper scale operation if you are installing a scanning-scale (you won’t need to provide an
additional gap for that).
 Loading...