Note: If you select the Inbox or My Instrument option, only plate files with properties that match
the polymer and capillary array configuration of the instrument are available for selection.
4.
Select a plat
e file.
If an Import failed message is displayed, see “Plate file troubleshooting” on page 501.
5.
Tap the Plate and List tabs to verify that settings are correct.
IMPORTANT! If you select a plat
e file that has cloud analysis enabled, ensure that Connect is
specified for the Save location in the Properties tab. If it does not specify Connect Platform, a
warning message is displayed. You cannot start the run until you specify Connect Platform for the
Save location.
If you change the injection properties for a plate file that specifies cloud analysis, cloud analysis is
automatically disabled.
Note: T
o quickly view the sample names, tap View sample list or tap the List tab, then tap View
by4Well Attributes.
If changes are needed, see Chapter 4, “Create a plate file on the instrument”.
If you select
ed an incorrect plate file, tap Actions4Change plate file.
6.
Tap Start run.
7.
Proceed to “Use the Run queue to monitor a run on the instrument” on page 160 or “Monitor a run
from the Remote Monitoring software” on page 182.
Chapter 6 S
tart and monitor a run
Link a plate file and start a run
6
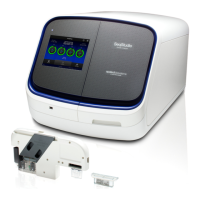
SeqStudio
™
Flex Series Genetic Analyzer with Instrument Software v1.0 User Guide
143