5.
Place a cap on the polymer, then store at 2–8°C.
6.
Wipe the pouch connector on the instrument with a moistened lab wipe.
7.
Insert the conditioning reagent pouch:
a.
Remove the seal from the conditioning reagent pouch.
b.
With the label facing the rear of the instrument, insert the pouch fitting into the slot on the
pump lever mechanism.
c.
Push the polymer pouch lever up.
8.
Tap Verify pouch to update the pouch information.
9.
Close the instrument doors.
10.
Tap Wash pump and channels.
IMPORTANT! Aft
er you tap Wash pump and channels you cannot cancel the procedure. The
wash procedure takes ~45 minutes to complete.
Change Polymer Type—Install capillary array
WARNING! SHARP The electr
odes on the load-end of the capillary array have small, blunt ends that
can lead to piercing injury.
IMPORTANT! If an aut
osampler error or a "power save" message is displayed, or if the CBC is not in
the forward, home position when you need to slide the array header into the housing, see “Check the
position of the cathode buer container (CBC)” on page 483.
In this procedure, you remove the array port plug, install a new or previously used capillary array, close
the det
ection cell heater door, and press the RFID tag in place.
1.
Open the instrument, oven, and detection cell doors.
2.
Loosen the array port lock by turning it ~1/4 turn counter-clockwise until it stops.
Chapter 13 Maintain the Instrument
Maint
enance wizard procedures
13
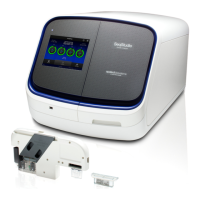
SeqStudio
™
Flex Series Genetic Analyzer with Instrument Software v1.0 User Guide
401