1. Remove the front and rear cabinet covers.
2. Mount the base elements on the base cabinet (BC). Place the basic cabinet in the installation
site and make sure that it is level and stable.
3. Place the expansion cabinet (EC1) on the basic cabinet. Make sure that the feet of EC1 slide
into the appropriate depressions in the top of the basic cabinet.
4. Attach the two cabinets using four connecting plates and two screws with washers each
(Figure 4-2).
It is important to ensure that the two connecting plates are mounted in the correct direction
(facing inside!).
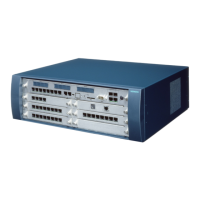
Installing a two-cabinet system
Figure 4-2 Hicom 150 E OfficePro - mounting a two-cabinet system (stacked)
Laying the connecting cables
You can cut out the pre-stamped recesses in the bottom of EC1 and top of the BC with a pair of
diagonal cutting pliers and break them out with a pair of flat-nosed pliers to lay the connecting cables
between the two cabinets.
Caution
In order to avoid injury, exercise caution when breaking out the recesses. Be sure to remove
any sharp edges or corners.
Procedure: Mounting the base elements
Caution
Always mount stacked system cabinets on base elements to ensure the necessary stability
(Figure 4-3).
Step Action
1. Place the base elements under the right-hand and left-hand outer edges of the cabinet(s). Insert
the feet of the system cabinet(s) into the two holes of the relevant base element.
http://cmweb01.mch.pn.siemens.de/e_doku/en/h150/h15/30/sh/2/15_4m.htm (6 of 27) [06/04/2000 13:04:41]
 Loading...