1-15
1
Step 1: Prior to placing the Coin Handler into the bolt down location, remove the L-Brackets from the
rear of the cabinet and apply the foam weatherstripping to the right side edges of the cabinet.
Place the bracket inside, at the bottom, of the Coin Handler when installation is done.
Step 2: Move the Coin Handler into the bolt down location (left side of the TR250 Cash Handler).
Step 3: Access the Coin Handler wiring harness by removing the (2) phillips head screws that secure
the upper/back cover and remove it by sliding rearward.
Step 4: Connect the Coin Handler wiring harness to the terminals at the top/rear of the TR250 Cash
Handler cabinet.
a) Cable length will determine orientation of connections.
b) Connect the ground wire to the center phillips head screw on the Power Supply Chassis.
c) Secure the wiring harness to the TR250 strain relief plate using the tie wraps included in
the accessory kit.
Step 5: Connect all power cords, network cables or grounding straps located behind the Cash
Handler marquee.
Do Not use the Vault Door as leverage to place the cabinet over the anchors !
Step 6: Remove any roller or moving assist equipment from under the Coin Handler Cabinet.
Step 7: Align the edges of the Coin Handler cabinet with the outline created using the supplied
template and the left edges of the TR250 Cash Handler Cabinet.
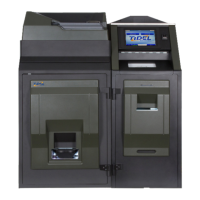
Power Cord Coin Handler Power
TR250 ON - OFF Switch
Ground Screw Network PortUSB Coin Sorter
TR250 Rear Panel - Coin Handler Connections
Hardware Support PCB
USB for UPS
(if equipped)
Coin Handler Placement