d-Color MF4003/MF3303
D SERVICE TOOL > 2. Utility tool
D-3
4. Select Loadable Driver in [Export Format] and click [Export].
5. Select the loadable driver to be updated and the output location of the loadable driver and click [OK].
6. Copy the output loadable driver (ICC_LDR.tar) to the root directory of the USB memory.
NOTE
▪ Please do not save any other data in the USB memory.
7. Call the Service Mode to the screen of the MFP.
8. Select [System 2] -> [Driver Install] -> [Install].
9. Connect the USB memory in which the loadable driver has been saved to the USB port on the side of the control panel.
10. Select [Loadable driver] and touch the [Start] to install the loadable driver.
11. Remove the USB memory and, accessing [Billing Setting] -> [Authentication Device 2], select [Card].
12. Turn OFF the main power switch, wait for 10 sec., then turn the switch ON.
13. Set the authentication user.
(d)Auth Device Tool Advanced for 5427CK (HID iCLASS)
1. Obtain the loadable driver (ICC_LDR.tar) for use in OMNIKEY 5427CK (AU-205H) that is compatible with the type of card used.
2. Start the Auth Device Tool Advanced for 5427CK (AU-205H).
3. Select HID iCLASS.
4. Click [Detail Setting].
5. Set the card ID length.
6. Select Loadable Driver in [Export Format] and click [Export].
7. Select the loadable driver to be updated and the output location of the loadable driver and click [OK].
8. Copy the output loadable driver (ICC_LDR.tar) to the root directory of the USB memory.
NOTE
▪ Please do not save any other data in the USB memory.
9. Call the Service Mode to the screen of the MFP.
10. Select [System 2] -> [Driver Install] -> [Install].
11. Connect the USB memory in which the loadable driver has been saved to the USB port on the side of the control panel.
12. Select [Loadable driver] and touch the [Start] to install the loadable driver.
13. Remove the USB memory and, accessing [Billing Setting] -> [Authentication Device 2], select [Card].
14. Turn OFF the main power switch, wait for 10 sec., then turn the switch ON.
15. Set the authentication user.
(e)Auth Device Tool Advanced for YSoft CRv2/YSoft CRv3
NOTE
▪ If a YSoft card reader is used, when performing authentication, the default setting for the loadable driver makes the card to
be informed as an HID Prox card regardless of which type you are using. To change the card type when performing
authentication, using Auth Device Tool Advanced for YSoft CRv2/YSoft CRv3 to choose a corresponding card type to be
reported to the authentication program from the following list.
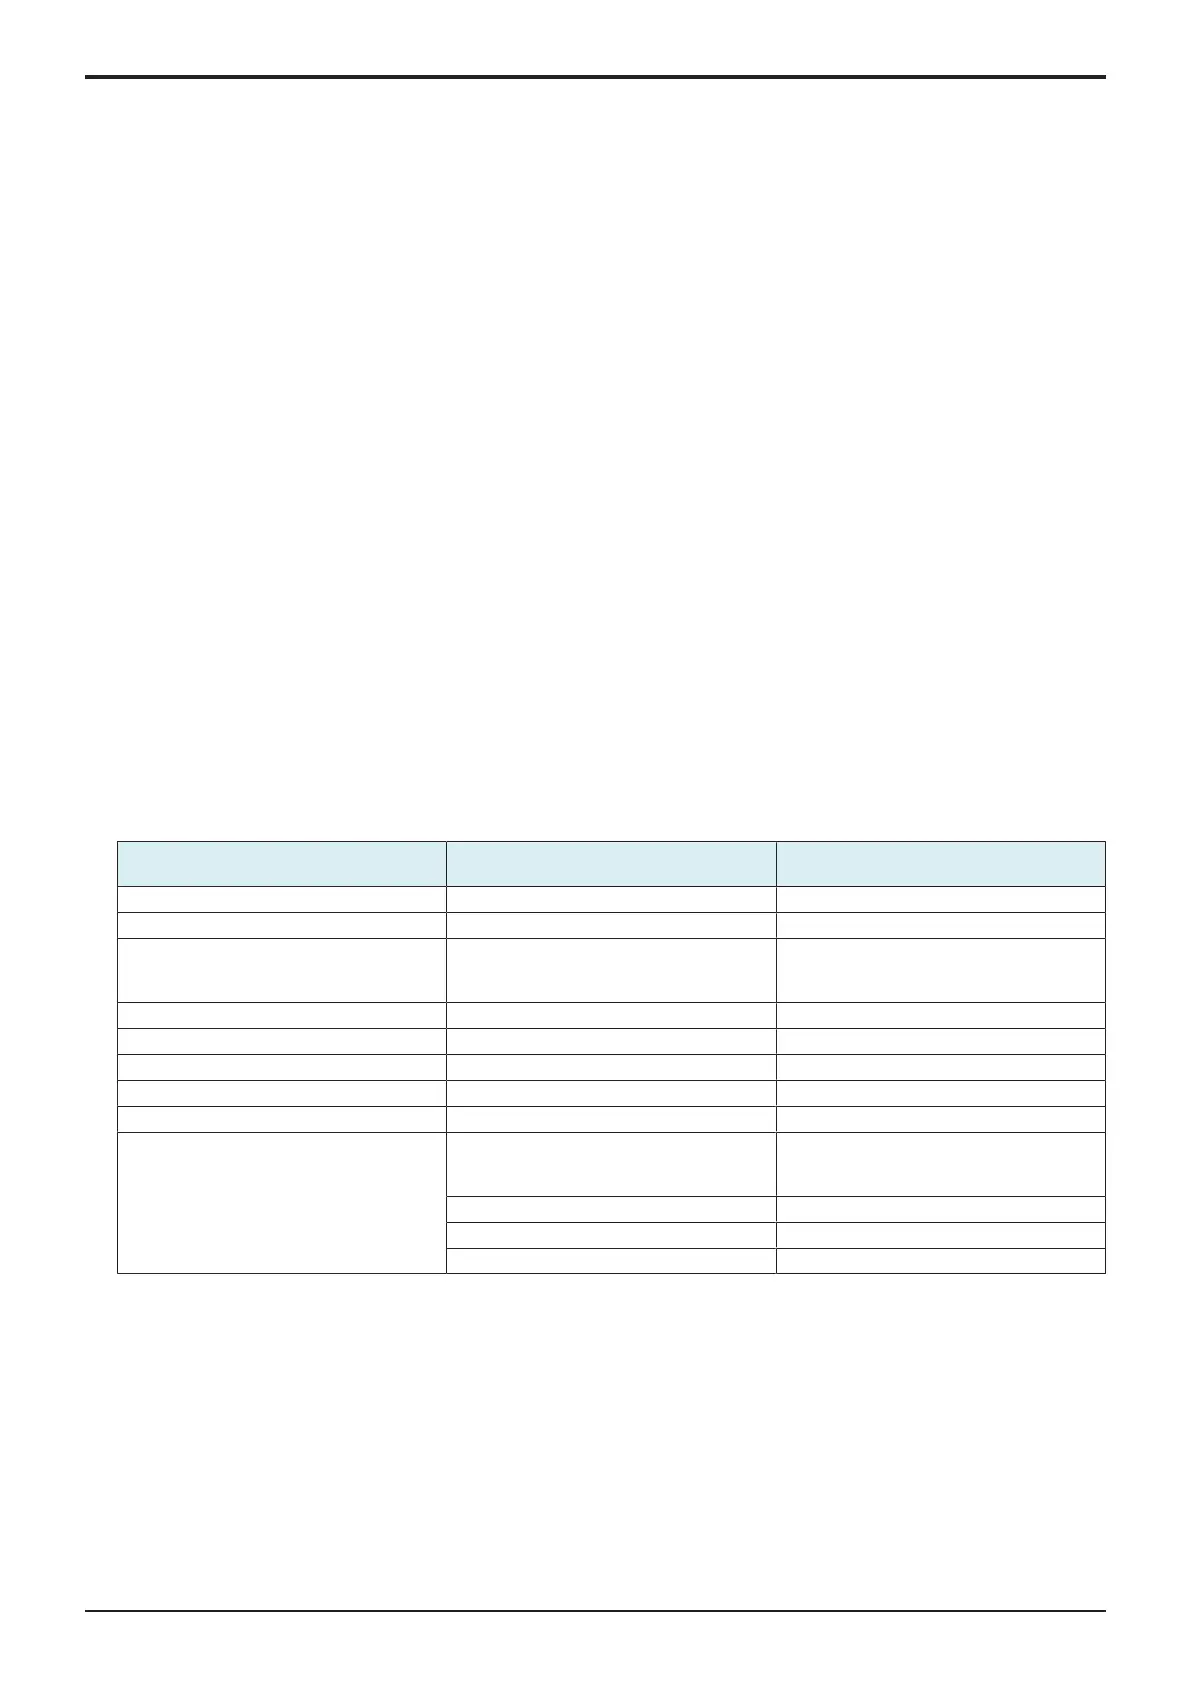
Card Reader Name Readable Card Type IC Card Information Setting (card type to
be reported)
KM USB Reader v2 MultiReader HF Mifare TypeA (1) (*1)
KM USB Reader v2 Legic Advant LEGIC TypeA (1) (*1)
KM USB Reader v2 ASK FSK 125kHz EM4100, EM4102, RFID 125kHz EM4100/
EM4102/
RFID 125kHz
KM USB Reader v2 Mot/Ind W26 Indala Indala
KM USB Reader v2 HID Prox HID Prox HID Prox (1) (*2)
KM USB Reader v2 HID iCLASS HID iCLASS HID iCLASS (1) (*3)
KM USB Reader v3 MF & Legic LEGIC TypeA (1) (*1)
KM USB Reader v3 Indala Indala Indala
KM USB Reader v3 MF+ EM4100, EM4102, RFID 125kHz EM4100/
EM4102/
RFID 125kHz
Mifare TypeA (1) (*1)
HID Prox HID Prox (1) (*2)
HID iCLASS HID iCLASS (1) (*3)
• *1: The content (ID) to be read from the type A card setting differs from which to be read by using AU-201/AU-201S.
• *2: The content (ID) to be read from the HID Prox card setting differs from which to be read by using AU-201H.
• *3: The content (ID) to be read from the HID iCLASS card setting differs from which to be read by using AU-202H.
1. Obtain the loadable driver (ICC_LDR.tar) for the YSoft card reader.
2. Start the Auth Device Tool Advanced for YSoft CRv2/YSoft CRv3.
3. Select card type.
4. Select Loadable Driver in [Export Format] and click [Export].
5. Select the loadable driver to be updated and the output location of the loadable driver and click [OK].
6. Copy the output loadable driver (ICC_LDR.tar) to the root directory of the USB memory.
NOTE
▪ Please do not save any other data in the USB memory.
7. Call the Service Mode to the screen of the MFP.
8. Select [System 2] -> [Driver Install] -> [Install].
9. Connect the USB memory in which the loadable driver has been saved to the USB port on the side of the control panel.
10. Select [Loadable driver] and touch the [Start] to install the loadable driver.

 Loading...