Home
Bizerba
Label Maker
GLM-I
Bizerba GLM-I User Manual
4
of 1
of 1 rating
505 pages
Give review
Manual
Specs
To Next Page
To Next Page
To Previous Page
To Previous Page
Loading...
Instruction manual GLM-I
Appendix
38.019.129.001 en
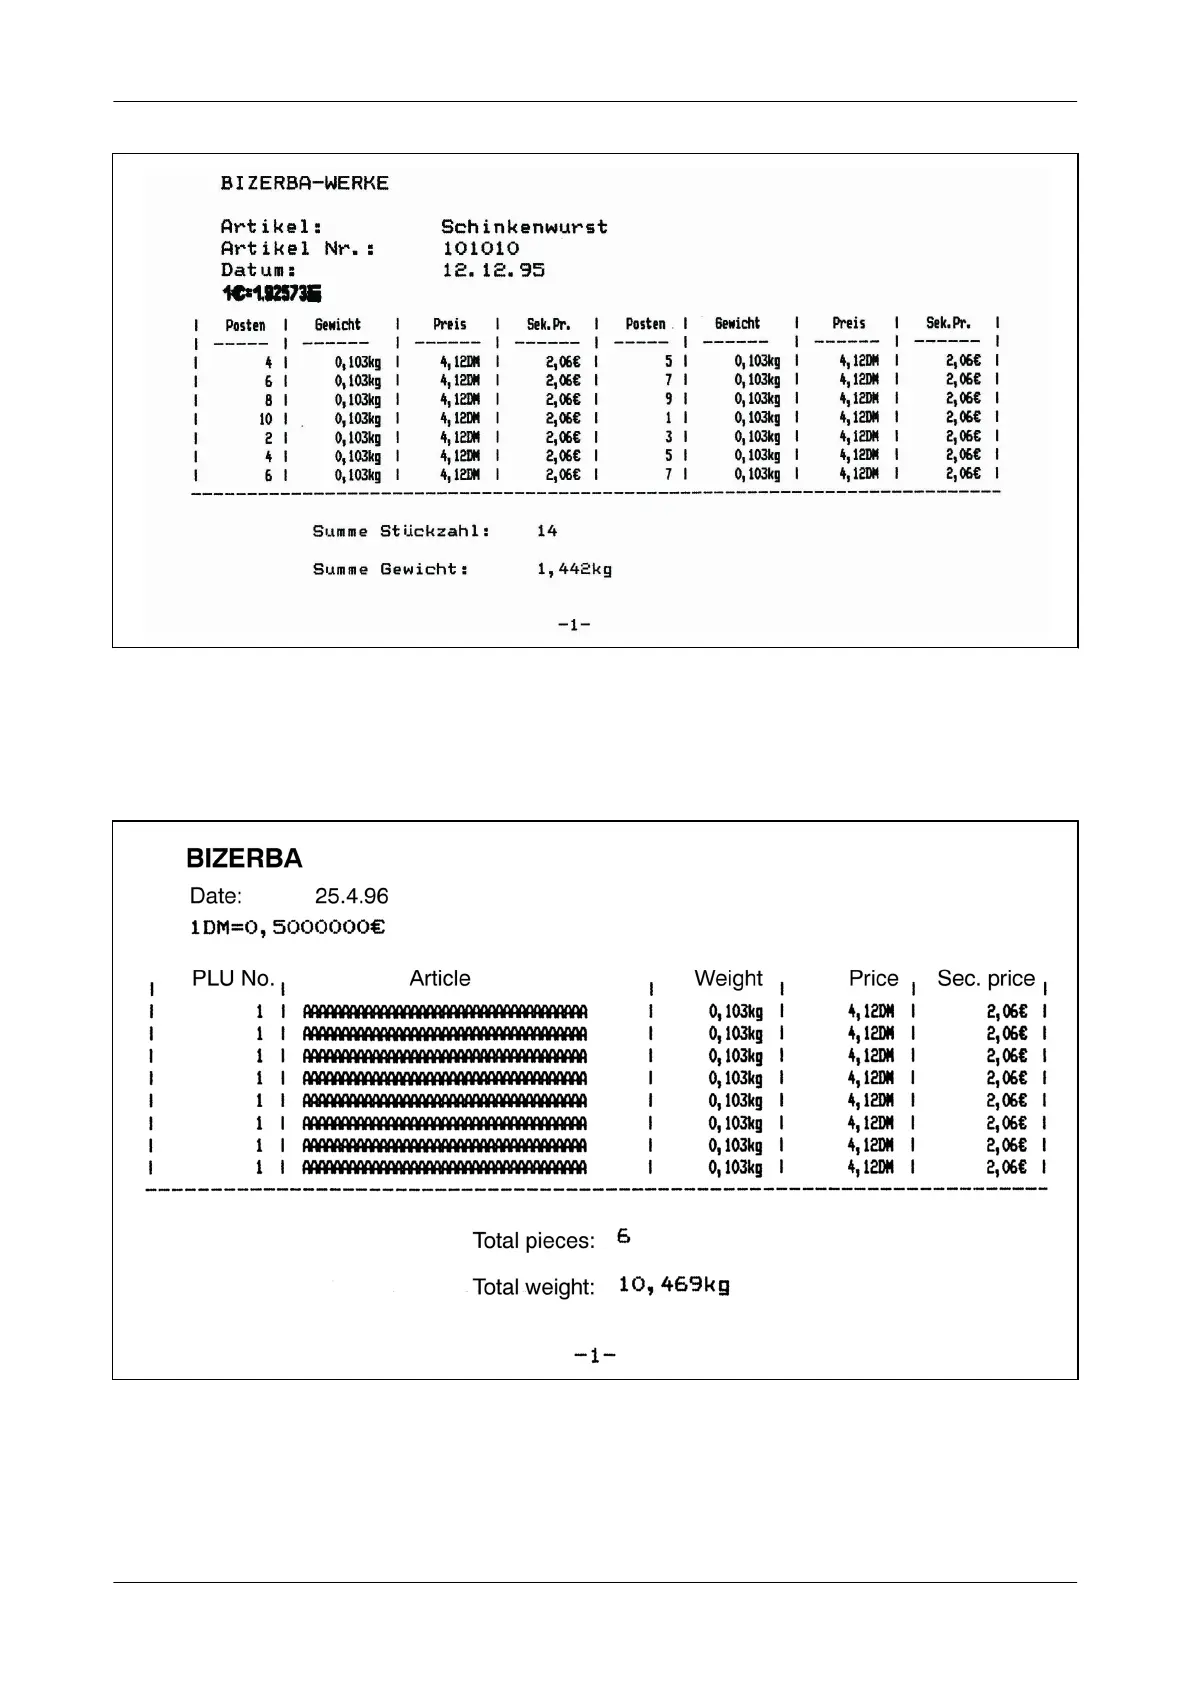
Illustration 118: Example of list 12
List 13
As list 8, but additional column for secondary price
. When configured correspondingly, the
conversion rate in printed in the list header, see page 159.
Illustration 119: Example of list 13
478
480
Table of Contents
Table of Contents
3
About These Instructions
25
Contents
25
Safe-Keeping
25
Target Group
25
Additional Applicable Documents
25
Symbols Used
26
How Notes and Information Are Depicted
26
How Safety Warnings Are Displayed
27
Viewing of Menu Call-Up
28
About the Device
29
Overall View of Device
30
Device Types
31
Accessories
31
Identification Plate
32
Intended Use
32
Verification Information
33
First Verification
33
Reverification
33
Norms and Guidelines
33
Operating Conditions
33
On-Site Mains Power Supply
34
Connecting Lines to External Devices
34
Wireless LAN Device Network
34
Warranty
35
Disposal/Environmental Protection
35
Safety Instructions
36
Requirements Imposed on Operating Personnel
36
Protective and Safety Devices
36
Main Switch
37
Plates on the Device
37
Sources of Risk Related to the System
38
Automatically Starting Components
39
Conveyor Belts
39
Pusher to Package Ejection
40
Package Ejector
41
Metal Detector
41
Scanner and Code Check Unit
41
Equipment Description
42
Automatic Labeler
42
Labeling Systems
42
Air-Jet Labeler
42
Rotary Arm Labeler
42
Piston Labeler
42
Belt Labeler
43
Device with Integrated Metal Detector
43
Bottom Labeling
43
GT-12C Display and Operating Unit
43
Multi-Labeling
44
Interfaces
45
Installation
46
Labeling Systems
47
Adjusting Labeler to Package Height
47
Manual Adjustment of the Labeler Height
47
Power-Driven Adjustment of the Labeler Height
48
Cross-Adjusting Labeler
49
Manual Cross- Adjustment of the Labeler
49
Power-Driven Cross- Adjustment of the Labeler
50
Turning Labeler
50
Setting Label Width
52
Switching off Vacuum Set of Gripper
53
Ecomotion Printer: Adjusting Pressure Rollers to Width of Backing Pa- Per
53
Labeling from Bottom with Air Jet or Stamp Labeler
54
Adjusting Rotary Arm Labeler
56
Selecting Position of Label with Rotary Arm Labeler
56
Labeling from Bottom with Belt Labeler
57
Adjusting Air Supply for Grippers
58
DIN A5 Label Applicator
59
Adjusting the DIN A5 Label Applicator
60
Changing Label Roll
60
Display and Operating Unit
65
Structure of Screen
65
Keys GT-12C
68
Symbols in Status Bar
70
Total Display
72
Display Total Temporarily
73
Softkeys
73
Find Softkeys
75
Switching Softkeys
75
Data Recording and Administration
76
Entering and Saving Text
76
Recording and Saving Numerical Value
76
Data for Current Production or Saving into Database
77
Administrating Tables and Parameters
77
Recording Parameter Number
79
Creating Parameter Tables and Opening Them for Editing
80
Editing Table
81
Printing Table Data
85
Saving and Closing Table
87
Deleting Table or Text
88
Setting Display and Keyboard Layout
89
Setting Language and Characters
89
Setting Operating Language
89
Setting Label Language
90
Setting List Language
90
Setting Keyboard Layout
91
Setting Character Set
91
Setting Country-Specific Sorting
92
Setting System Time
92
Switching on or off Menu Path Display
92
Selecting Display Format
93
Setting Weight Display
94
Setting Text Display
94
Setting Total Display
94
Switching on or off Weight History
95
Setting Statistics Display
96
Structure of Statistics Display
96
Histogram Display
97
Setting Analog Display
97
Displaying Numerical Data
99
Setting Value Range for Display-Optimized Statistics
99
Resetting Display-Optimized Statistics
99
Selecting Statistics Display
100
Selecting Weight Indication for Display and Print
100
Showing, Hiding or Deleting Modified Softkey Texts
100
Showing or Hiding Modified Softkey Texts
100
Deleting Modified Softkey Texts
101
Permission Concept
102
Mode Levels and Passwords
102
Changing Mode Level
102
Manage Passwords
103
Block or Activate Service Password
103
Define or Change Eservice Password
103
Customer Specific Functions
104
Approve or Block Key Programming
104
Renaming Soft Keys
104
Assign Image to Softkey
105
Managing and Applying Macros
105
Record Macro
108
Add to Macro
110
Play Macro
111
Delete Macro
112
List Macros
113
Managing and Using Templates
114
Create New Template
114
Open Existing Template for Editing
114
Edit and Save Template
115
Enter Template Name
115
Insert New Cell into Template
116
Insert the Existing Template Cell
117
Copy Softkey in Form Cell
117
Enter or Change the Default Values
118
Change Cell Properties
118
Remove the Template Cell from the Template
119
Copy Cell Properties
119
Display How Template Cells Are Used
119
Delete Unused Cells
120
Delete Template
120
Calling up and Using Form
121
Setting up and Using Quick Keyboard
121
Define Customer-Specific Mode Level T
122
Copy Softkeys to Mode Level T
123
Define a Menu Structure for Softkeys
124
Edit Softkeys in Mode Level T
125
Display Softkey Properties
125
Copy Macros to Soft Key
126
Copy the Customer-Specific Input Cell to the Softkey
126
Copy Operating Connection to Other Devices on Softkey
127
Info Menu
128
Show Manuals
128
Open the Manual
128
Navigate through the Manuals
129
Show License Conditions
129
Display License Conditions of Integrated Version of Software
129
Display Information about Software
130
Software Update Display Log Book
131
Display Message History
131
Display Maximum Belt Speed
131
Display Hour-Meter
132
Viewing Number of Labels and Paper Length
132
Article Data
133
Organize Article Data
133
Overview of Article Data
134
Article Configuration
136
Select Arity of PLU and Customer Number
137
Select Type of PLU Change
137
Release or Disable Article Call-Up Via Keyboard
138
Approve or Block Automatic Change with PLU Change
138
Create PLU
138
Opening Article for Processing
139
Processing and Saving Article Data
140
Search for Reference Target
140
Edit Reference Target
141
Copy Reference Target
142
Save Article Data
142
Printing List of Created Articles
142
Deleting Article
143
Deleting Article Number Range
143
Call up Article
143
Calling up Article Via PLU Number and Customer Number, if Available
144
Search Article Via Article Text
144
Weights and Ingredients
145
Select Weight Type
145
Set Weight Type for Weight 2
146
Switch Weight Type Change on PLU Change Either on or off
146
Enter Fixed Weight
146
Configure Weight Printing
147
Configure Printing of Weight Dimension on Single Labels
148
Configure Printing of Weight Dimension on Total Labels
148
Activate or Deactivate Tare Printing
148
Switch Printing of Gross Weight on or off
149
Switch Printing of Weight 2 on or off
149
Switch Printing of E-Symbol on or off
149
Select Font Height for Printing Weight on Standard Labels
150
Select Weight Text: Fixed Weight or Nominal Fill
150
Select Weight Text: Meat Percentage or Drained Weight
150
Selecting Weight Indication for Display and Print
151
Entering Tare
151
Allow or Block Tare Changing on PLU Change
151
Work out Share of Ingredients
151
Configure Ingredient Percentage
152
Enter Ingredient Share
152
Print Drained Weight or Net Weight
152
Prices and Currencies
153
Enter Prices
153
Select Special Price Option
153
Enter Unit or Fixed Price
154
Enter Special Price
154
Enter Parameter for Special Price
155
Unit Price Splitting
156
Switch On/Off Unit Price Splitting
156
Enter Unit Price Splitting
157
Configure How Price Is Printed
157
Print Unit Price on Single Labels
157
Print Dimension and Currency Symbol for the Unit Price
158
Print Unit Price on Total Labels
158
Print the Second Unit Price
159
Configure Printing of the Sales Price
159
Print the Currency Unit for Totals
160
Print Secondary Price
160
Select a Different Font Size for the Places after the Decimal Point
161
Print Conversion Rate
161
Select a Position for the Currency Symbol
162
Select Separator
162
Countries and Changing the Country
162
Select Primary Country
163
Select Secondary Country
164
Allow or Block Country Change on PLU Change
164
Rounding of Price
165
Select Rounding of Price for Primary Country
165
Select Rounding of Price for Secondary Country
166
Update Conversion Table
166
Swap Primary and Secondary Country
167
Currency of Neutral Country
168
Texts
169
Using Text Editor
169
Call up Text Editor
172
Loading Text into Editor
172
Selecting Character Size
173
Selecting Text Alignment
174
Inserting Further Control Characters
175
Saving Text for Current Labeling
176
Save Text in the Database
176
Closing Text Editor
177
Delete Text
177
Delete Text Area
177
Print List of Saved Texts
178
Manage General Texts
178
Edit General Text
179
Save General Text for the Current Labeling Job
179
Save General Text under a Text Number in the Database
179
Manage Static Texts
179
Open Table of Static Texts in Order to Edit
181
Edit Static Text Table
181
Save the Static Text Table
182
Close the Static Text Table Without Saving
182
Delete Static Text Table
182
Open the Static Text Table for the Current Labeling Job
183
Edit Static Texts for Current Labeling Job
183
Manage Date Texts
183
Configure Printing of Date Text
185
Managing the Date Text in the Database
186
Enter or Change the Date Text for the Current Labeling Job
187
Delete Date Text
187
Managing PLU Texts
187
Managing Simple Texts
188
Date and Time
189
Packed-On, Sell-By and Use-By Date
189
Enter Date 1
189
Enter Date 2
189
Enter Date 3
190
Shelf Life Days
190
Enter Shelf-Life Days 1
191
Enter Shelf-Life Days 2
191
Enter Time Date 1, 2, and 3
191
Enter + Days
191
Configure Printing of Date and Time
192
Print Options for Date 1
192
Print Options for Date 2
192
Print Options for Date 3
193
Determine Format for Printing Date
194
Select How to Write the Date
195
Select Date Format
196
Select How Half-Days Should be Displayed
197
Select Number of Digits for Displaying Year
197
Select Time Format
198
Switch On/Off Printing Time
198
Further Print Settings
198
Numbers and Values
199
Entering Product Group Number
199
Entering the Number of Pieces Per Package
200
Configure the Content of General Numbers 1 to 3
200
Enter Printable Numbers
201
Label Data
202
Manage Label Parameters in Tables
202
Overview of Label Parameters
203
Define New Label Parameter Table or Open Table for Editing
203
Edit Label Parameter Table
204
Delete Label Parameter Table
204
Call up Label Parameter Table
205
Select Label Layout
205
Select Label Size for Standard Labels
206
Delete Label Layout
207
Switch 180° Rotation on or off
207
Set Variable Header Length
207
Set the Light Barrier Offset
208
Set Line Spacing
209
Set Layout Length for Ticket
209
Switch Frame on or off
209
Switch Texts on and off
209
Switch Weight Text on or off
210
Activate or Deactivate Price Text
210
Activate or Deactivate Supplementary Text
211
Activate or Deactivate Total Text
211
Switch Digit Code on or off
211
Switch Logo in Textfield 1 on or off
212
Select Logos
212
Delete Logo
213
Configure Digit Height
213
Delete Font Set
213
Codes and Scanning Rules
214
Important Terms for Barcodes
214
Overview of Code Types
215
Manage Code Structure Rules
216
Code Editor Overview
217
Define Code Structure Rule and Open It Ready for Editing
217
Edit and Save Code Structure Rule
218
Possible Code Contents
219
Enter Code Structure
222
Special Inputs
226
Error Messages Concerning Code Structure
228
Delete Code Structure Rule
229
Load Code Structure Rule into Code Field
229
Enter or Change the Code Substring for the Current Labeling Job
229
Settings for Printing Barcodes
230
Allocate Total Code
230
Activate or Deactivate Code Printing
230
Switch Separate Code String Printing on or off
231
Print Sub-Code String: Explanations
232
Print Sub-Code String
233
Select Code Field for RFID Label (Smart Label)
233
Features of Individual Code Types
233
EAN13 or UPC-A Code
233
EAN-D3 Code
234
Industrial Code
235
Logistics Codes ITF-14
235
Logistics Codes Maxicode
235
Code for RFID Labels (UHF Only)
236
Enter Code Structure Rule SGTIN-96 (Example)
239
Scanning Rule
240
Overview of Scan Code Contents
240
Sequence During Processing of Scanned Code Contents
242
Administrating Scanning Rules
242
Re-Creating or Opening Scanning Rule for Editing
243
Editing and Saving Scanning Rule
244
Selecting Code Type for Scanning Rule
244
Entering Code Structure for Scanning Rule
245
Deleting Scanning Rule
249
Calling up Scanning Rule
249
Changing Current Scanning Rule
250
Automatic Machine Parameters
251
Managing Automatic Labeler Parameters in Tables
251
Overview of Automatic Labeler Parameters
252
Defining New Label Parameter Tables or Opening Tables for Editing
252
Editing Labeler Parameter Tables
253
Deleting Labeler Parameter Table
253
Calling up Labeler Parameter Tables
253
Labeler Adjustment
254
Activating and Deactivating the Height Adjustment for Labelers
254
Activating and Deactivating the Transverse Adjustment for Labelers
254
Setting the Height Offset of the Labeler
255
Setting the Transverse Offset of the Labeler
255
Enter the Maximum Package Height
256
Adjusting Labeler Height by Means of Softkeys
256
Enter Transverse Position of Labeler
257
Adjusting the Transverse Position of the Labeler Via Softkeys
257
Distances and Positions of the Labeler
258
Entering the Label Distance
258
Enter Reference Line for Label Distance
259
Piston Labeler
259
Entering Package Height
260
Entering Gripper Offset
260
Entering Rotational Angle
261
Entering Acceleration Time
261
Entering Extension Time
261
Rotary Arm Labeler
261
Rotation Parameter
262
Belt Labeler
262
Entering Label Overhang
262
Entering Supporting Air Supply for Roller Lift
262
Entering Supporting Air Supply for Gripper
262
Entering Extension Time of Pressure Roller
263
Delay for the External Triggered Labeler
263
Conveyor Unit
263
Switching on or off the Auxiliary Belts
263
Registration of Light Barrier Masking Section
264
Selecting Transmitting Current of Light Barrier
264
Entering Belt Speed for Labeling
265
Registration of Belt Speed for Conveying
265
Registration of Separation Factor
265
Activating or Deactivating Pressure Roller
265
Entering Speed of Pressure Roller
266
Selecting Operating Mode for Weighing Belt
266
Selecting Operating Mode for Labeling Belt
266
Adjusting and Calibrating Guide Rails
267
Dividers and Package Ejector
267
Registration of Switch-On Time
267
Selecting Polarity
268
Selecting Activation Criteria
269
Registration of Delay Time
270
Setting Control and Container Light Barrier
270
Ejecting Package for Quality Assurance
270
Signal Lamp for Paper Status
271
Polarities
271
Setting Polarity for Control Light Barriers
271
Setting Polarity for Container Light Barriers
272
Setting Polarity for Other Inputs and Outputs
272
Delays
273
Scale
273
Activate or Deactivate Tare Printing
273
Processing
274
Configuring Resolution for Label Printing
274
Switch on and Apply Automatic PLU Change
274
Configure Synchronization Message of Weighing Belt
276
Enter Labeling Type
277
Configure Change of Labeling Type
280
Entering Device Number
280
Entering Device Name
280
Enter Production Numbers
281
Switch Printing of the Operator Number on or off
281
Entering Operator Number
281
Configuring Batch Number
282
Entering Batch Number
282
Entering Lot Number
282
Use Numerators
283
Configuring Individual Numerator
283
Configuring Total Numerator
284
Enter the Range of Values of the Numerators
285
Editing Start Value of Numerators
285
Configuring Available Counters
286
Printer Channel Control
286
Totals
288
Set Totalization Type
288
General Total Preselections
289
Selecting the Preselection Type for Total 1 to 3
289
Entering Preselection Value for Total 1 to 3
290
Configure Equaled Total
290
Fill up Box Total 1
291
Fill up Pallet Total 2
291
Enter Equaled Weight for Totals 1 to 3
291
Enter Special Unit Price for Total Weight
292
Define Weight Total
292
Enter Total Tare for Totals 1 to 3
292
Select Deletion Criteria for Totals
293
Select Totals Deletion Criteria for Total 1
293
Select Totals Deletion Criteria for Total 2
294
Select Totals Deletion Criteria for PLU Total
294
Select Totals Deletion Criteria for Product Group Total
294
Set up Total Release
295
Set up Total Acknowledgement for External Printer
296
Print Totals on Different Customer Labels
297
Select Barcode for Printing Total Labels
297
Configure Printing of Weight Dimension on Total Labels
298
Switch Printing Secondary Price Total on or off
298
Triggering of Totals
298
Printing Article Totals Greater than Zero
299
Total Preselection Matrix
301
Use Total Preselection Matrix
301
Use Total Preselection Column
304
Enter or Edit Total Preselection Data for a PLU
305
Delete Total Preselection Data for a PLU
306
Total Evaluation
306
Allocate Key Attributes for Total Evaluations
307
Configure Total Evaluations a to C
308
Delete Data Records from Total Evaluations
310
Delete Data Record Range from Total Evaluation
310
Delete Totals in Total Evaluations Automatically
310
Printing Total Evaluation A, B, or C
311
Weight Classes and Statistics
312
Weight Classes
312
Enter the Column Number for the Weight Class Tables
312
Define or Edit Weight Class Table
313
Set up Weight Class Columns
313
Enter the same Presettings for All Weight Classes
314
Edit Weight Class Attribute
315
Types of Statistics
318
Delete Weight Class Table
319
Configure Weight Class Change
319
Open Weight Class Table Manually
320
Edit the Current Weight Class Table
321
Edit Current Weight Class Table Via Input Assistant
322
Selection Criteria for Editing Weight Class Tables Via the Input Assistant
323
Enter the Fixed Weight for the Current Labeling Job
327
Enter the Minimum and Maximum Weight
328
Enter Start Value for Sliding Content Check
328
Statistics
329
Selecting Statistics Report
329
Selecting Initiation Criterion for Statistics Reports
330
Releasing Statistics Reports Manually
332
Adding to Statistics Data
333
Creating Customer-Specific Statistics Reports
334
Assigning Statistics Report to a Transmission Channel
335
Display Statistics Report
335
Printing Process Data
335
Operation
336
Switch on Device
336
Switching off Device
336
Preparatory Work
337
Conditions for Package Infeed
337
Call up Article
337
Calling up Article Via PLU Number and Customer Number, if Available
338
Search Article Via Article Text
339
Zerosetting Scale
339
Weighing Tare Weight
339
Labeling
340
Cancel
340
Cancelling Via Numerator
341
Cancel with Minus Tool
342
Printing Total Label
345
Printing Total Label by Hand
345
Synchronous Printing of Total Label
345
Print Label Sequence
345
Print Label Sequence for Unknown Package Number
347
Print Label Copies
347
Dispense Separating Label Automatically
347
Printing Lists
348
Releasing Statistics Reports Manually
348
Troubleshooting
350
Troubleshooting through Reset
350
Executing a Package Reset
350
Executing a Device Reset
350
Messages
351
Acknowledging Messages
351
Redisplaying Lock Messages
351
Lock Messages: "Processing Disabled
352
Messages: Scale
353
Messages: Printer and Labeling System
354
Messages: Package
355
Other Messages
356
Configure Error Behavior
358
Setting Operating Mode in Case of Error
358
Set Error Number for Automatic Stop
358
Set the Approval Rights for Remote-Controlled Lock Status
358
Service Print-Outs
359
Select Device for Service Printouts
359
Setting Smaller Character Set for Service Printouts
359
Redirecting Service Printouts
360
Printing Device Settings
360
Print Log Book of Metal Detector
361
Diagnostic Tool
362
Print Internal Device Status
362
Print Menu Tree and Set Parameters
363
Printing Resource Data
363
Test Functions for Service Purposes
363
Testing Belt Tension of Conveyor Belts
363
Testing Belt Drives
364
Test Printer
364
Test Scales
365
Check if Within Permissible Verification Limits
365
Delete Remote Soft Keys
365
Manage Licenses
366
Activate Licenses
366
Print a List of Licenses
366
Switch On/Off the Demo and Trial Licenses
366
Switch Licenses on and off
367
Back up Data
368
Data Backup on Storage Medium
368
Formatting Storage Medium
368
Saving Line Backup
369
Load Line Backup
371
Display Status of Line Backup
372
Delete Line Backup
372
Select Device for Line Backup
373
User-Defined Soft Keys
374
Save User-Defined Softkeys
374
Load User-Defined Softkeys
374
Setup
374
Save Setup
375
Activate Setup
375
Delete Setup
376
Remove Storage Medium Safely
376
Maintenance
377
General Information
377
Safety Measures
377
Cleaning
379
Cleaning Information
379
Display and Operating Unit
379
Switch Cabinet
379
Conveyor Belts
379
Package Guides
380
Light Barrier and Reflecting Foil
380
Cleaning Printer
381
Maintenance
383
Assembling New Printer Roller
383
Ecomotion Printer: Changing the Felt Strip in the Printer
384
Service and Maintenance Tables
385
1-Shift Operation
385
2-Shift Operation
388
3-Shift Operation
391
Printer
394
Printer Equipment
394
Display Thermal Strip Type
394
Activating or Deactivating Smart Label (RFID Labels)
394
Operating Mode
395
Activate or Deactivate Reverse Mode
395
Choose Thermal Direct Printing or Thermal Transfer Printing
395
Sent Print Output
396
Printer Positions
396
Modify Label Feed
396
Change Horizontal and Vertical Print Position
397
Select Position on Rip-Off Edge
397
Print Quality
398
Modify Printing Speed
398
Adjust Printing Density for Thermal or Thermal Transfer Labels
398
Set Print Image
398
Printer Sensor System
399
Calibrating Label Light Barrier
399
Select Label Light Barrier
400
Modify the Transmission Current of the Label Light Barriers
400
Set Label Contrast
400
Enter Diameter of the Label Roll for Supply Message
401
Interfaces
402
Interface Overview
402
Output Port
402
Serial Interfaces (EDP Interfaces)
402
Allocate Serial Interface Application
403
Set the AEDP Parameters
404
Set Parameters for List Printer and Scanner
405
Set the Interface Parameters for "Send from Formula
405
Systembus
406
TCP/IP (Ethernet)
406
Set up ID Address
406
Enter Subnet Mask
406
Enter Gateway Address
407
Send Single Ping
407
Outgoing Connections
408
Send Data
408
Specify the Connection Parameters
411
Assign Package-Synchronous Data (PSV_PCK Wdout-Flag)
413
Select the Additional Data that Is to be Sent with Package-Synchro
413
Nous Data (Addition to PSV_PCK)
413
Select Send Single Package Data to Higher-Ranking EDP System
414
Tent of PSV_DATA)
414
Select Send Data on Change
414
Only Send Valid or also Faulty Package Data to the Higher-Ranking
415
EDP System
415
Incoming Connections
416
Set Receiving Level for Remote Printing
416
Set Confirmation for Remote Printing
417
Set Trigger for Remote Printing
417
Set Error Message for Remote Printing
418
Forward Reception Data from the Higher-Ranking EDP System to Devi
418
Ces on the System Bus
418
E-Mails
419
Creating E-Mail Address Book
419
Deleting E-Mail Addresses
419
E-Mail Configuration
420
Send E-Mail
421
Finding Saved Text for E-Mail
421
Activate or Deactivate Transmission Channels
421
Select Year Formatting Via Interface
422
Accessories
423
Package Guidance
423
Manual Package Guidance
423
Centered Package Alignment
423
Lateral Package Guidance
424
Motorized Guide Rails
424
Switching On/Off Motorized Guide Rails
424
Defining Operating Mode of Guide Rails
425
Specifying the Maximum Package Width
425
Entering the Package Width
426
Automatic Guide Rail Adjustment Via Softkeys
426
Guide Rail Adjustment
427
Removing Motorized Guide Rails
429
Guide Rail Calibration
430
Metal Detector
430
Activating or Deactivating Metal Detectors
430
Entering the Metal Detector Product Number Manually
430
Operating the Metal Detector
431
Package Ejector
431
Package Ejector Description
432
Maximum Package Size
432
Settings
433
Pusher for Package Ejection
433
Adjusting Pusher Lengthwise to Conveying Direction
434
Adjusting Pusher at Right Angles to the Conveying Belt
434
Compressed Air Supply for Pusher
434
Swivel-Mounted Labeling Conveyor for Long Packages
434
Belts
435
Oblique Adjustment of V Belts
437
Label Pressure Roller
437
Label Dispenser
438
Inserting the Label Roll
440
Specifications for the Label Dispenser
442
Display
443
Error Messages
444
Setting Label Parameters
445
Saving Label Settings
446
Calling up Saved Label Settings
447
Cleaning and Maintenance
447
Troubleshooting
448
Writing Unit for RFID Labels
450
Scanner
451
Configure Scanning Behavior
452
List Printer
453
Selecting Printer Driver
453
Enter Paper Size
454
Paper Take-Up: Endless or Single Page
454
Printer Settings
454
Tendency Control
454
Principle of the Tendency Control
456
Overview of Tendency Control Parameters
456
Defining New Tendency Control Parameter Tables or Opening Tables for Editing
456
Editing the Tendency Control Parameter Table
457
Deleting Tendency Control Parameter Tables
457
Calling up Tendency Control Parameter Tables
457
Modifying Current Tendency Control Parameters
457
Code Checker
458
Selecting Packages to be Checked
459
Entering Evaluation Time
459
Entering Gate Width
459
Entering Gate Offset
459
Technical Data
460
Dimensions
460
Glm-I 40
460
Glm-I 70/100
461
Glm-I 150
462
Glm-I 170
463
Printer
464
Label Roll, Take-Up Roll, Labels
465
Compressed Air Supply
466
Power Supply
467
Operating Conditions
467
Protection Type
468
Noise Level
468
Barcodes
468
Display and Operating Units
469
Scale Data
470
Package Dimensions
470
Package Weights
471
Labeling Performance
471
Appendix
472
Overview: List Formats
473
Weight Lists
474
Item Lists
480
Database Lists
485
Overview: Font Set
487
Font Set Western Europe, ASCII
487
Font Set Eastern Europe1, ASCII
489
Font Set Eastern Europe2, ASCII
490
Font Set Greek, ASCII
491
Font Set Cyrillic, ASCII
492
Overview: Font Sizes
493
Overview: AI Identifiers in GS1-128
496
Overview: Transfer Data
499
Bizerba Service Oil: EU Safety Data Sheet
503
4
Based on 1 rating
Ask a question
Give review
Questions and Answers:
Need help?
Do you have a question about the Bizerba GLM-I and is the answer not in the manual?
Ask a question
Bizerba GLM-I Specifications
General
Brand
Bizerba
Model
GLM-I
Category
Label Maker
Language
English
Related product manuals
Bizerba GLM-I 40
50 pages
Bizerba GLM-I 70
50 pages
Bizerba GLM-I 100
50 pages
Bizerba GLP 80
394 pages
Bizerba P220901037
505 pages