1/05
6-122
DocuColor 12/DCCS50
dC612 Color Test Pattern Print, dC701 Fuser Nip Mea-
Reissue
General Procedures
dC701 Fuser Nip Measurement
Purpose
Makes a copy for the Contact Arc Adjustment and measures the Fuser Nip Width with a simple
operation.
NOTE: For details, see Adjustments Section 4:ADJ 8.
1.1 Fuser Nip Adjustment (dC701).
Procedure
1. Enter the Service Diagnostics Mode. Refer to Entering the Service Diagnostic Mode
using the PWS.
2. Select Adjustmen
ts on the Service Entry Screen.
3. Select Other
Adjustments on the Adjustments Screen. Other Adjustments Screen is dis-
played.
4. Select Fuser Ni
p Adjustments (dC701). Fuser Nip Adjustment Screen is displayed.
5. Check that A4 LEF
or Letter LEF paper has been loaded into Tray 5.
6. Select Nip A
djustment Black Copy and press Start.
7. The message execute is displayed.
a. Make a copy for measuring the nip width by using A4 LE
F or Letter LEF.
b. A error message screen will be displayed if there is no paper tray loaded with A4
LEF or Let
ter LEF.
8. The message “Completed” is displayed when the “Nip Adjustment Black Copy” is com-
pleted successfully.
a. When the “Nip Adjustment Black Copy” is not completed successfully, the message
“Not completed suc
cessfully” will be displayed.
9. Select Nip A
djustment Sequence.
10. The message “Executing in Progress” is displayed at the same time the Nip Width Mea-
surement begins.
11. The message “Completed” is displayed when the
“Nip Adjustment Sequence” is com-
pleted successfully. The message “Not completed successfully” will be displayed when
the
“Nip Adjustment Sequence” is not completed successfully.
12. Measure the nip width of the output paper for “Nip Adjustment Sequence”.
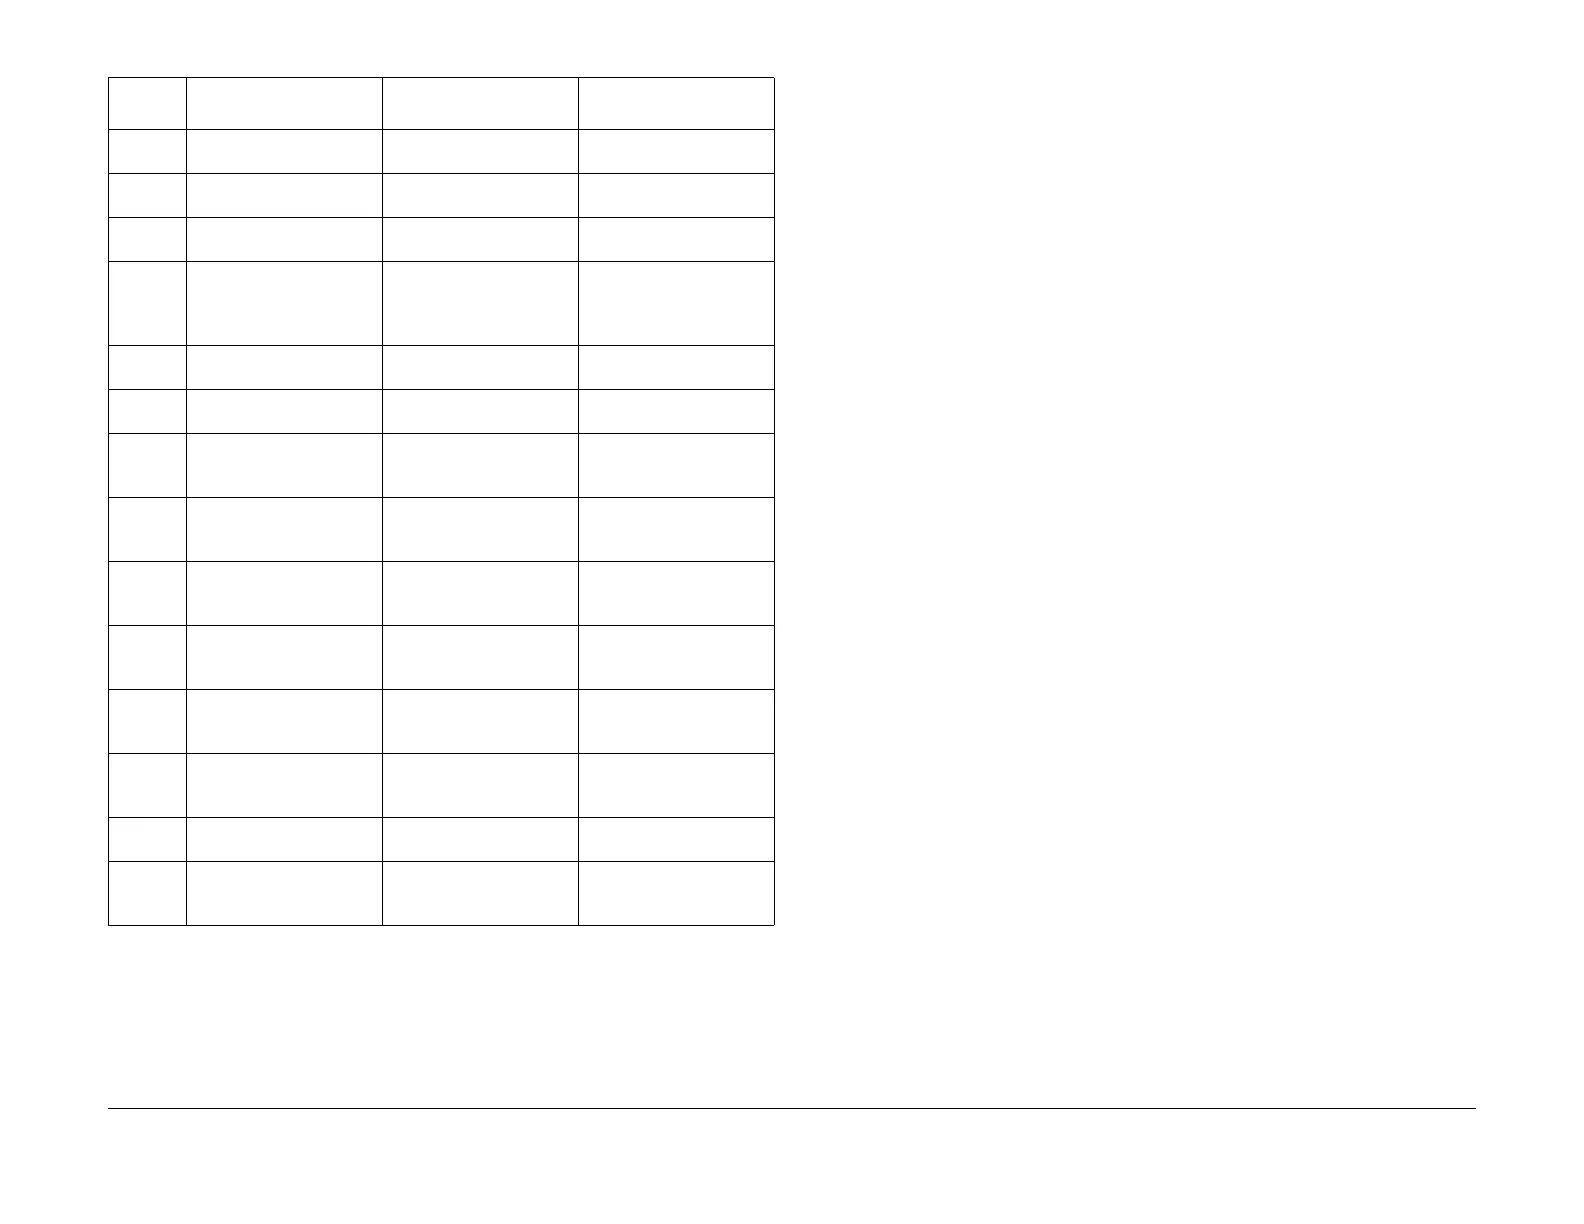
55 Color patch: 2nd page The middle color patch for
the E
ditor Pad is output.
PostIPS (Image Process-
ing)
56 Color patch: 3rd page The bottom color patch for
the E
ditor Pad is output.
PostIPS (Image Process-
ing)
82 Grid (Measurement) - 600 20mm pitch/2dotline grid
Paper size: A3 or 17
IOT (Image output)
84 Grid (Registration) - 600 Scale/2dotline grid
Paper size: A3A4L/A4S/
B
4S/
B5L/B5S/LetterL/Let-
terS
IOT (Image Processing)
85 Grid (45 degree) - 600 45 degree grid/2dotline
Paper size: A3 or 17
IOT (Image Processing)
88 Color registration (Mea-
surement) - 600
Cross mark/4dotline
Paper size: A3 or 17
IOT (Image Processing)
89 Color registration (Visual
obser
vat
ion) - 600
Color registration visual
check pattern
Paper size: 17 or A3
IOT (Image Processing)
97 Half tone - 4C Any density pattern (Vari-
able Cin% can be set).
Paper size: A3 or 17
IOT (Image Processing)
98 Halftone - 3C Any density pattern (Vari-
able Cin% can be set).
Paper size: A3 or 17
IOT (Image Processing)
99 Other Halftones Any density pattern (Vari-
able Cin% can be set).
Paper size: A3 or 17
IOT (Image Processing)
100 16 grasslike SS SS direction: 16 gray-
sc
ale
P
aper size: A3 or 17
IOT (Image Processing)
101 ProCon ProCon patch pattern/
16.
3x19.
3 mm patch
Paper size: A3 or 17
IOT (Image Processing)
102 TED/STV - 600 TED/STV
Paper size: A4L
IOT (Image Processing)
103 Wedge SS - 600 SS direction pattern/1
gray
-sca
le
Paper size: A3 or 17
IOT (Image Processing)
Table 1 Test Patterns
P
attern
Number Pattern Name Description Remarks
manuals4you.commanuals4you.com

 Loading...


